Help Centre

Find all your answers here...
.svg)


How to Add a Product Item that isn't in the Database
Sometimes you may not be able to find your item in the database. You can add the product to your database, so that in future the item is available in your product item lists, for orders, stock takes and so on. Here’s how:
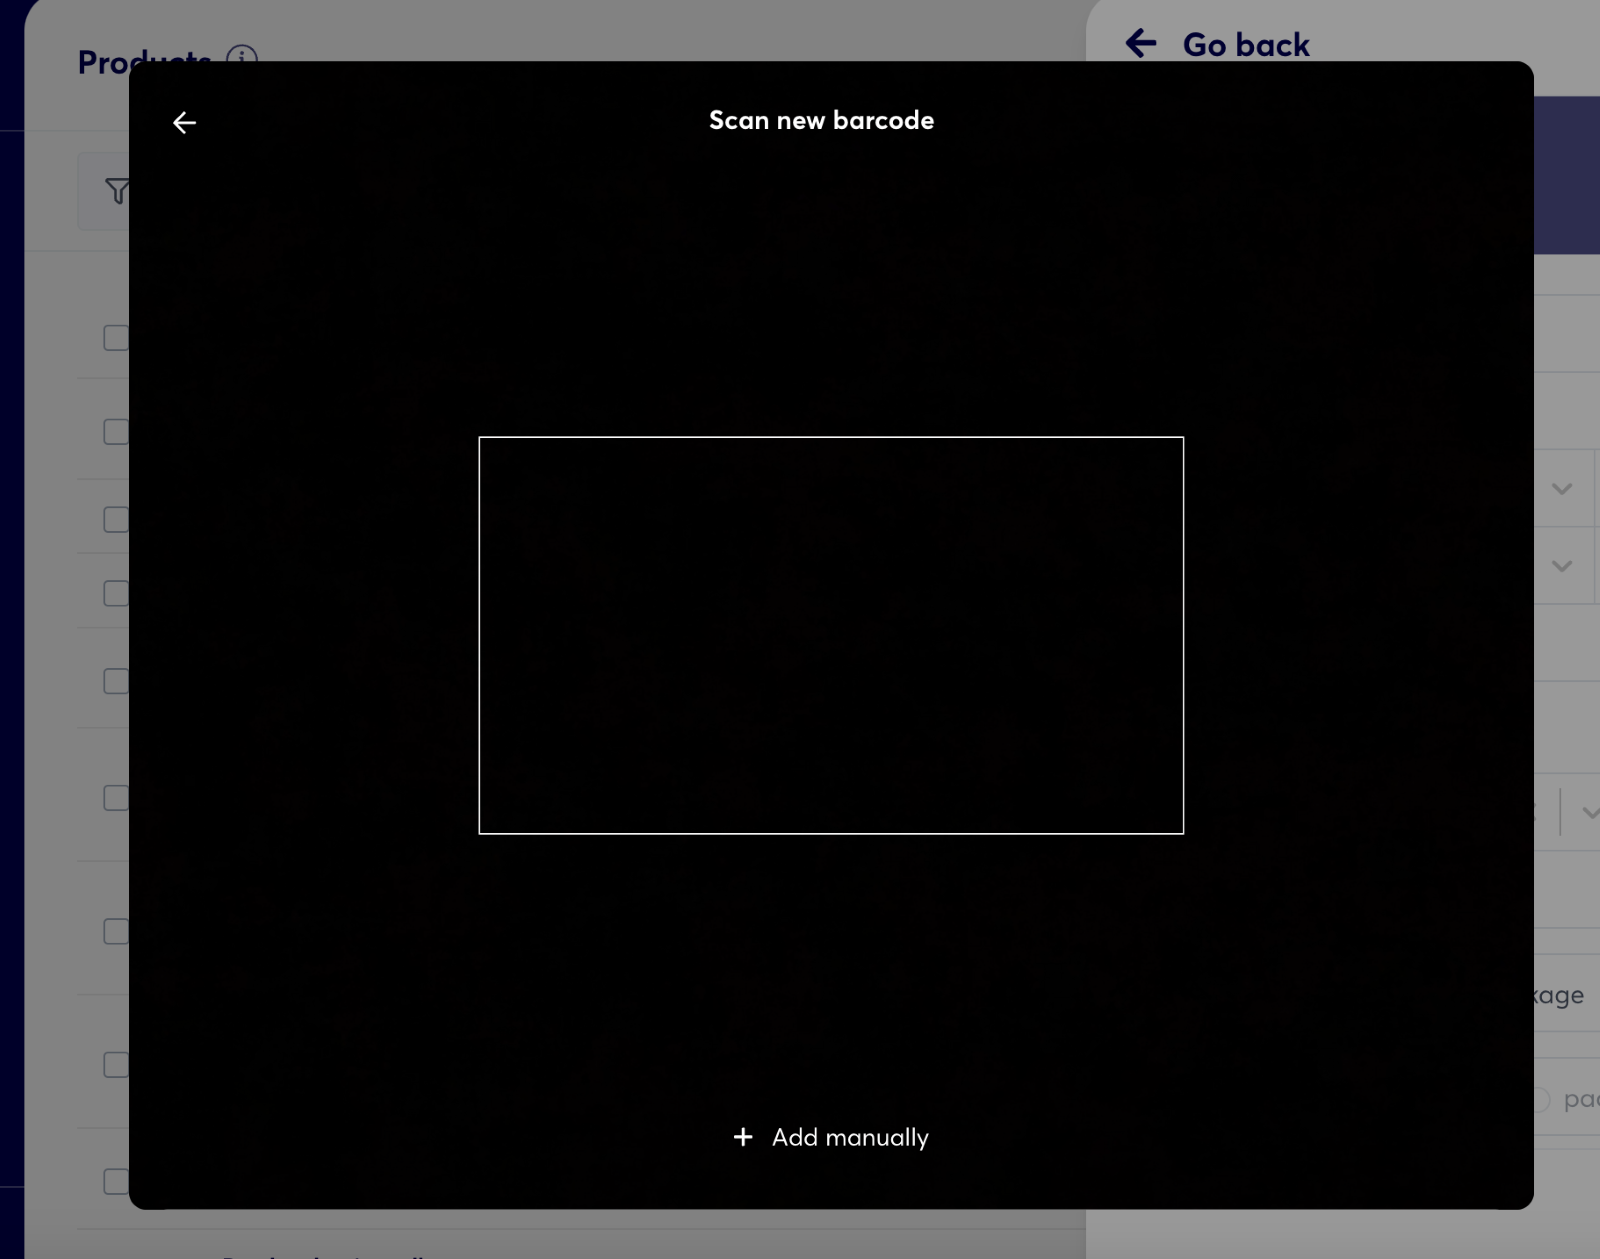
1. Scan item
Select ‘Products’ and ‘Items’ from the menu bar. Then select the green icon from the top right-hand corner to open your options and select ‘Scan to add’.
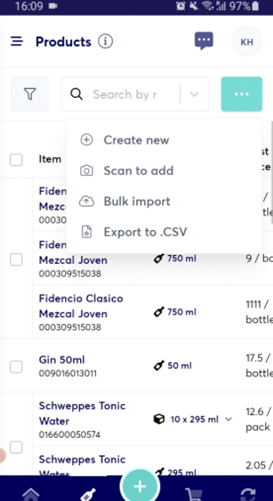
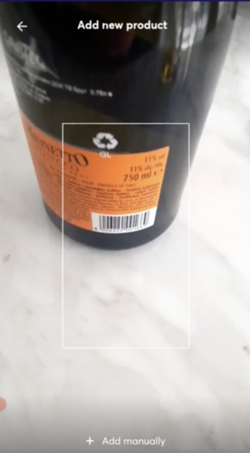
This will open the camera and allow you to scan the barcode.
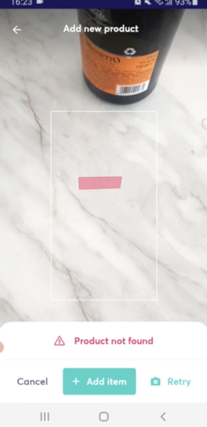
Scan the barcode of your item as shown here:
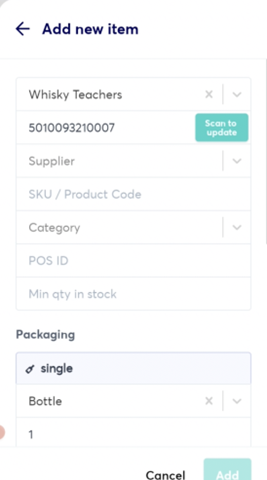
Here you can see the message ‘Product not found’. This happens when the product isn’t available in the growyze database, or hasn’t yet been added as an item by you, the user.
2. Add item
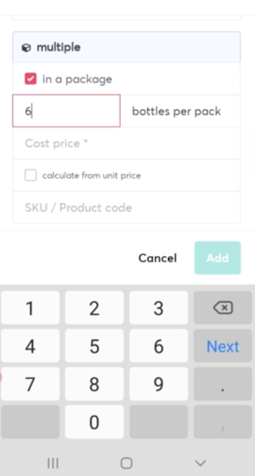
Click ‘Add item’ and you will see that the barcode has been added but that you need to add the other details.
Here you can add details such as the item name, cost price, POS ID and minimum stock quantities.
Once you are happy with the details select ‘Add’ to create your new product.
This will ensure that the product then becomes part of your item database, meaning you only need to add each product once for it to be automatically available in the future.
For further help using growyze contact us at support@growyze.com
How to Add Barcodes to Products (Single and Case)
Adding barcodes to products is super simple. You can add one or more barcodes to one product. These can be the barcode for the individual item, or the barcode for the case.
Follow these steps to add barcodes, using your mobile device:
1. Go to Products – Items
- Find the item you’d like to add the barcode to
- Click on the product, or edit
- Then click on the green ‘barcode’ icon

- The barcode scanner will open
2. Point the mobile device towards the barcode
- The scanner will capture the barcode and will ask you whether you’d like to Replace
- Click on ‘Yes’
3. Add more barcodes to this item
- Click on the ‘+’ next to the barcodes.
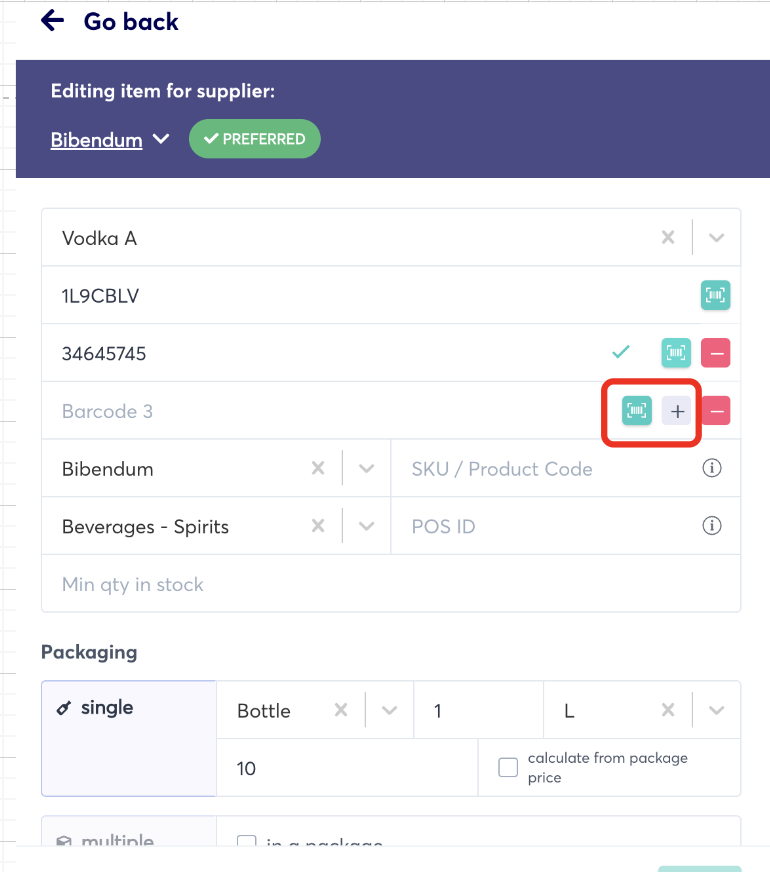
- To delete a barcode, click on the ‘-‘ next to the barcode.
For further help using growyze contact us at support@growyze.com
How to Add Dishes in growyze
Where recipes are ‘things’ you’d normally produce in-house, in bulk (ie gravy, anchovy mayonnaise), Dishes are the actual items you sell to customers.
These are the menu items you have set up on your POS.
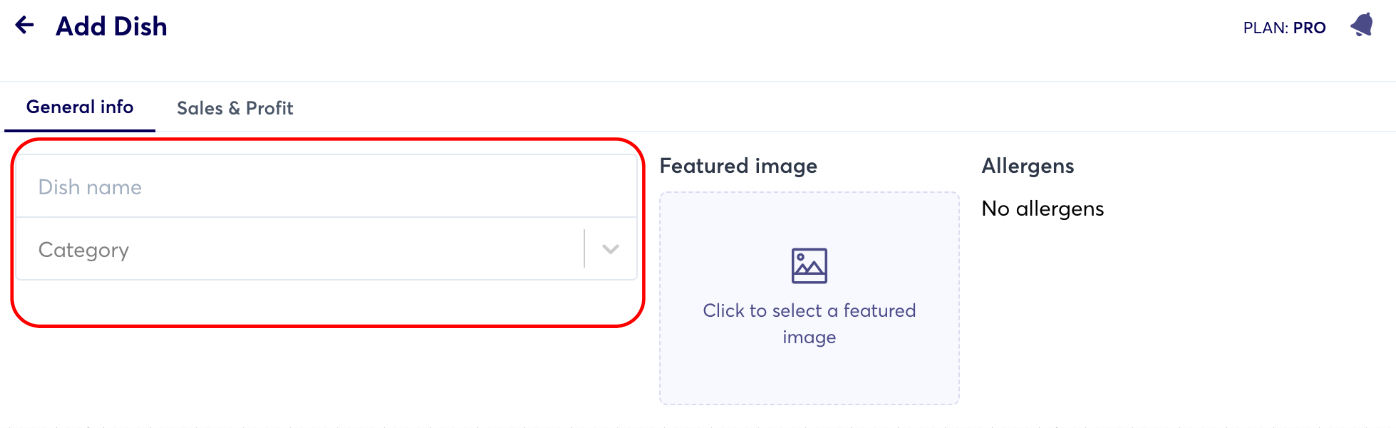
1. Go to Products -> Recipes & Dishes -> Dishes -> Add Dish

2. Fill in the ‘General info’ details such as Dish name, and choose a category (Food or Beverages)
3. Sections
Your dish can contain several sections. For example: Starter, Main and Dessert.
To create a section, click on the ‘+ Section’ -> Add a ‘Section name’
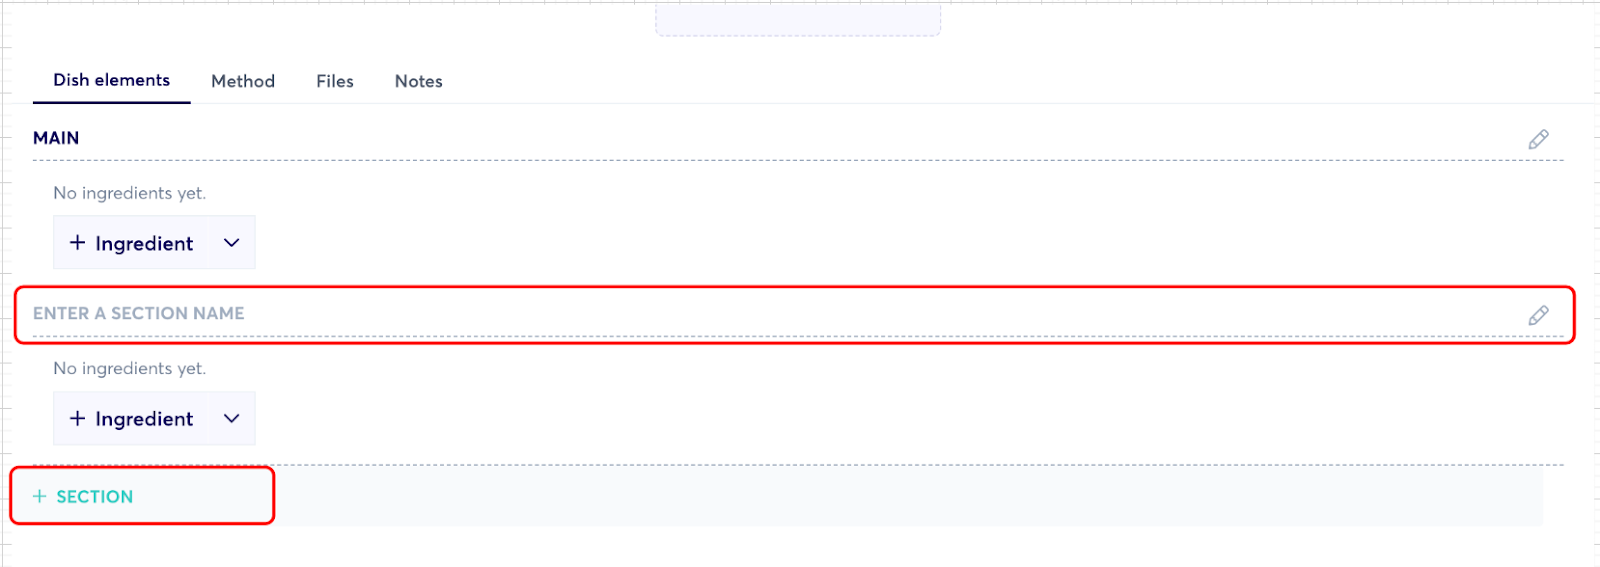
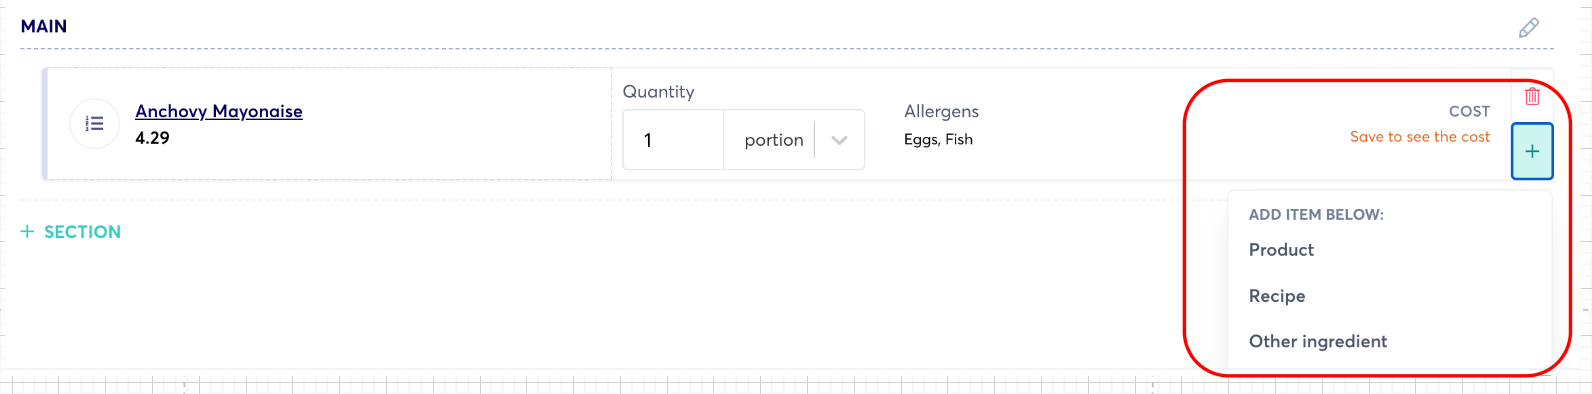
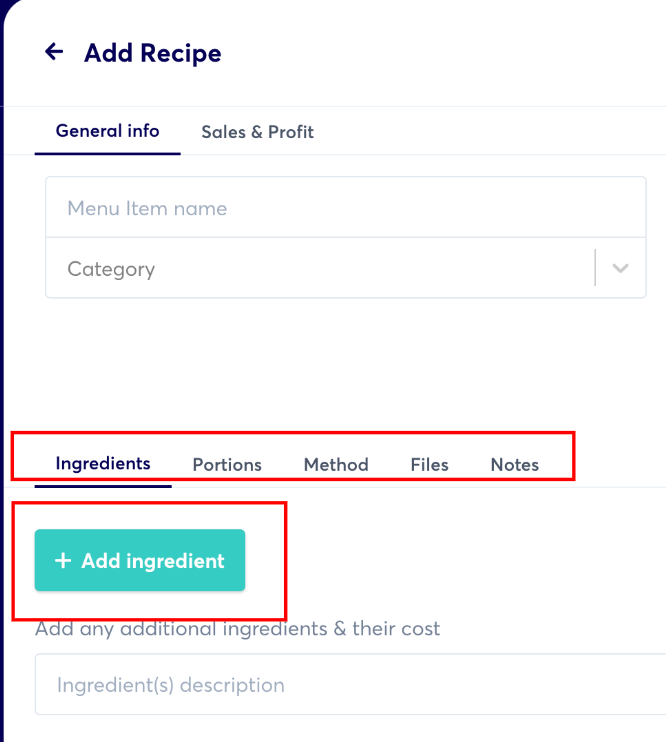
4. Add ingredients in each ‘Section
Click on ‘+ Ingredient’ -> Select ‘Product’, ‘Recipe’ or ‘Other ingredient’ -> Add Quantity

Add Quantity
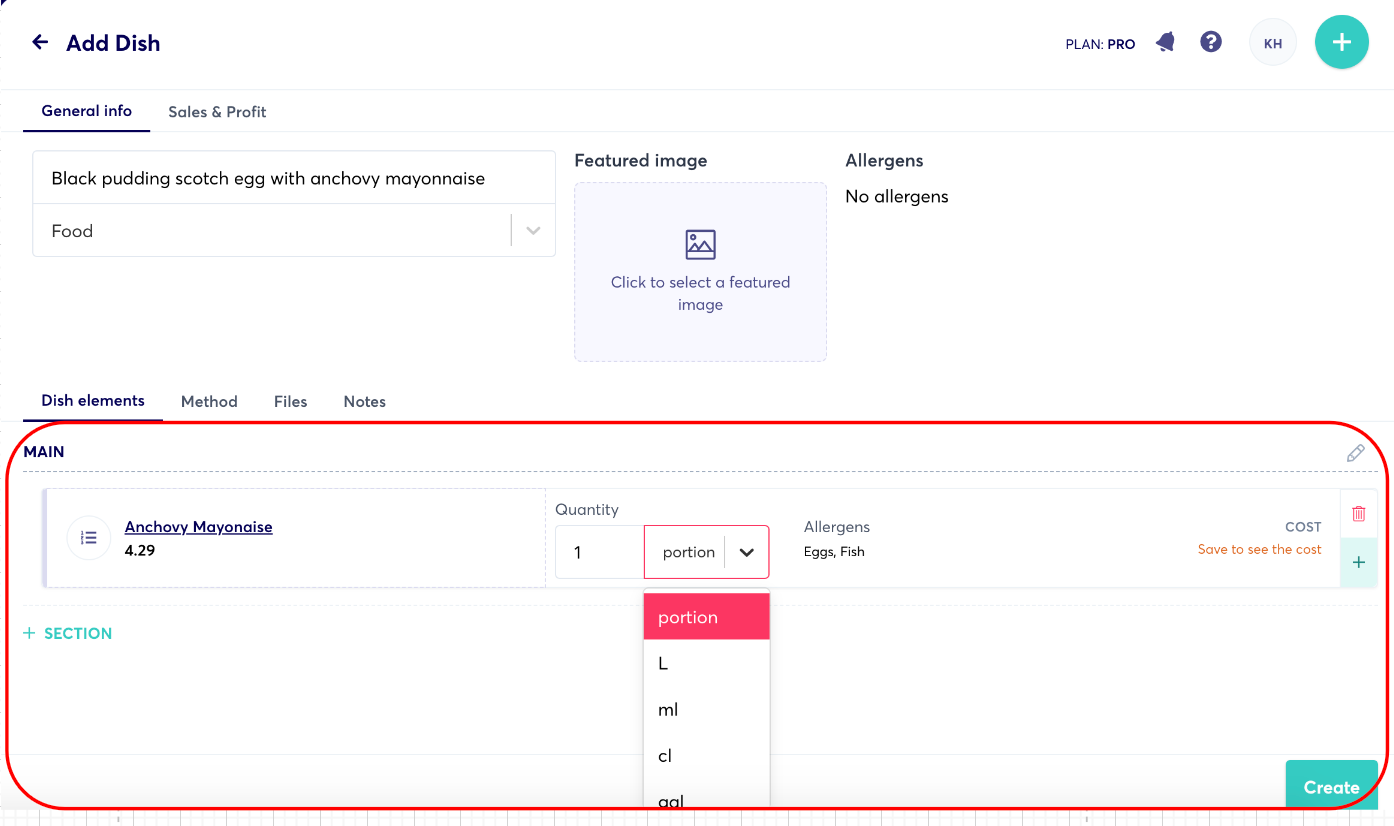
- To add more ‘Ingredients’ to the same ‘Section’ click on the ‘+’ on the right-hand side of the first ingredient you added to this section
- You can also add a picture of your dish
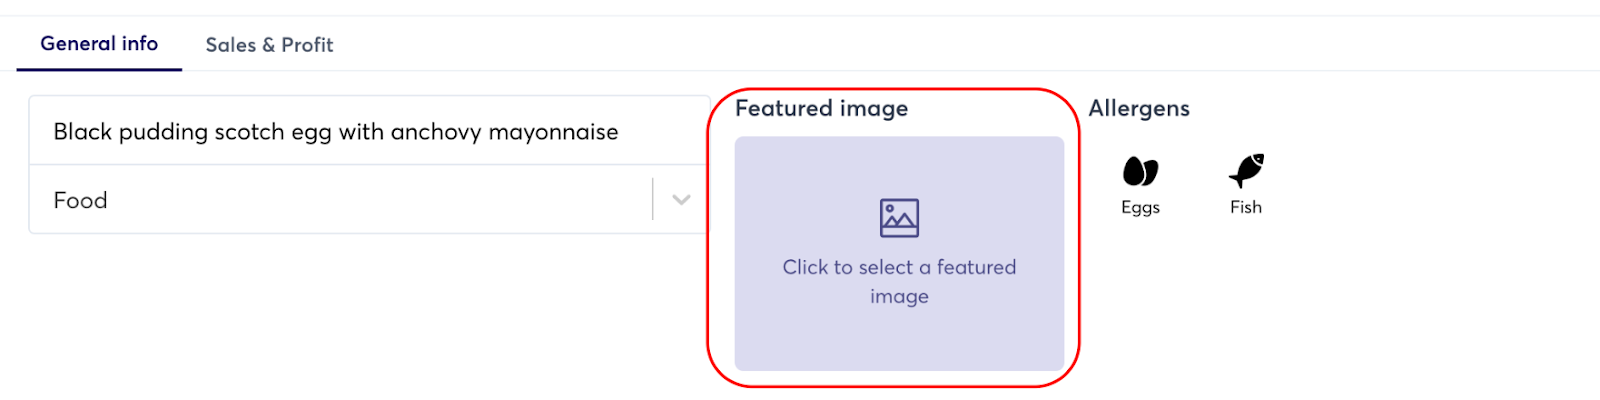
- If any of the added ingredients (Products and/or Recipes) have Allergens assigned to them, these will appear to the right of the image
5. Continue to adding Method, any Files and Notes to make your Dish complete

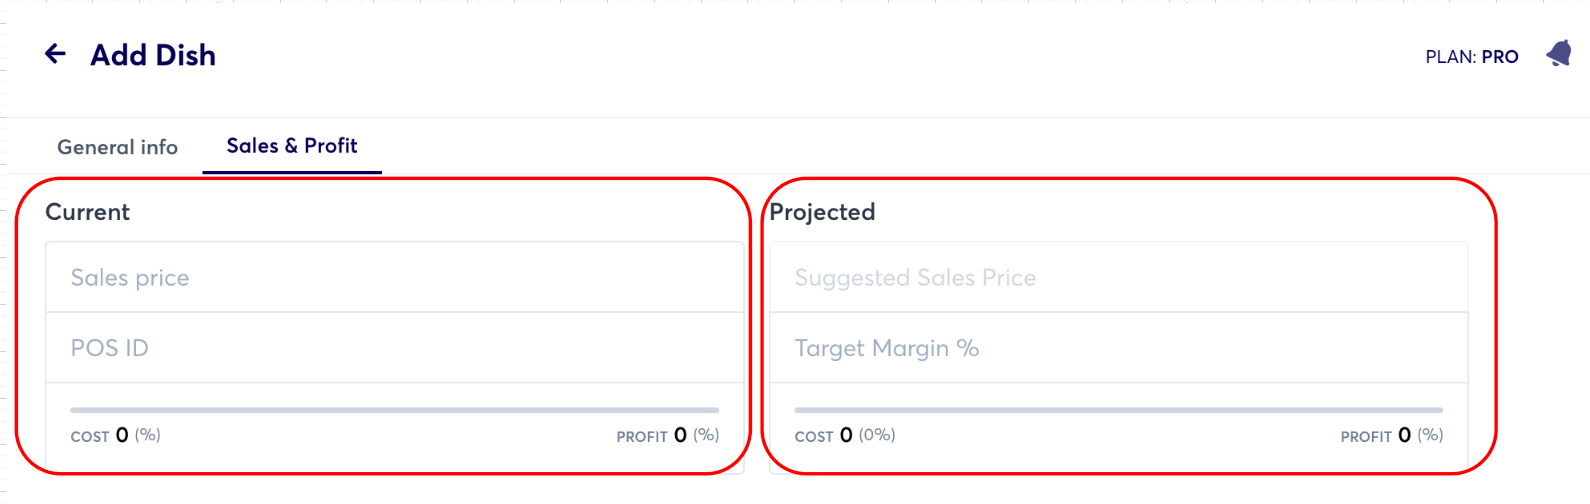
6. Go to Sales & Profit tab
Here you can see the Cost & Profit of your dish.
- Add the Sales price (this can be Gross or Net) but bear in mind, your ingredients’ cost is most likely in ‘Net’ values
- Add POD ID - this is the ID you have assigned in your POS. This is critical to ensure that the mapping between your sales & dishes is complete. This way, you ensure the accuracy of all the reports in growyze
- You can also add a ‘Target margin %’. Click ‘Save’ to get a ‘Suggested Sales price’
7. Click ‘Create’ to create and save the Dish
8. Printing a ‘Dish’
Open the Dish you’d like to print -> click on the three dots at the bottom by the ‘Save’ button
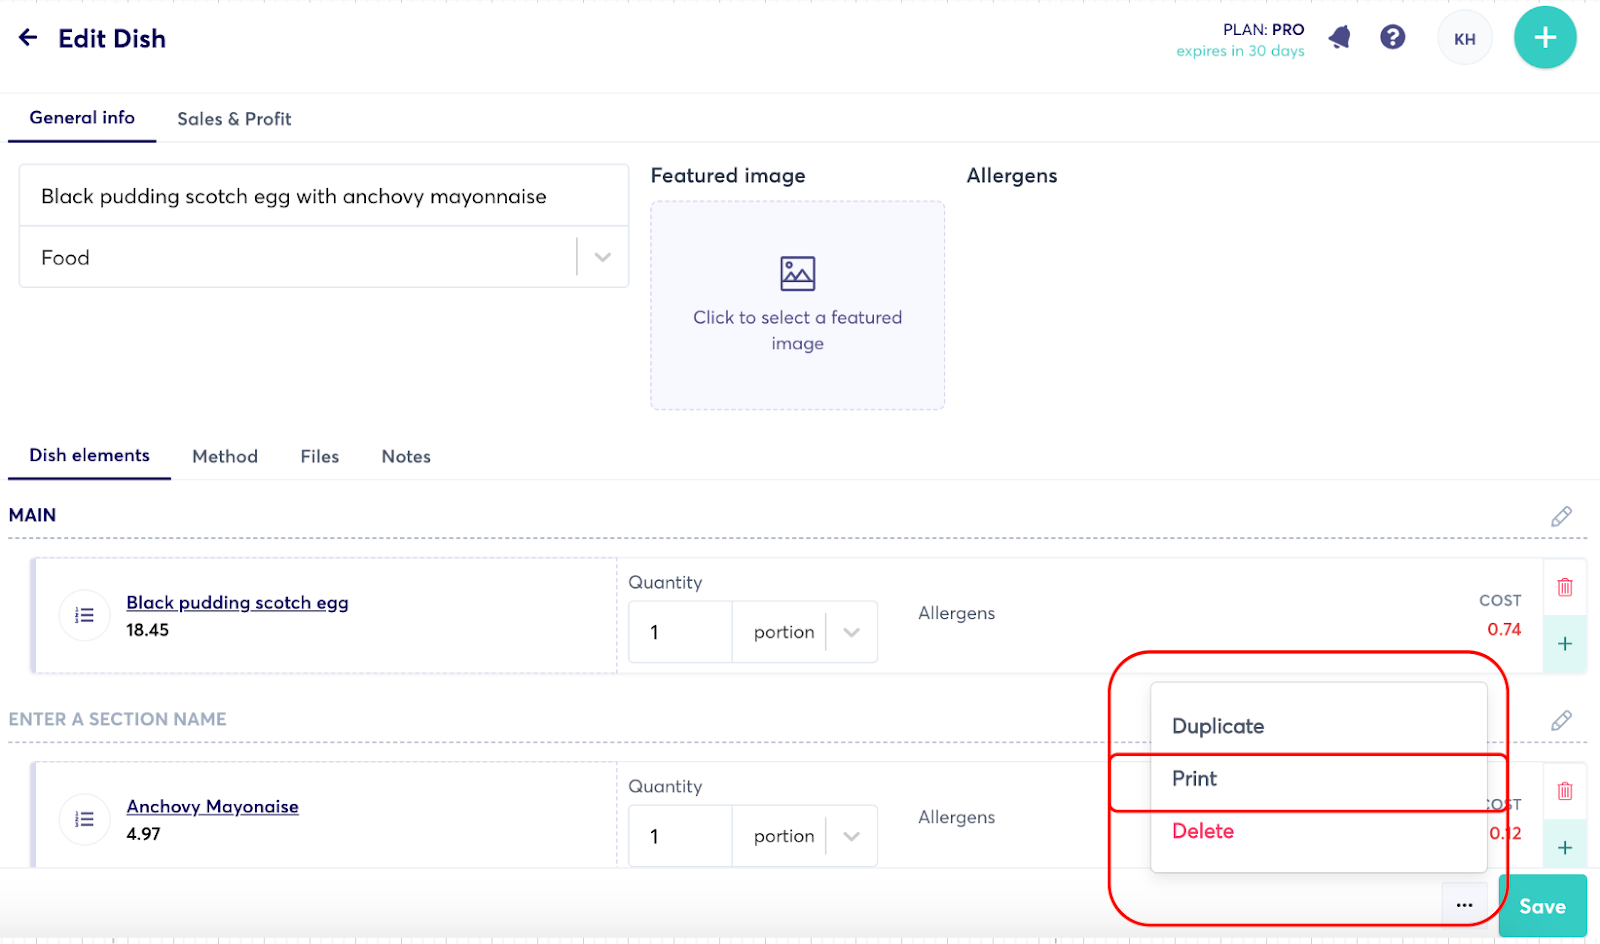
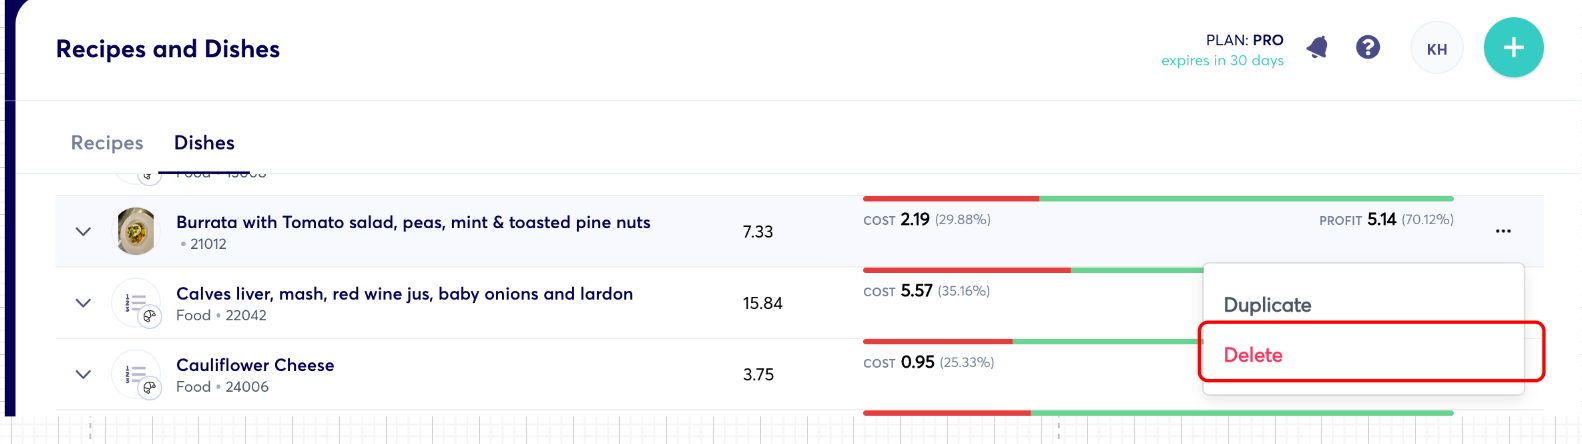
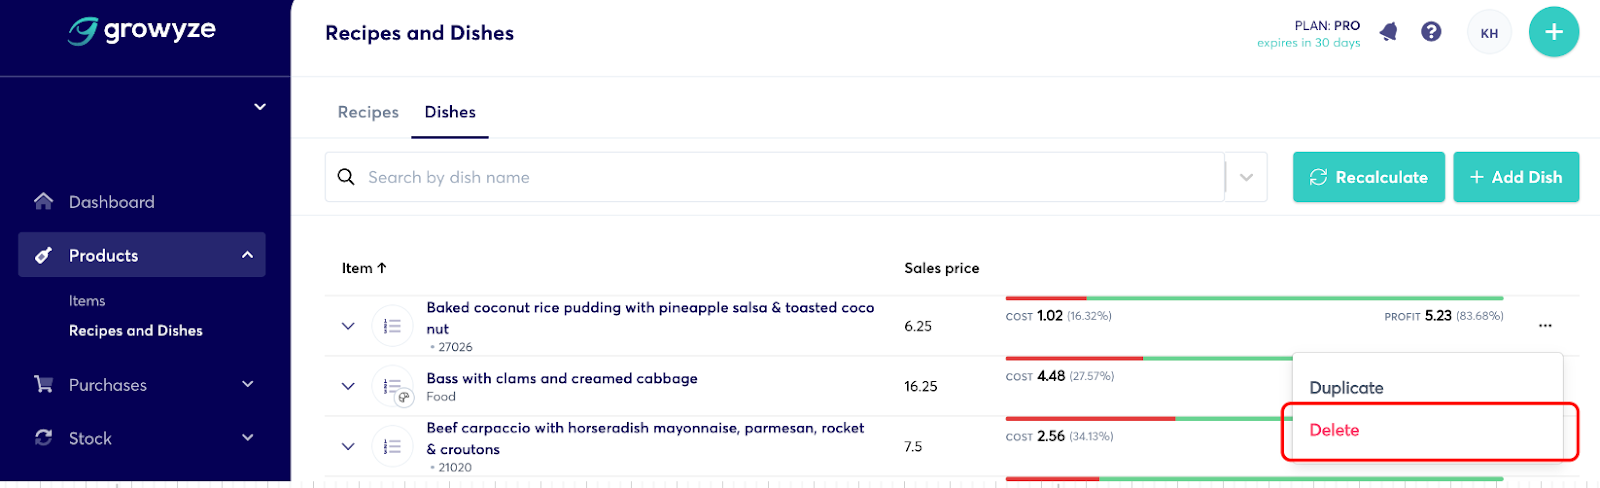
9. Deleting a Dish
- From the Dishes dashboard, find the Dish you’d like to delete
- Click ‘Delete’
- Confirm
How to Add Recipes in growyze
Recipes are ‘things’ you’d normally produce in-house, in bulk.
For example, ‘Anchovy mayonnaise’ can be created as a recipe, which can then be added to a number of dishes (Burgers etc)
1. Go to Products -> Recipes & Dishes -> Recipes -> Add Recipe
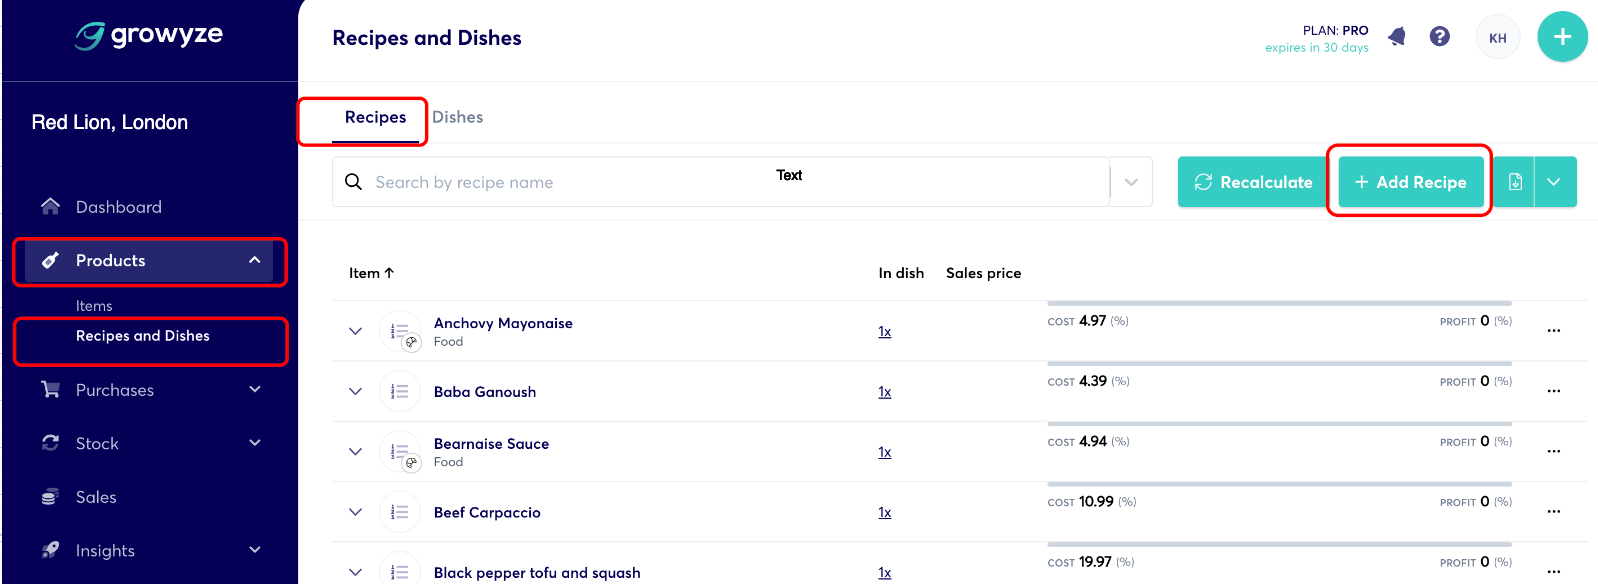
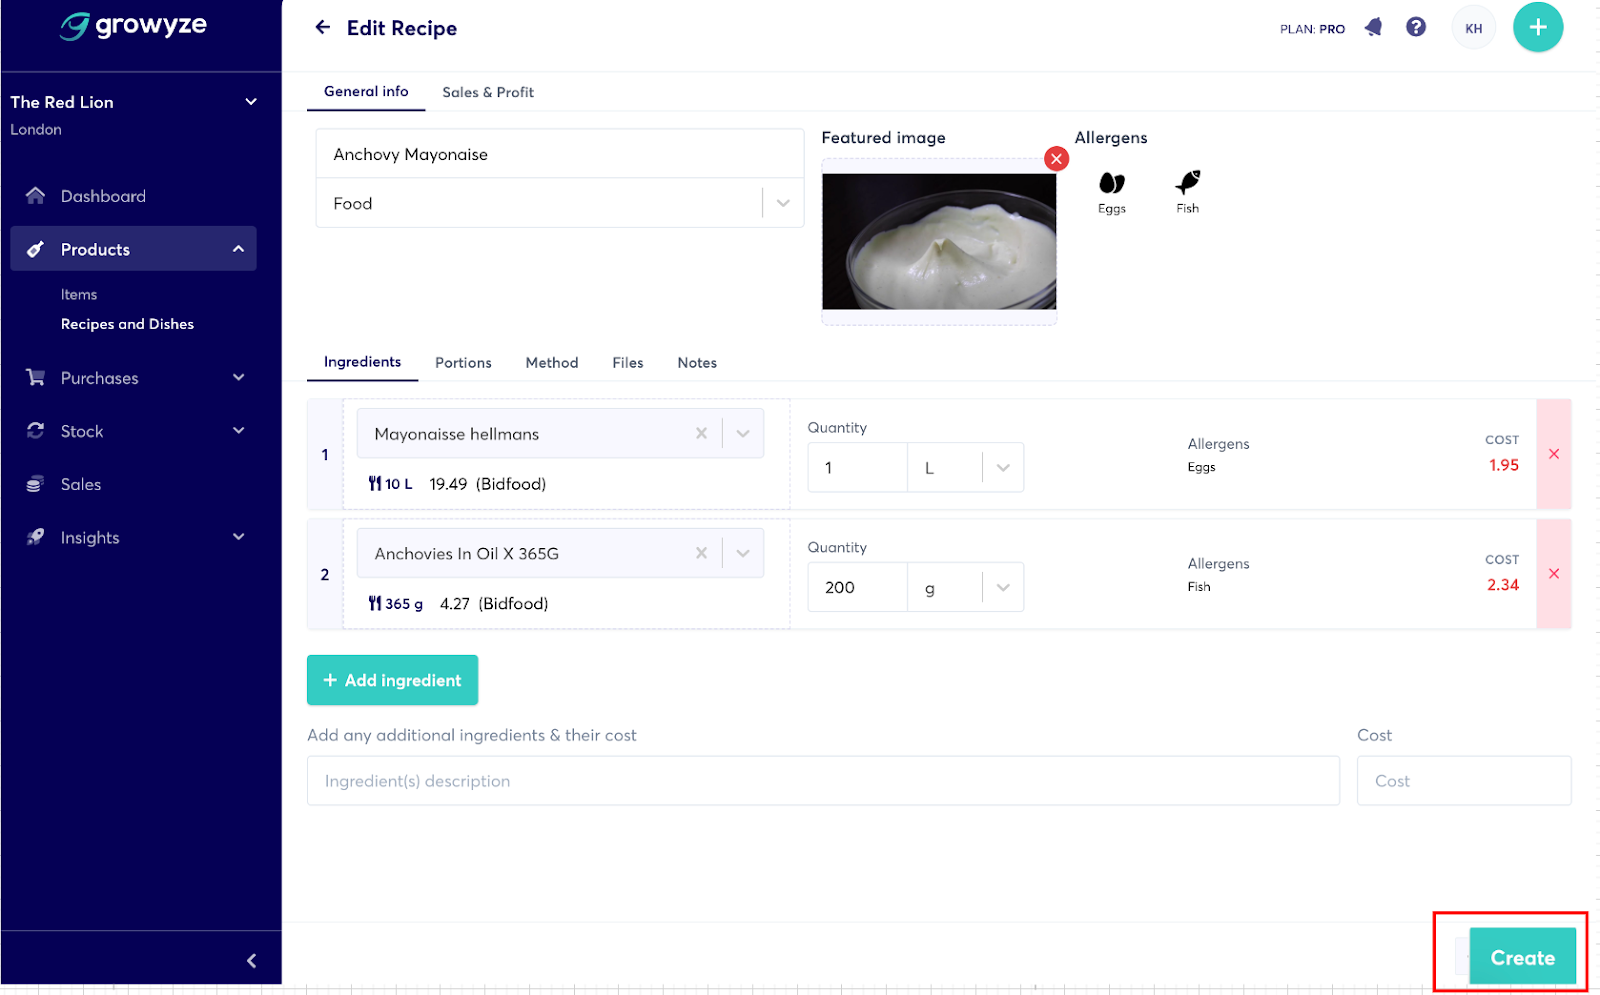
2. Fill in the ‘General info’ details such as Recipe name, and choose a category (Food or Beverages)
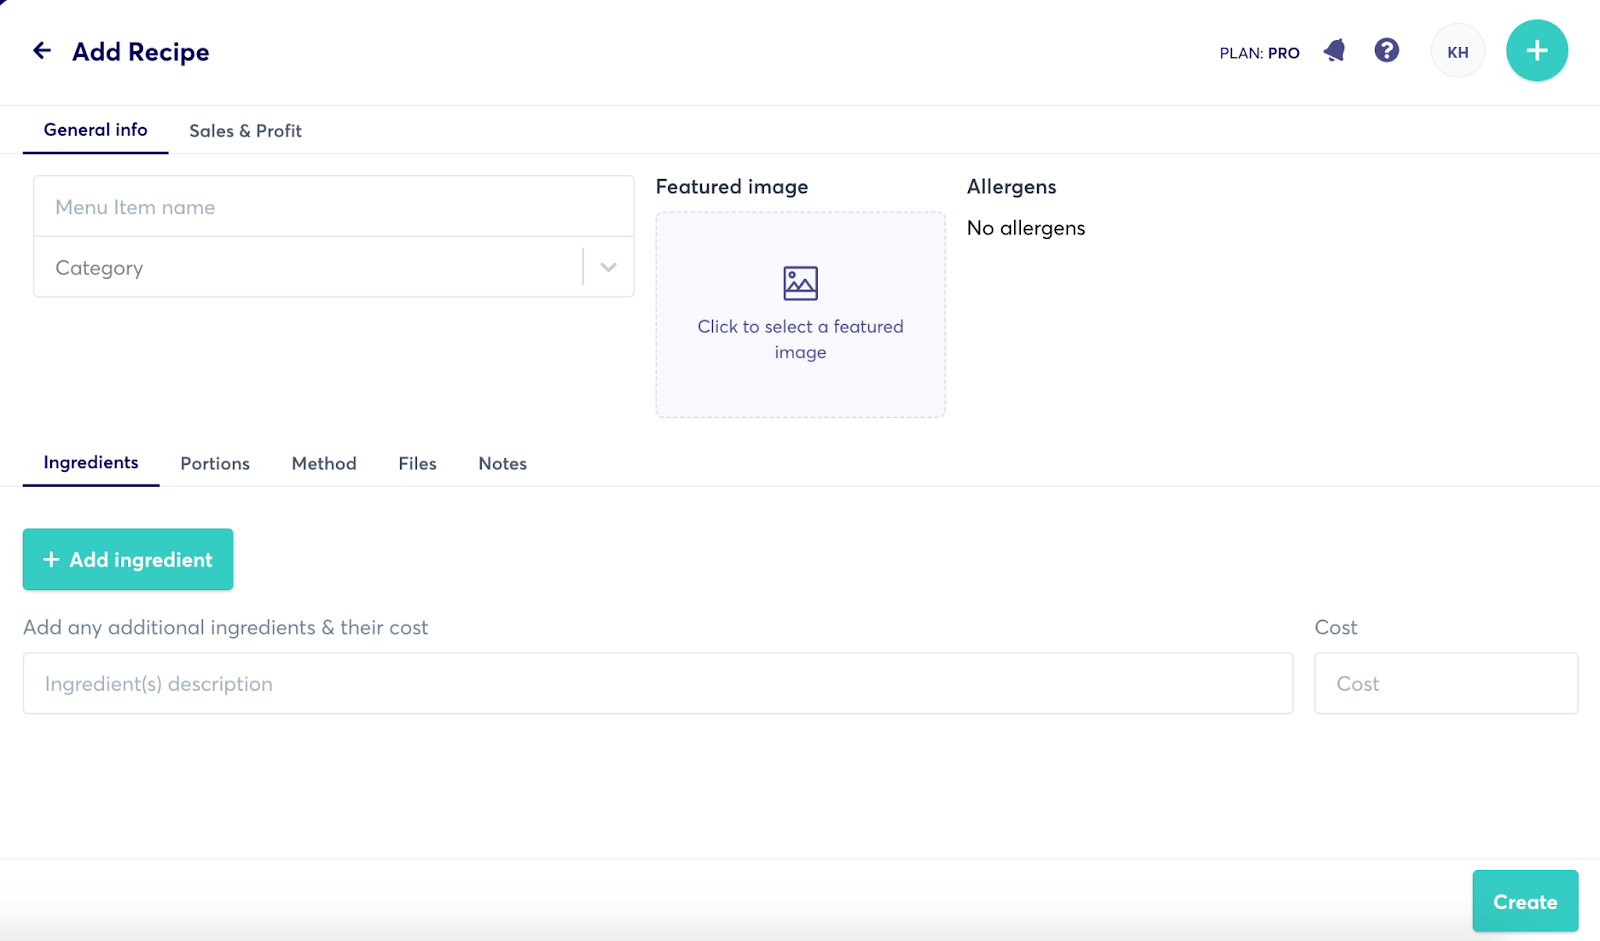
Then you can start adding all the Ingredients, the Yield and Portions, Method of preparation, any Files you have and Notes applicable
Note: You can also add ‘Other costs’ for products you may want to add without linking to an existing product so that you get a better view of the recipe margin.
For example, you many want to add things like disposable cups etc, and even labour cost.
A/ Adding Ingredients
- Click on the green ‘Add ingredient’ button
- Select the relevant ingredient to be included in this recipe -> Add the Quantity of this product used in the recipe
Depending on the set up of this item, you’ll be given an option to add quantities in ‘each’, ‘%’, kg, L, ml etc.
If the added as an ingredient product has been marked with any allergens, these will appear here too.
- Continue adding all the ingredients you use in this recipe
- To delete ingredients click on the red ‘X’ on the right of the added ingredient

- You can also upload a picture.

B/ Add Yield & Portions

After you add the yield and the portions, click ‘Save’
This will give you information for the cost of each portion.
C/ Continue to adding Method, any Files and Notes to make your Recipe comple

D/ Click‘Create’ (the green button at the bottom left) when you’ve finished adding all the required information
E/ Make sure you Save the Recipe each time you make an amendment
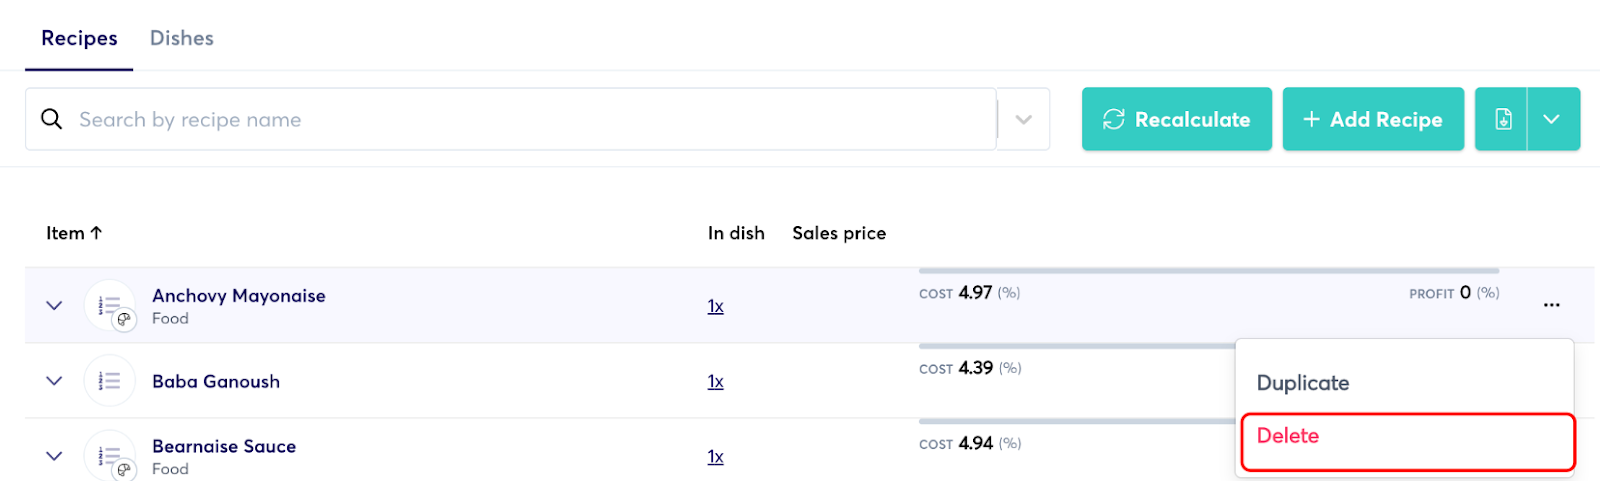
3. Deleting a Recipe
- From the Recipes dashboard, find the Recipe you’d like to delete
- Click ‘Delete’
- Confirm
How to Add Suppliers to growyze
To start using growyze you’ll need to add details of your suppliers. This enables you to make orders easily, receive notifications on delivery cut-off dates and so much more. In this guide, we’ll walk you through how it works.
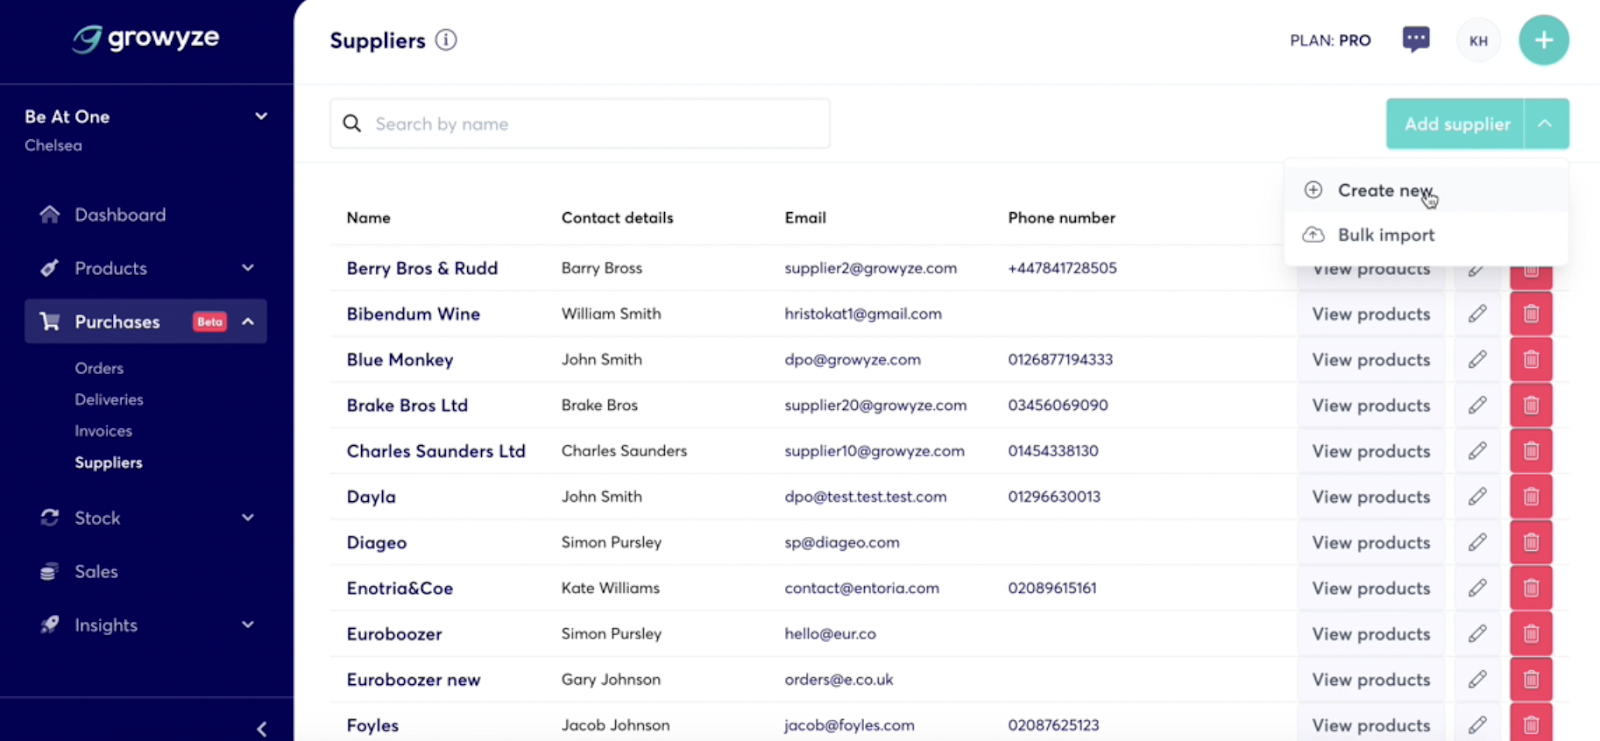
1. Add a new supplier
From the left-hand menu choose ‘Purchases’ and ‘Suppliers’.
Choose ‘Add supplier’. Here, you add suppliers in two ways:
a. Create a new supplier individually
To add suppliers one-by-one choose ‘Create new’.
Here you can add the details of your supplier including:
- Supplier name
- Your account number with this supplier
- A main contact (name, email, phone number)
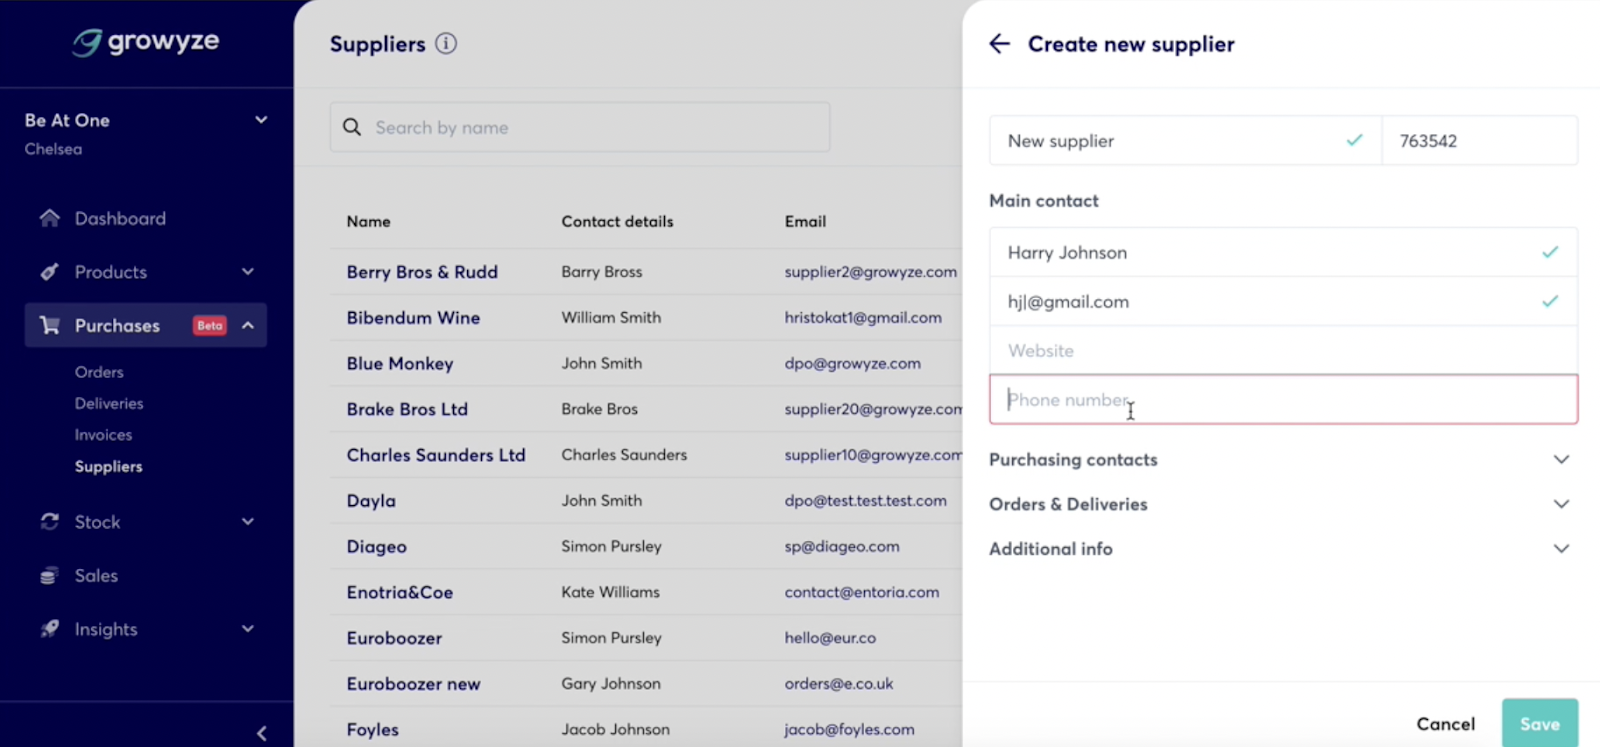
It’s important to add a main contact name to each supplier as this will allow you to automate orders and raise invoice or delivery queries automatically.
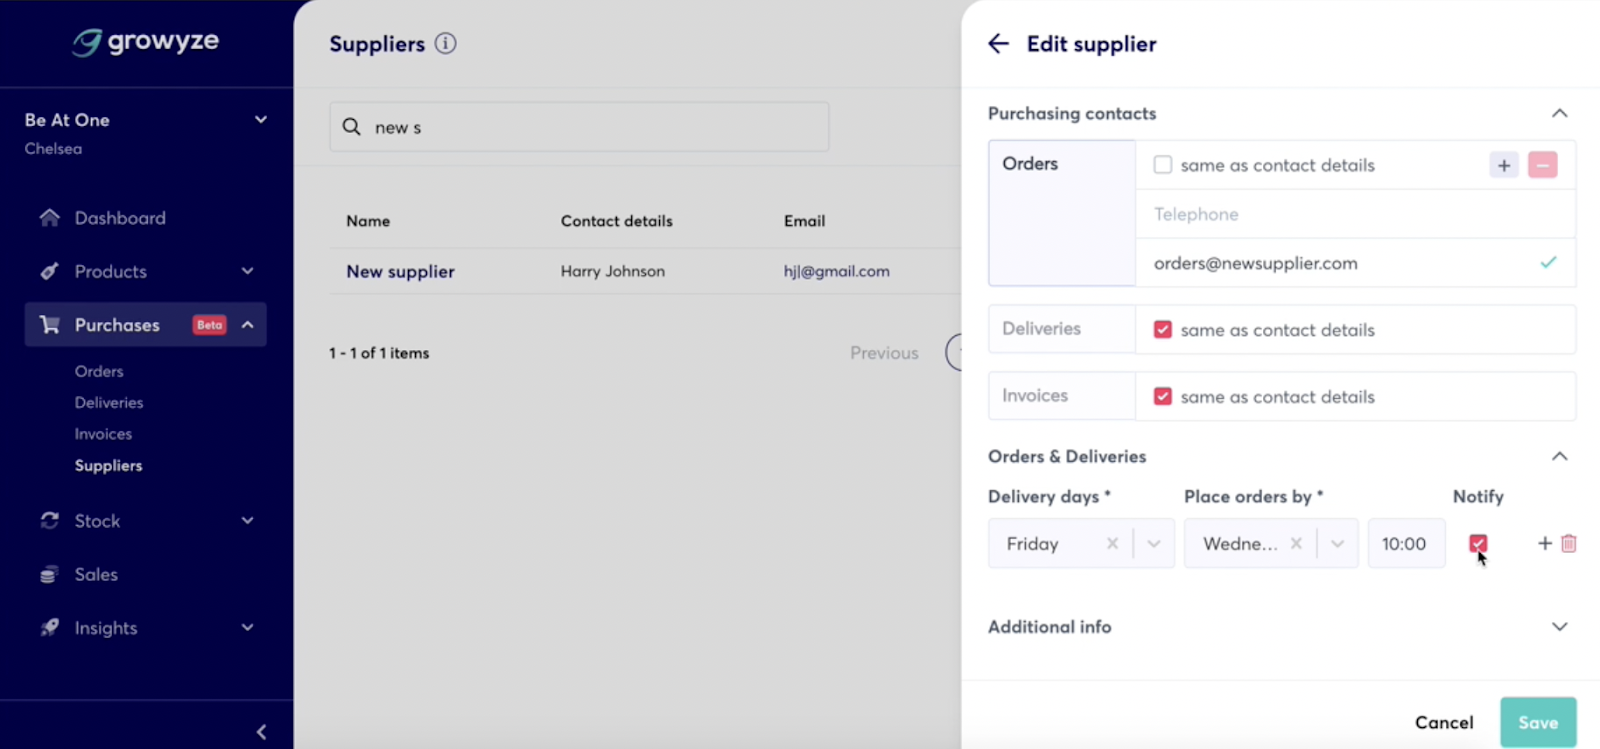
You can also add additional details such as Purchasing contacts:
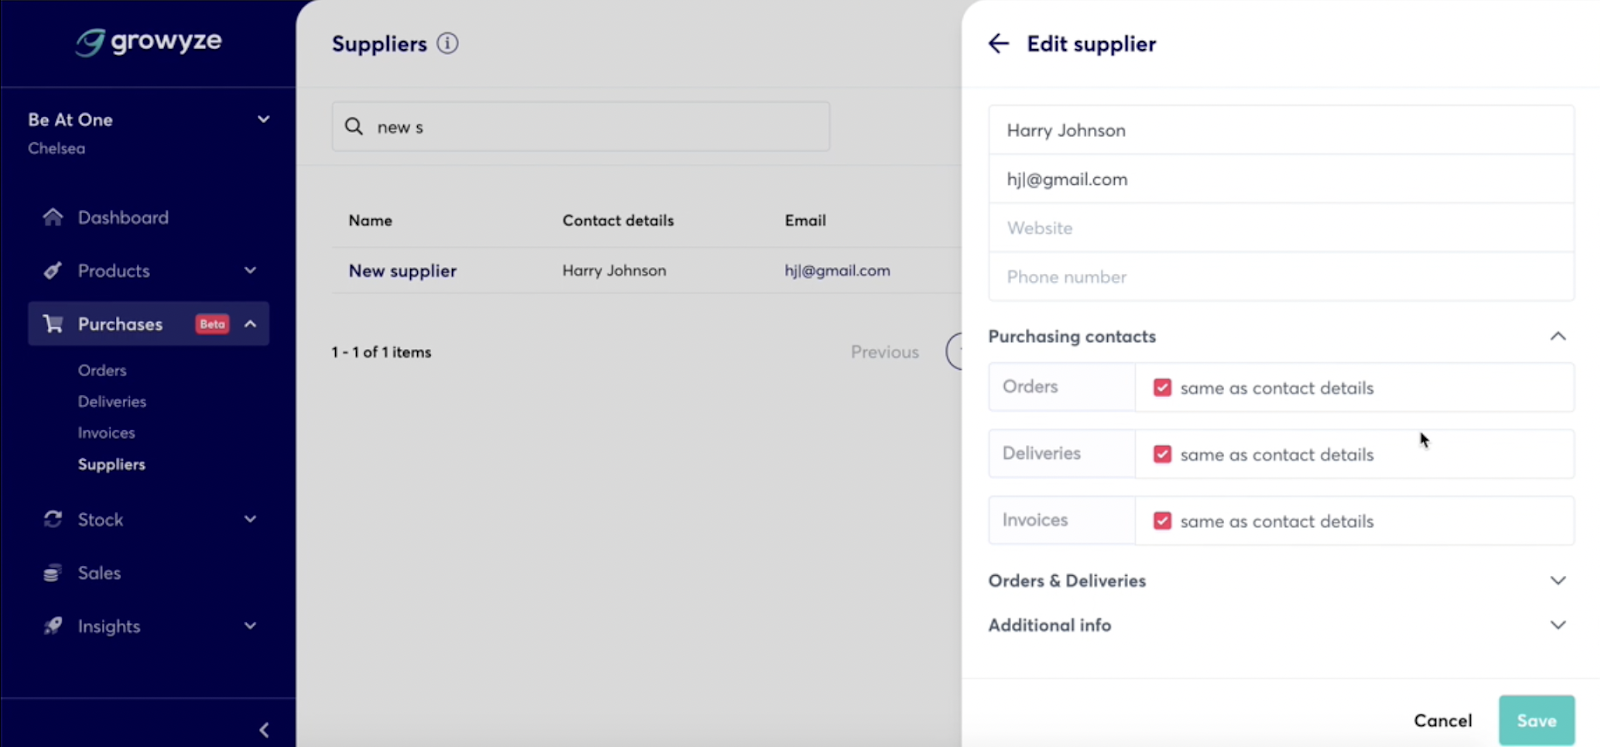
This allows you to input different contact details for your order, delivery and invoice queries, or use the same details as the main contact.
Under the ‘Order & Deliveries’ heading you can also set up an order reminder for that supplier. This is useful if the supplier has an order cut-off day or date. To do this, select ‘Set order reminder’ and enter a date and time for your reminder.
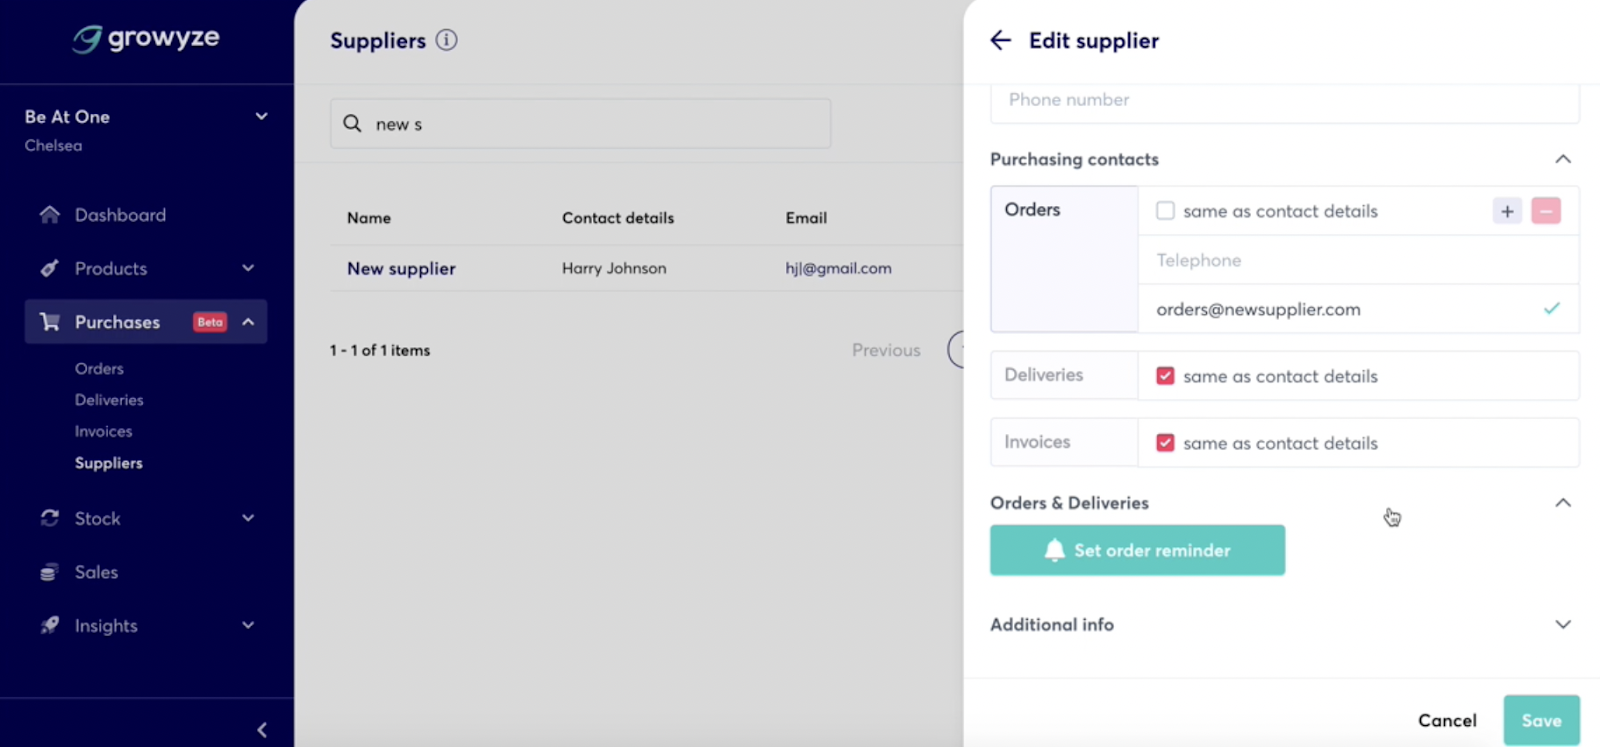
By selecting ‘Notify’ you’ll receive an email notification before the order deadline so that you can get your orders in on time.
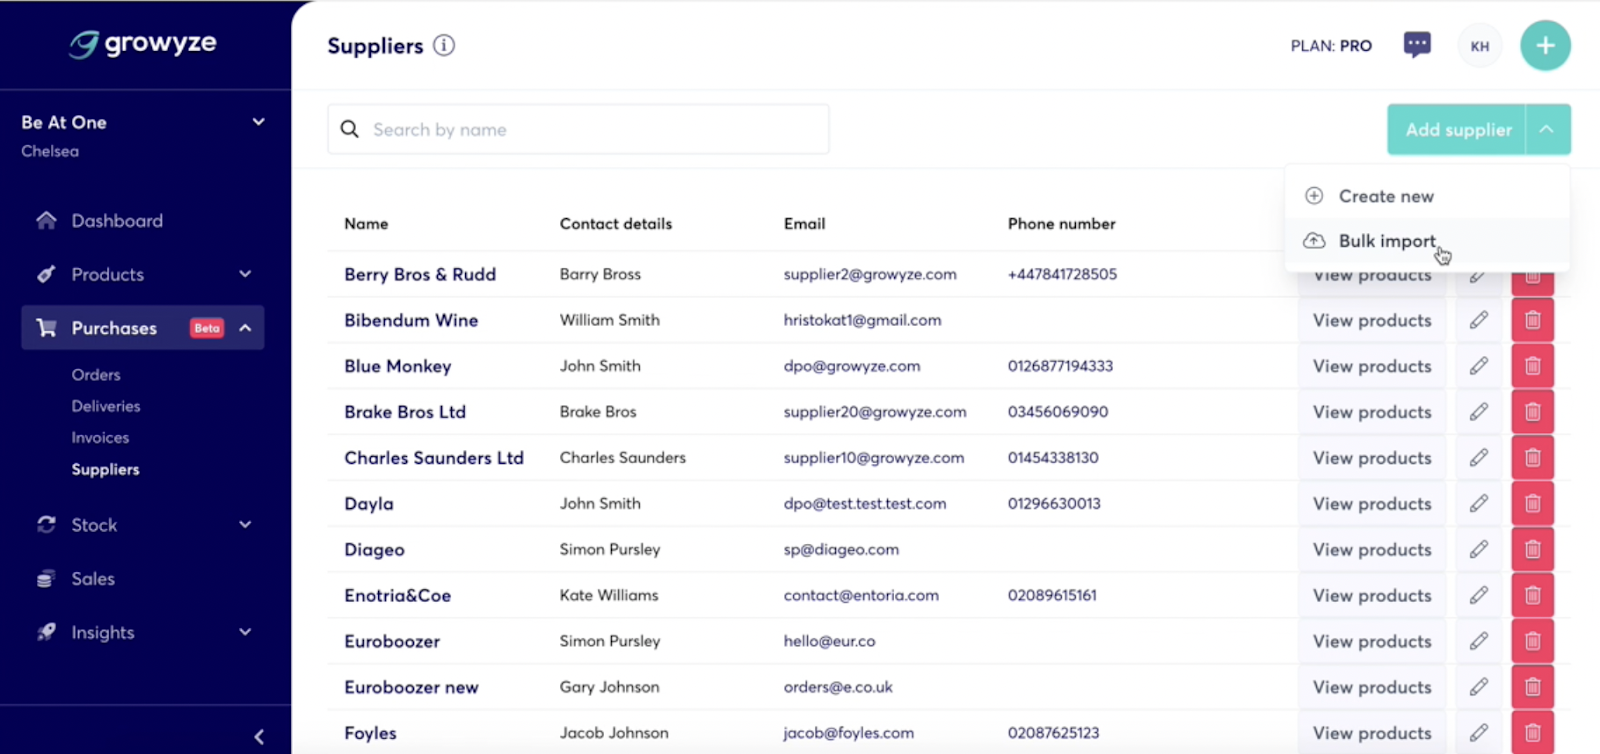
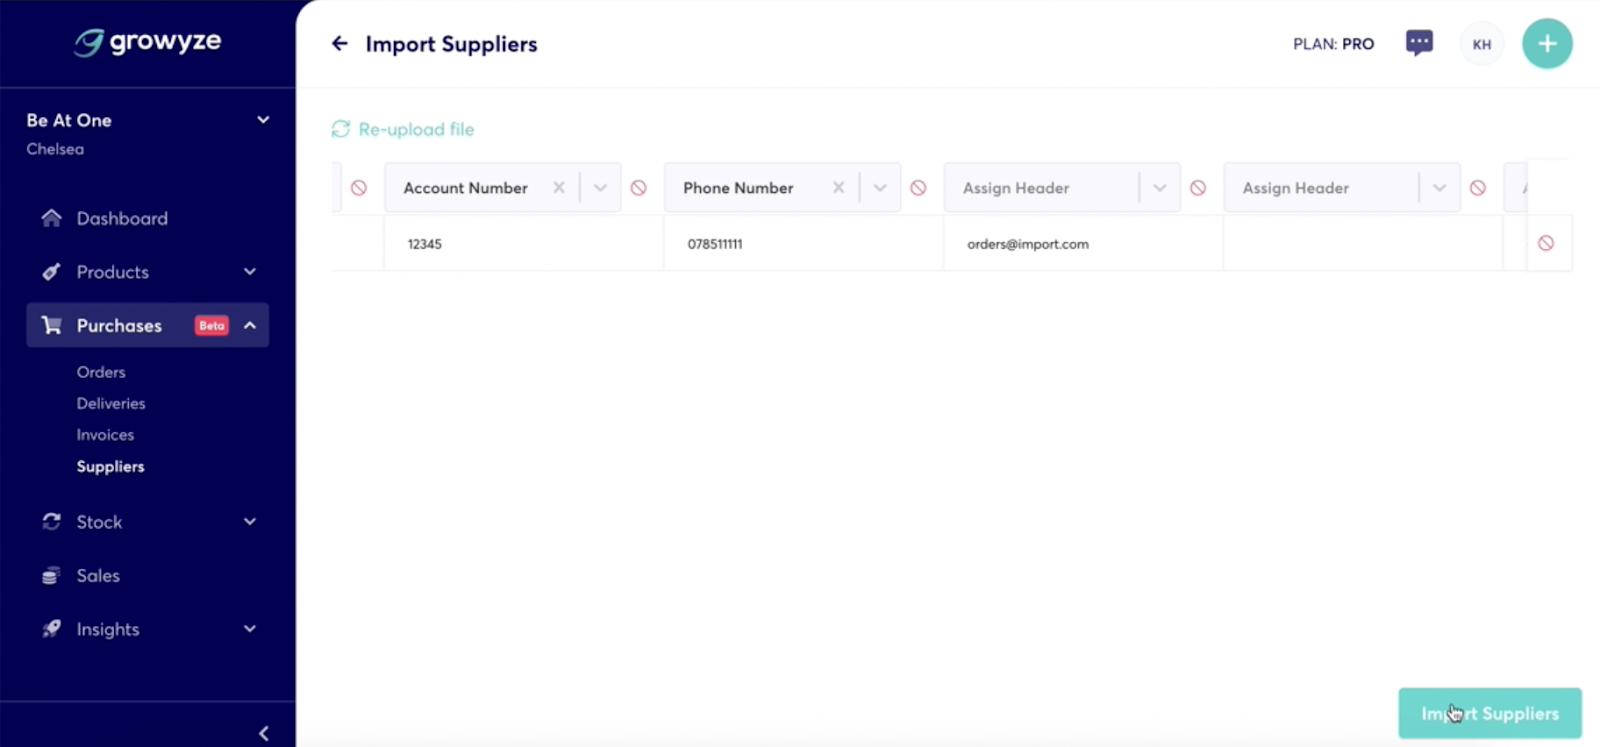
b. Create suppliers by bulk import
To add multiple suppliers at the same time choose ‘Purchases’ and ‘Suppliers’. From the ‘Add supplier’ dropdown choose the ‘Bulk import’ option.
Here you will need to upload a file containing your supplier details.
Within the upload screen you can see a list of what’s required within the upload file. This should be a csv, xls or xlsx file. You can include various details within your file including the supplier name, contact name, email, your account number, a phone number and more.
If you’d like an example file to use, you can download the growyze example Excel spreadsheet by choosing ‘view example’.
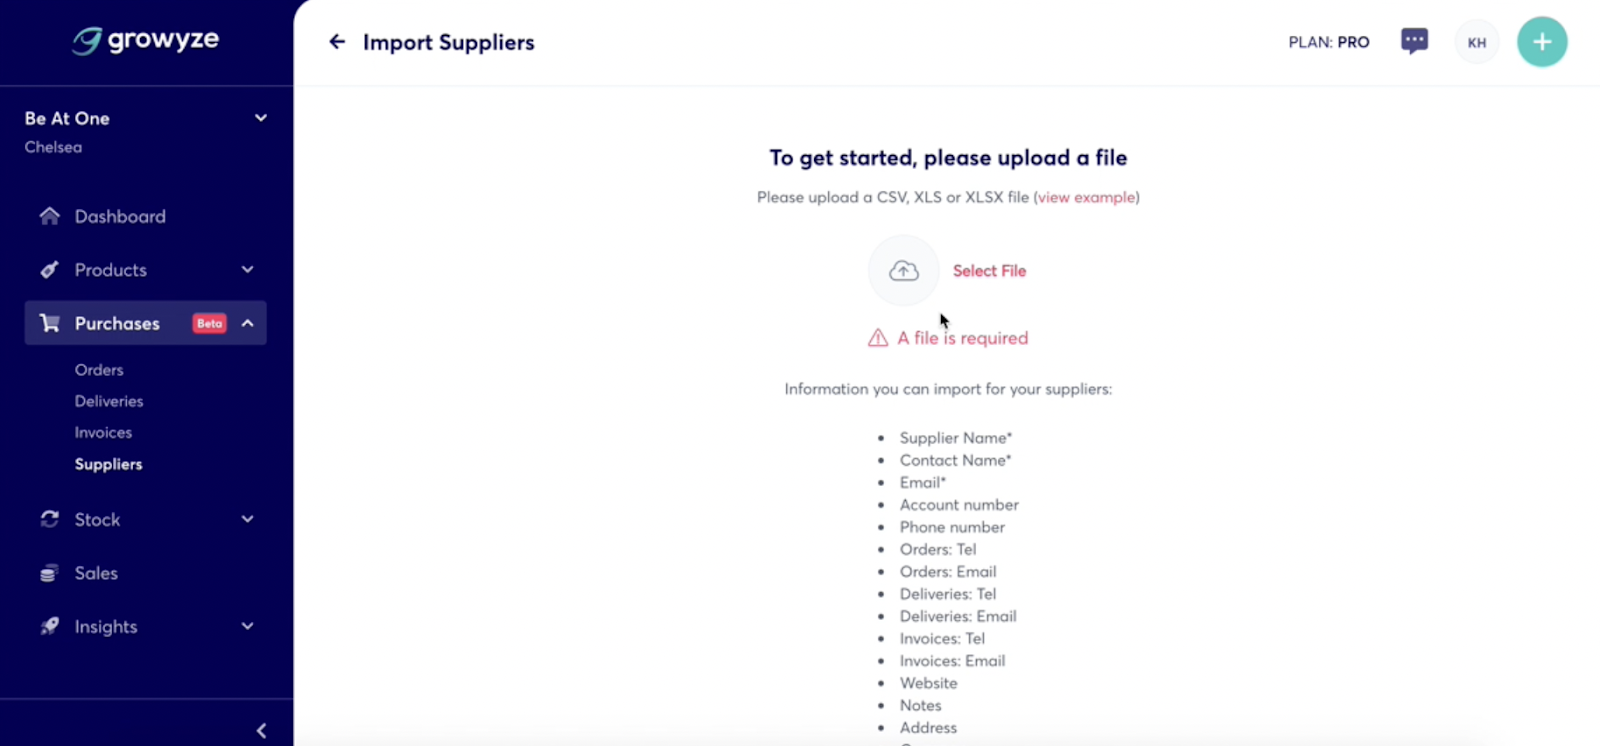
Once you have created your file and it’s ready to upload, choose ‘Select File’ and upload your file from where it’s located.
Next you’ll need to assign the headers to each column.
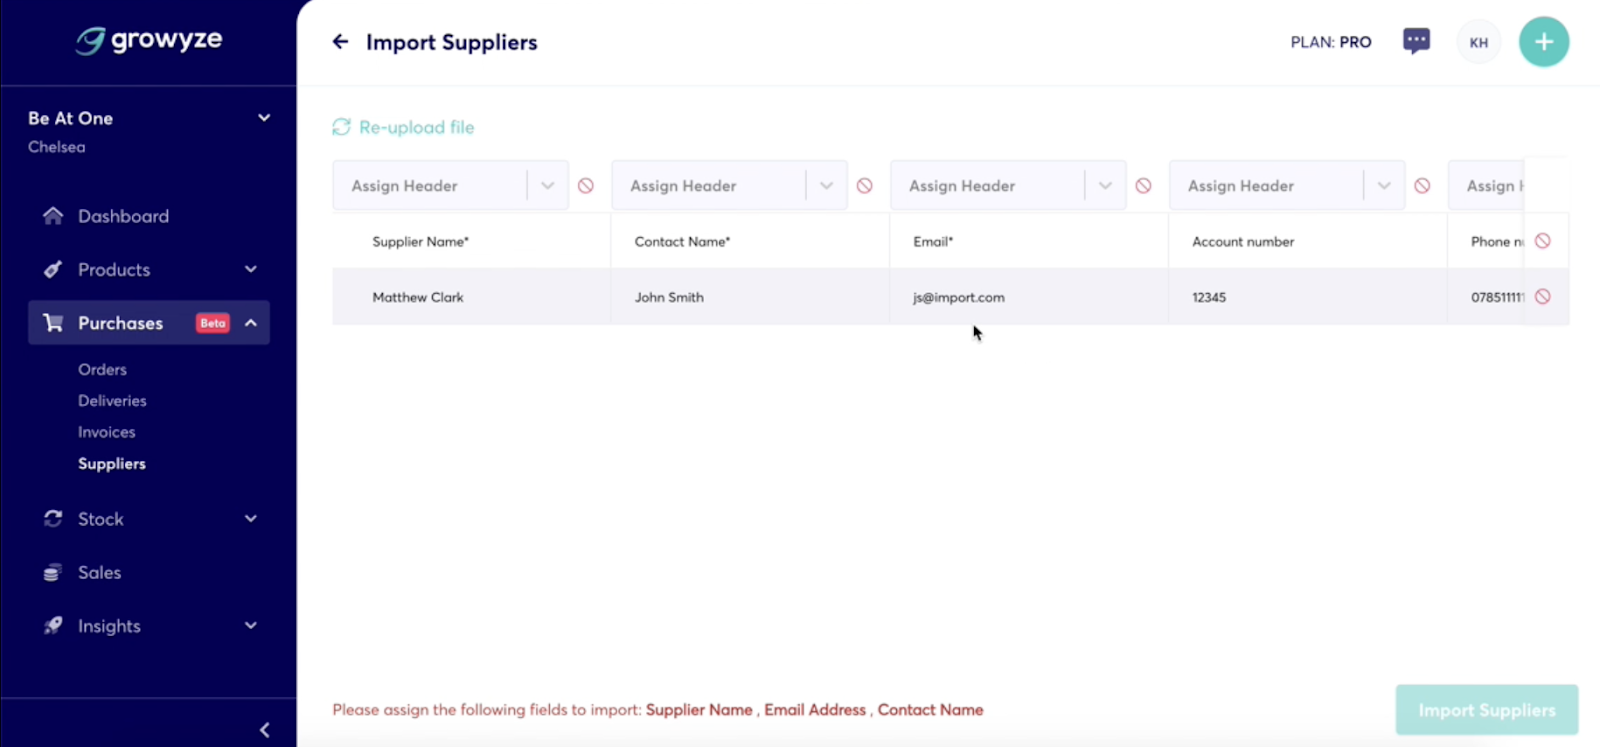
You can do this by choosing the correct header from the dropdown for each column.
To delete any redundant lines (for example the header line from your original file) choose the red icon at the right-hand side of the row.
You don’t need to worry about deleting any empty columns you aren’t using as these will automatically be left empty once you have imported your supplier information.
Once you are happy with your selections, choose ‘Import Suppliers’.
For further help using growyze contact us at support@growyze.com
How to Add Your Product Items to growyze
In this guide we’ll cover the three different ways you can use to enter your product items in growyze, plus how to filter and export CSV files of items.
1. Add new product items
From the left-hand menu choose ‘Products” and ‘Items’.
Within the Items section you can add new products via three different methods:
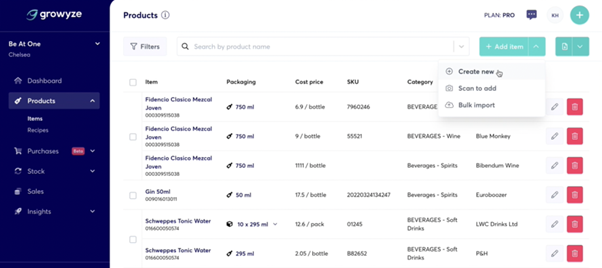
a. Add items manually
Select ‘Add item’ from the dropdown and ‘Create new’. This allows you to add items manually and enter the details of an item one-by-one. To create the item, add all of the item details including:
- Item name
- Barcode (you can either scan this using your camera or enter this manually)
- Supplier
- SKU or product code information (usually found via your supplier invoice)
- Category (for example ‘Beverages - wine’)
- Size of item (unit, measure etc.)
- Multiple (this is if you order many items as part of a package - for example there are six bottles per package that arrives)
- Product description
- Notes
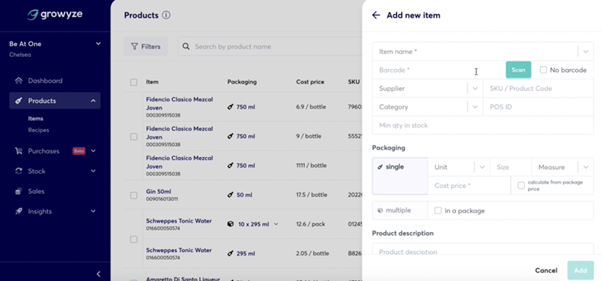
Once you are happy all of the item fields have been added correctly you can select ‘Add’.
When a new product has been added you can search for this using the product search bar, and then edit the details or delete the product easily.
b. Scan items
This option allows you to scan an item using its barcode. This is usually easiest to do from your smartphone.
Select ‘Products’ and ‘Items’ from the menu bar. Then select the green icon from the top right-hand corner to open your options and select ‘Scan to add’.
This will open the camera and allow you to scan the barcode.
Scan the barcode of your item as shown here:

This will create a new entry including the product name and the barcode number.
Top tip: This item is found when the name and barcode number automatically appears once scanned. This is because growyze already has a database of thousands of popular beverage items. If growyze is unable to find the product within the database you can learn how to add a product item that isn’t in the database here.
As well as the name and barcode you can then amend or add further details such as the cost price, POS ID and minimum stock quantities.
Once you are happy with the details select ‘Add’ to create your new product.
c. Add items by bulk upload
To add items by bulk upload you will need to do an upload for each supplier you order items from. To do this for your first supplier, from the left-hand menu choose ‘Products” and ‘Items’.
Choose ‘Add item’ from the right-hand side and choose the ‘Bulk import’ option.
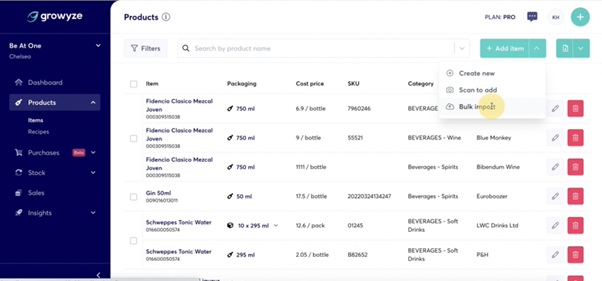
In this screen you can see an example of the file.

Click on the hyperlink ‘view example’ which will open as an Excel spreadsheet. There is the option to use this as a template and add your information into this, as it already has the correct growyze headings listed.
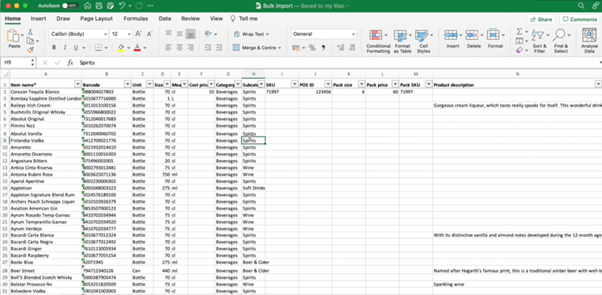
For your upload to work correctly you must include Item name at minimum. However, we strongly recommend also adding:
- Barcode
- Unit type (bottle, keg etc.)
- Size
- Measure (ml, g, oz etc.)
- Cost price
There are then other fields which you have the option of adding including pack size, quantity in stock, product description, product category and so on. You can view all of these fields in the ‘Information’ tab of the example sheet available.
Once you have created your file with all of the product items in, choose ‘Select File’ and upload the correct file.
Next, you can choose the correct supplier for those items:
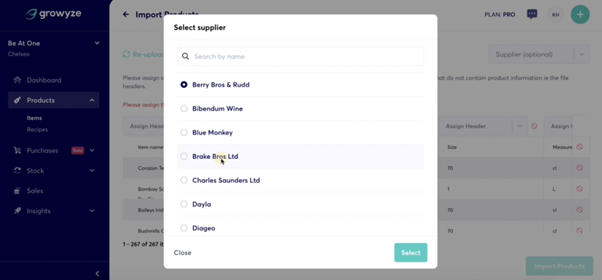
All of the list will now be imported under the correct supplier details. Lastly, you will need to ensure the right headers are assigned to the columns from your sheet.
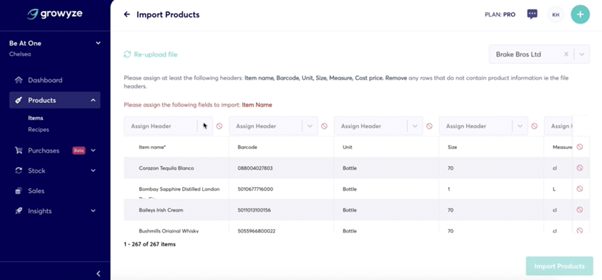
You can do this by selecting the dropdown above each column and choosing the correct field to match the examples given (for example the first column above would be ‘Item name’).
Once you are happy with your headers you can select ‘Import Products’.
You can then repeat the bulk upload option for each supplier you order items from.
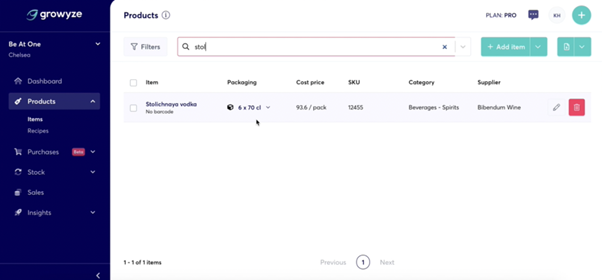
2. Filter items
Once you have added product items you can also filter the list. To do this, click ‘Filters’.
Here you can see the option to filter items by supplier by choosing a supplier from the dropdown list:
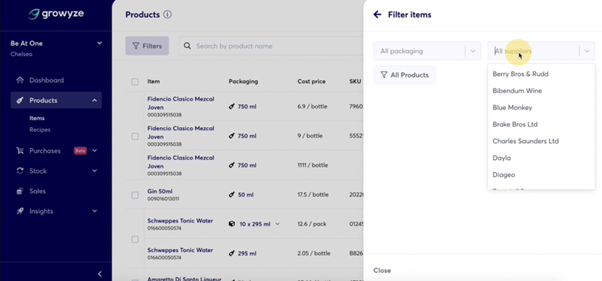
This will provide a filtered view of all of the items from one supplier.
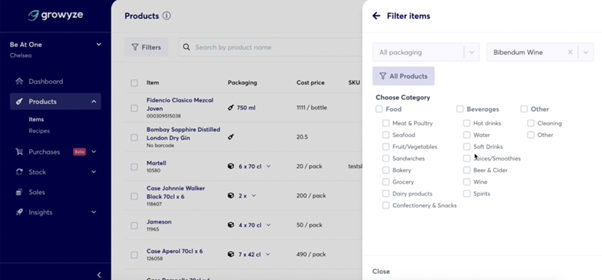
By clicking ‘Filters’ and ‘All Products’ you can also choose to filter by category of item, for example ‘Hot drinks’ or ‘Spirits’.
3. Download a list of product items
If you wish you can download a list of product items. Click the download button on the top right-hand side and you can export the list of product items as a CSV file.
For further help using growyze contact us at support@growyze.com
How to Complete a Stocktake Using growyze
Whether you’re doing stocktake each week, or on a monthly basis, growyze helps you save more than 60% of the time you’d normally take to do it using pen and paper. Here’s how to get started:
Top tip: Before you complete a stocktake using barcodes you need to have added items to your products database by scanning / or manually adding their barcodes. You can do this via the 'Products -> Items' tab in your growyze account.
1. Create or join a stocktake
To get started, you’ll need to create or join a stocktake. Choose the 'Stock' tab from the left-hand sidebar and select 'New stocktake' to create a new stocktake.

To join an existing stocktake (for example, a stocktake that is already part completed or to join your team in a group stocktake) select the correct stocktake from your list within 'History'.
Here, you can choose the correct stocktake in progress and select 'Join / Edit'.

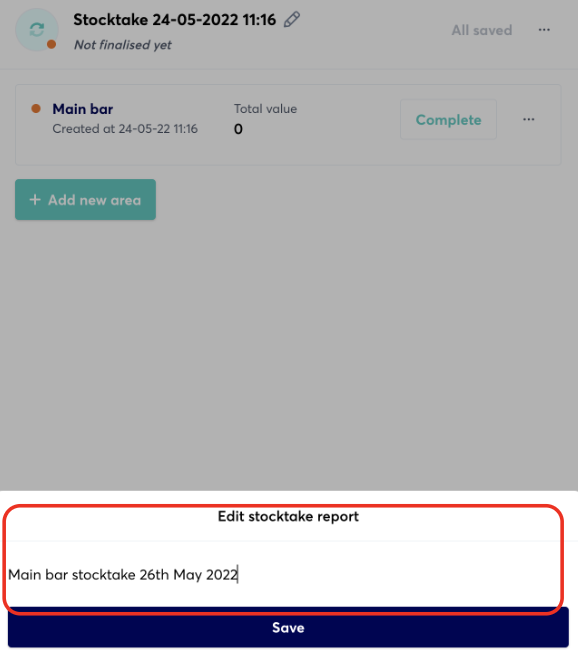
2.Name your stocktake
Once you’ve created a new stocktake, click on the pencil next to the automated stocktake name. Here you can edit the stocktake details. It’s good practice to use the same naming convention across your stocktakes, so that they’re easy to come back to. For example, the name of the area or venue, followed by the date.
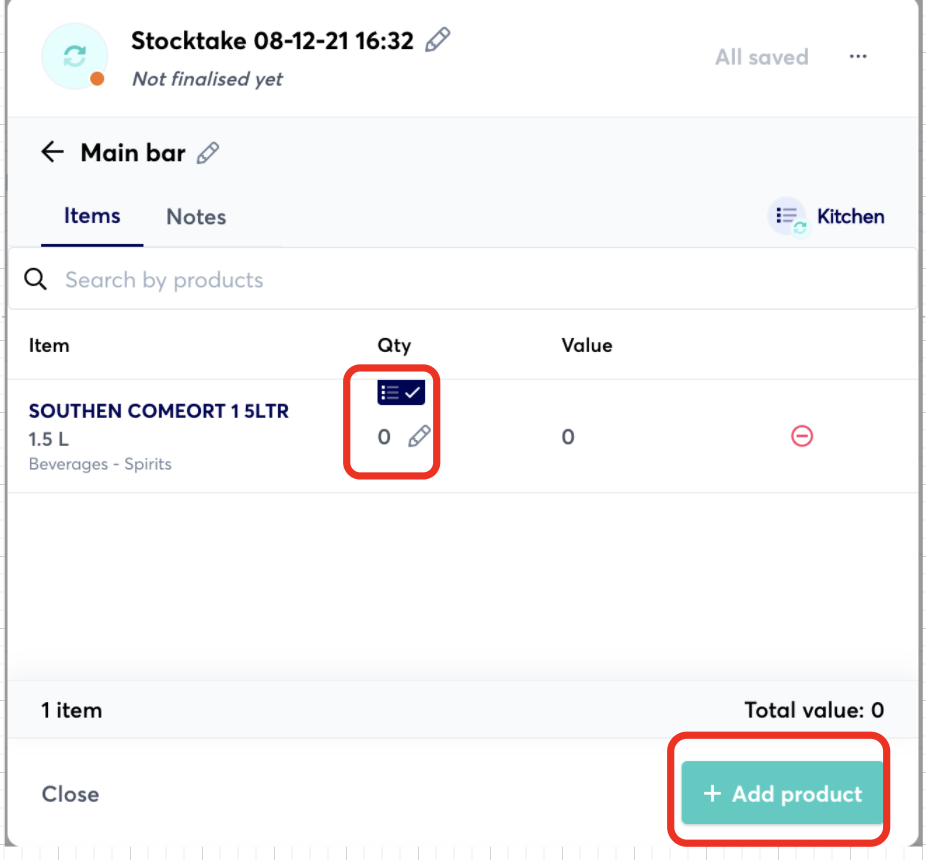
3. Adding products to your stocktake
There are two main ways to begin adding products to your stocktake. The first is by barcode scanning.
Here, select 'Add product' and simply scan the barcode of the item.
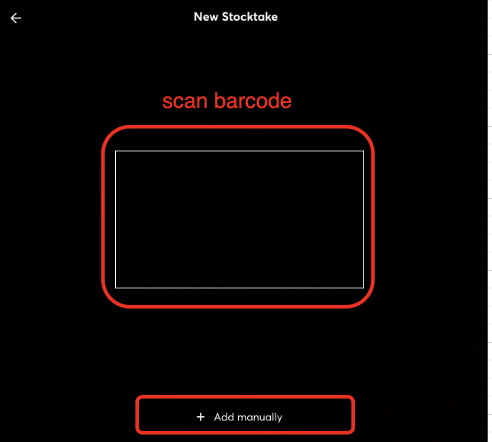
If the item doesn’t have a barcode, you can also add a product manually. Click 'Add manually' to search for the product within your database of items.
Note, only items that exist in your product database can be scanned or added manually. To add the items, go to ‘Products -> Items -> Add Item’
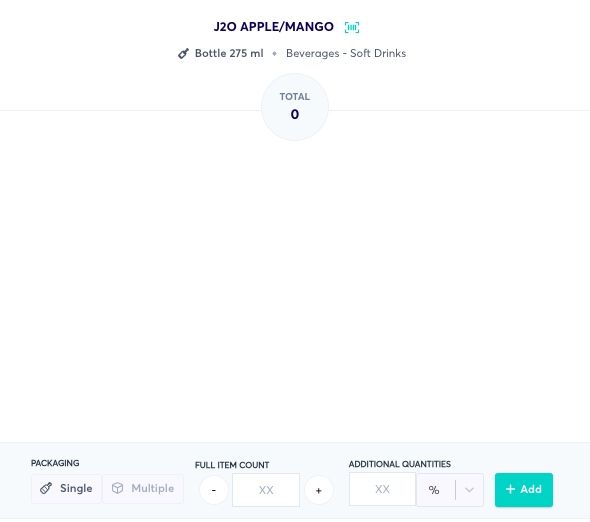
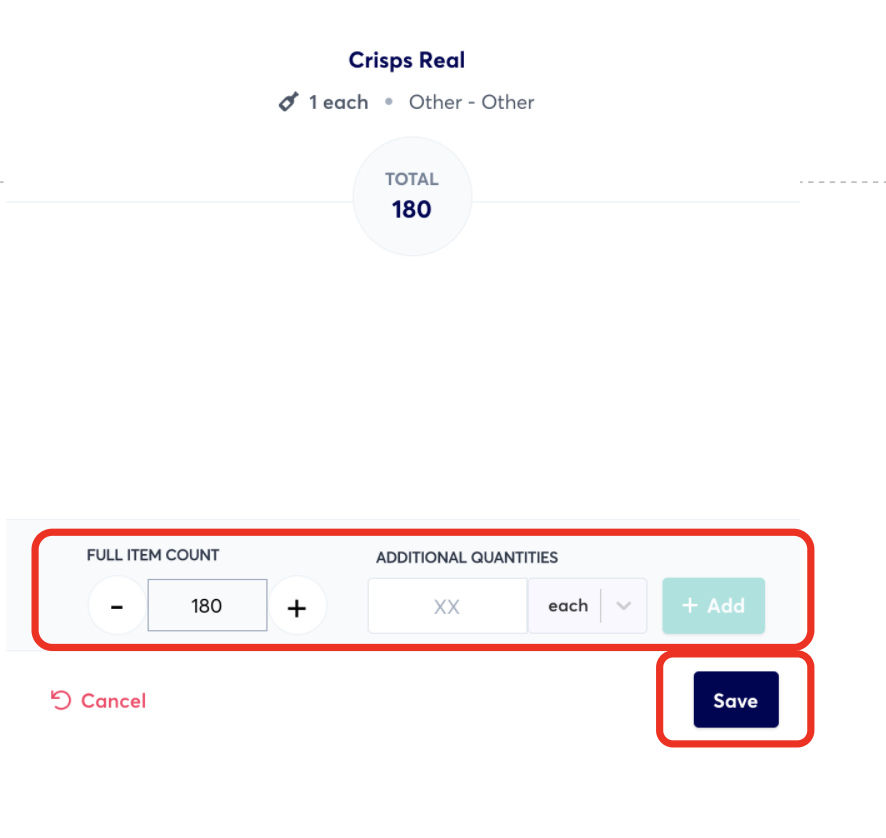
Once you have found your item you’ll need to add the quantity you’ve counted in full or part. For example, if you’ve found half of a bottle you would add '50%' in Additional Quantities and click the green 'Add' button.

When you’re happy you’ve added the correct quantity click 'Save & Next' to move onto the next item.
Continue this process until you’ve counted all of your items for that stocktake.
It is also important to note that if your product comes in a pack of multiples, you can also count it in that measure. The example shows below how easily you can flick between the two, this will save you time when counting large amounts of stock at one time.
3. Creating a regular stocksheet
Some stocktakes include regular counts of the same items, counted in the same order. In this instance it can be useful to use stocksheets. These sheets contain a default list of products that you would count for each stocktake.
To create a stocksheet select ‘Sheets’ and ‘New Sheet’.

You can rename the sheet by selecting the pencil icon next to ‘New sheet’ and entering your own name. Next, you’ll need to add all of the products within that stocktake, either by scanning the barcodes or adding the products manually.
Once all of your products have been added you can then select that stocksheet within your stocktake.
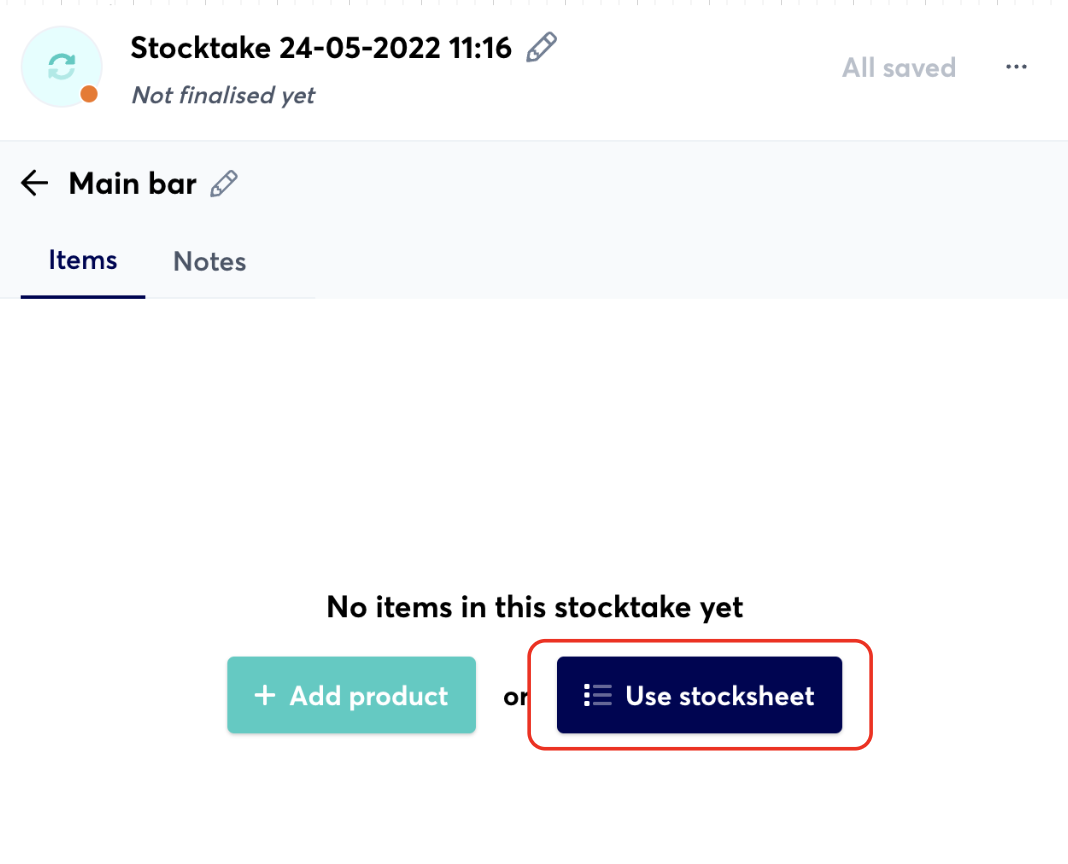
Create a new stocktake and select ‘Use stocksheet’.
Next, select the stocksheet you wish to use.
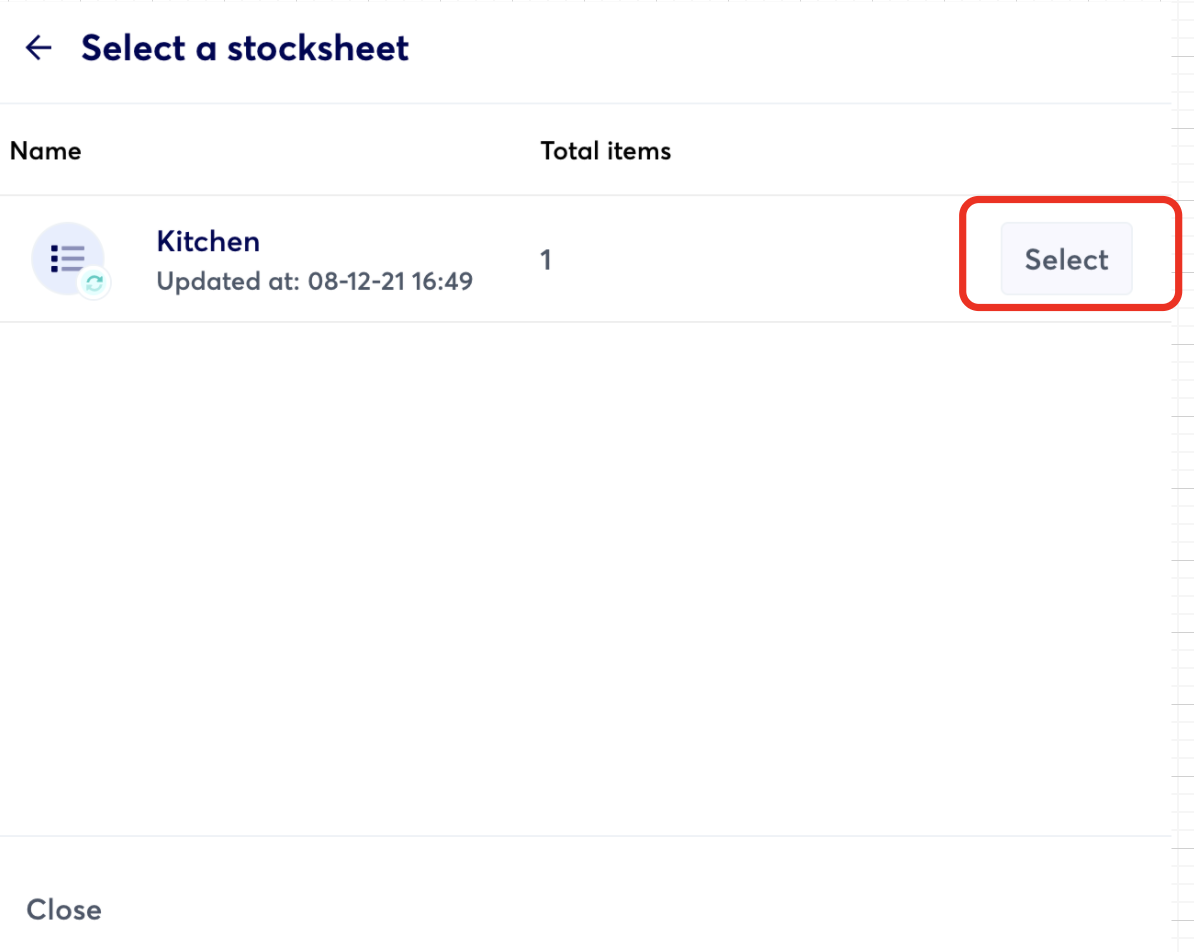
For each item you can then click on the pencil icon to enter the quantity of the item counted.
If there’s an item that is not on your stock sheet, click on the green button to ‘Add product’. Here you’re given the option to add new products by scanning the items or adding manually.
4. Complete the stocktake
When you have finished counting and are ready to submit the final stocktake, click ‘Complete’ for each area within the stocktake.
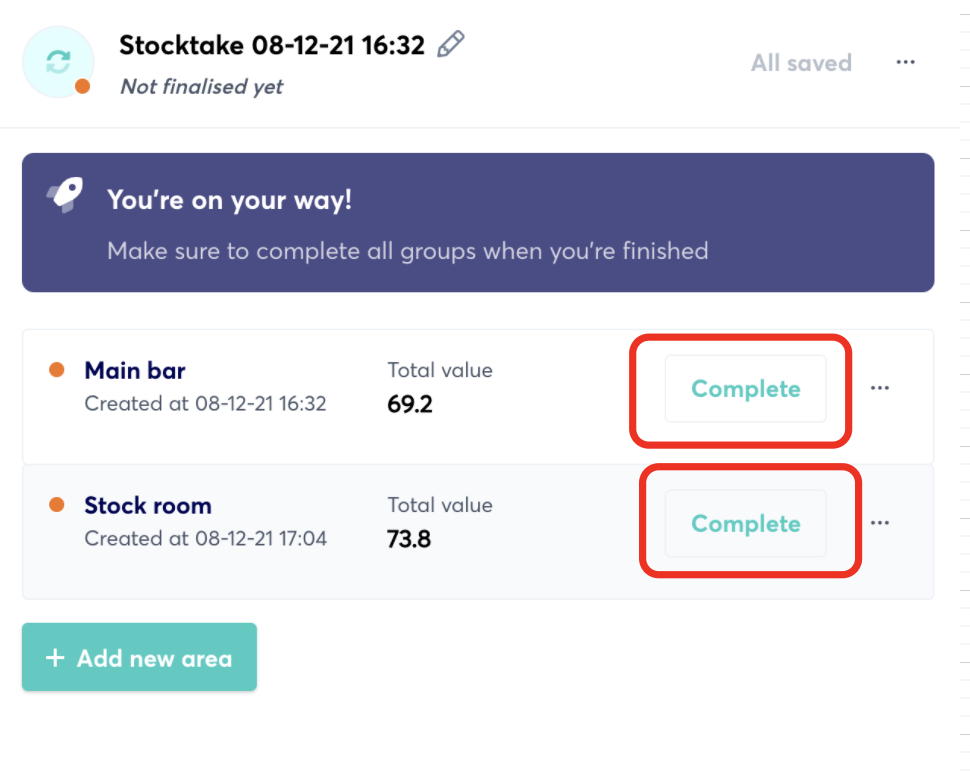
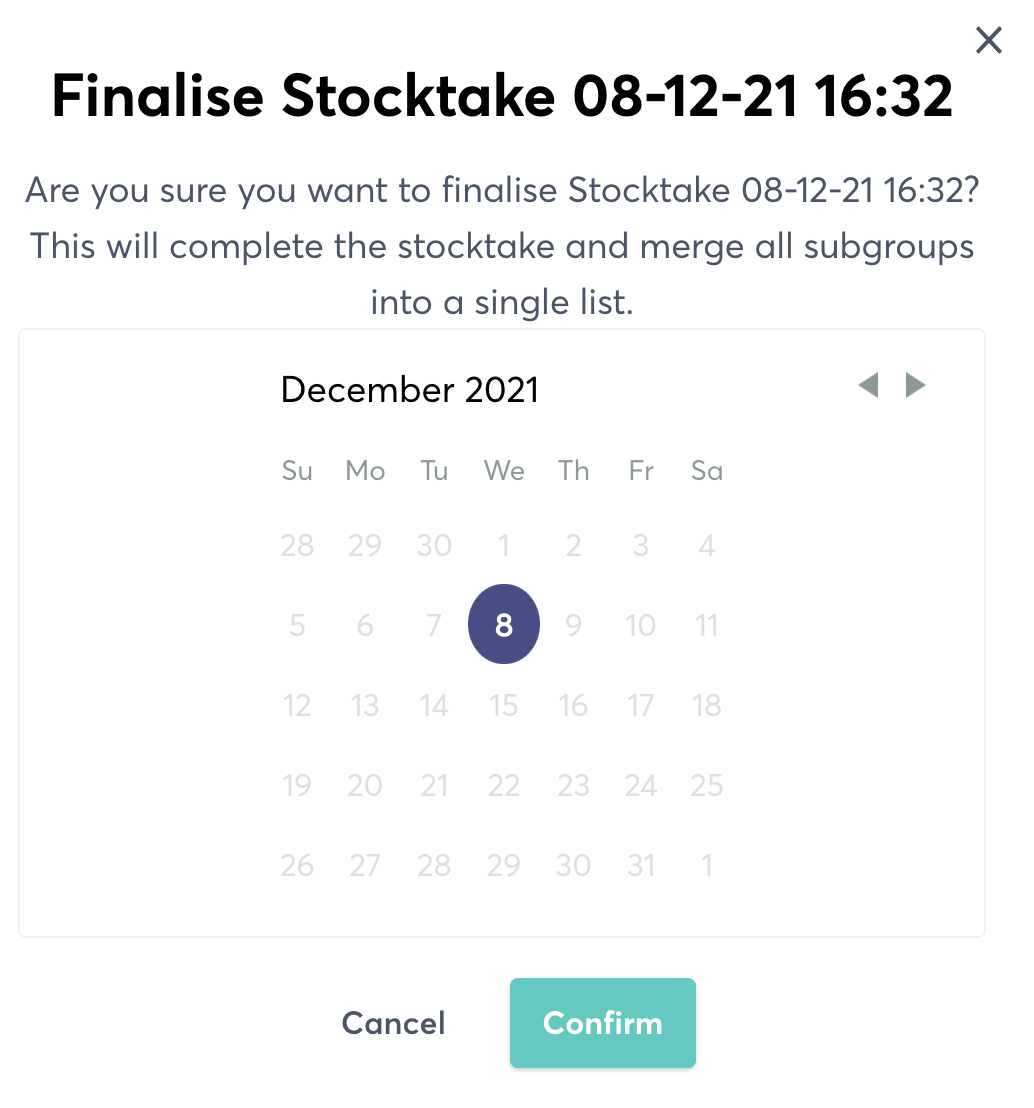
When all areas are ‘completed’ you’ll see a ‘Finalise’ button which you need to click on to finalise the full stock count. You can finalise the count once all areas have been ‘Completed’.
It is important to note that checking over your stocktake before finalising is crucial, this is where you can check if any errors have been made and you are able to correct them swiftly.

You’ll then be prompted to confirm the date of the stock take.
Once ‘Finalised’ you’ll see all areas ‘merged’ into one main count. This also provides the final value of items within the stocktake.
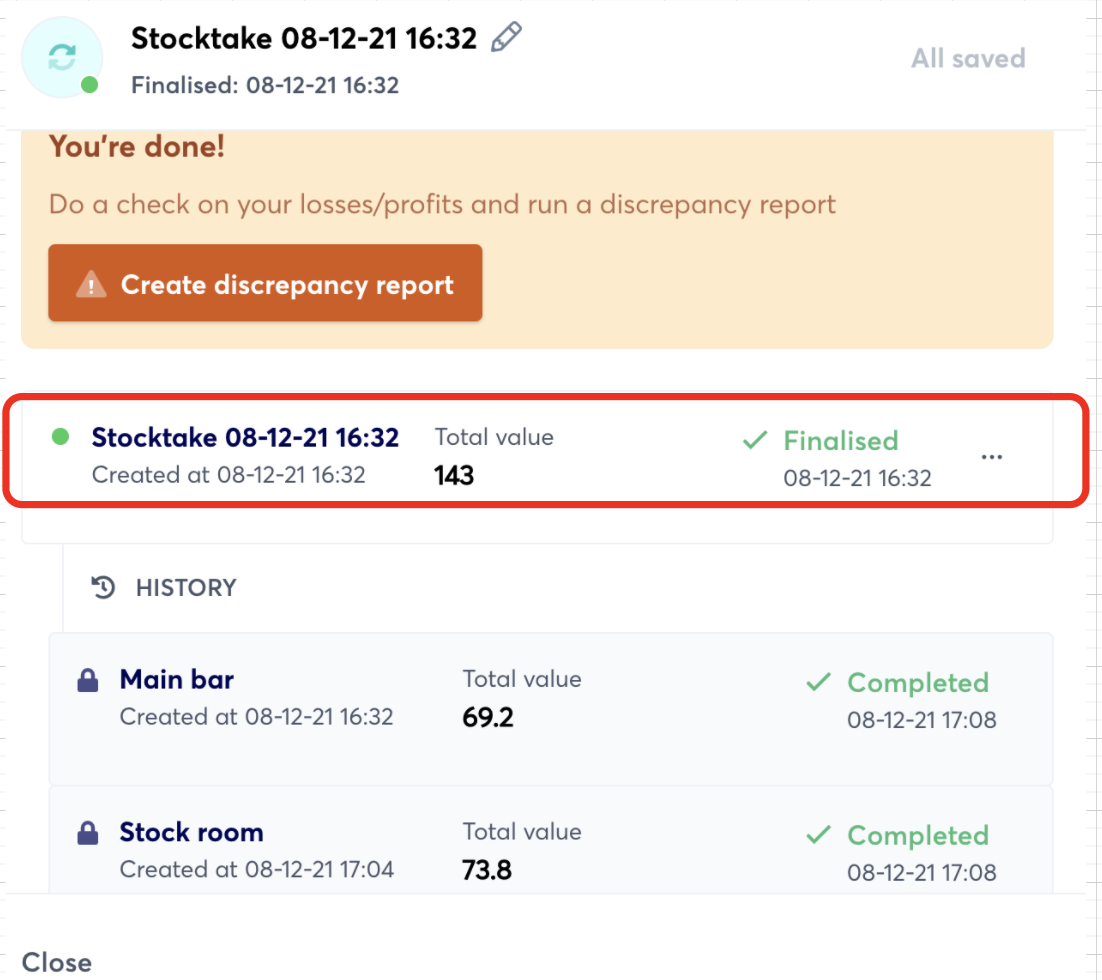
Should you wish to amend quantities of the items in the stocktake, simply click on the finalised stocktake. You’ll be given a ‘merged’ list of all items counted in the different areas, with the ability to edit the quantities.
For further help using growyze contact us at support@growyze.com.
How to Connect growyze to POS System Square
In this guide we’ll walk you through how to integrate your Square POS system with growyze so all of your sales and stock data lives in one place.
1. Open your company settings in growyze
Open your growyze account at app.growyze.com and log in. Once logged in, select your profile icon in the top right-hand corner and select ‘Company Settings’.
2. Set up your Square POS integration
Select ‘Integrations’ and here you’ll see the integration open for Square POS.
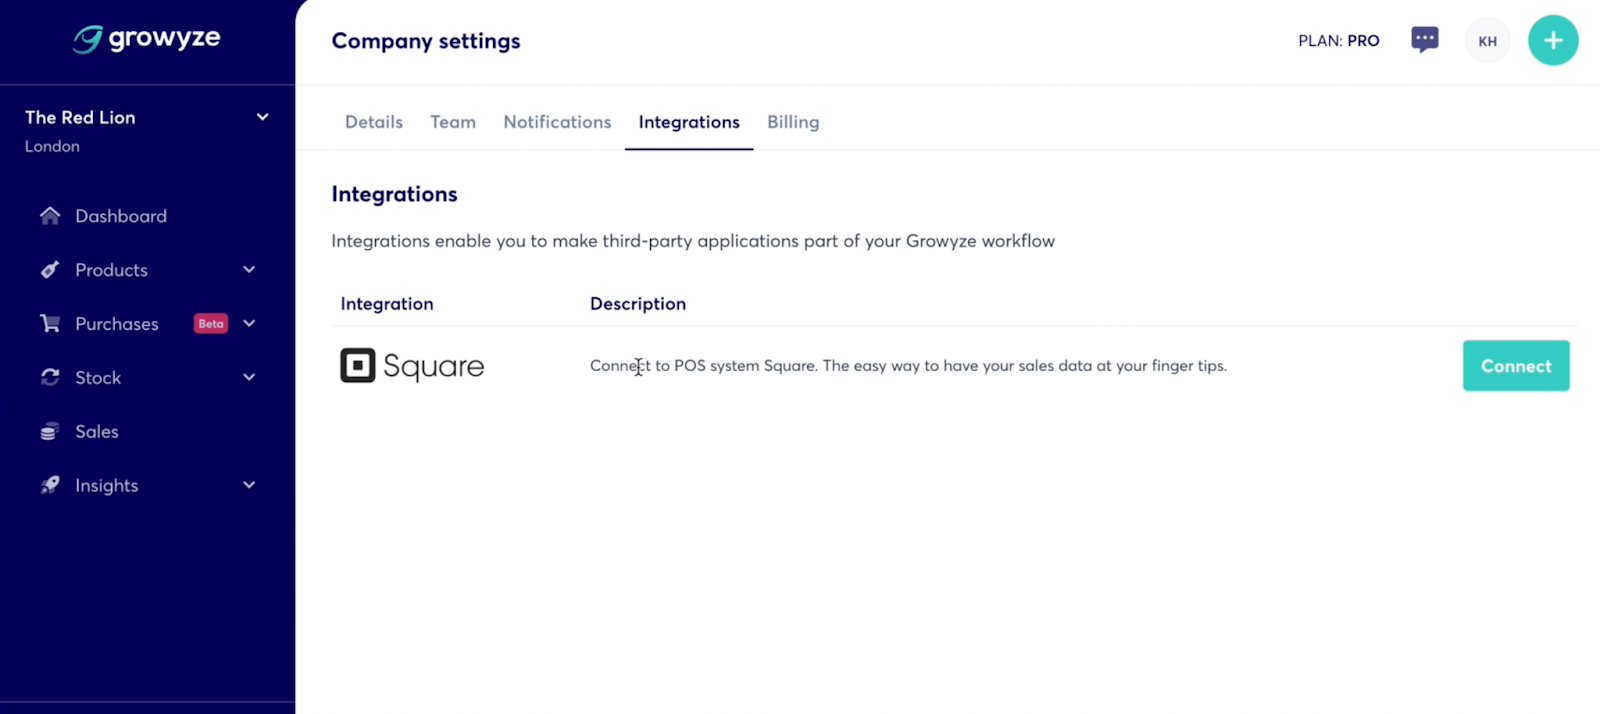
Select ‘Connect’ and this will redirect you to your Square sign-in page. Here you can enter your Square email address and password and click ‘Sign in’.
Once signed in you will be redirected back to growyze. Here you will see a list of options for the venues you have in Square.

Select the correct venue from the list and this will be connected to your growyze account. Once it’s connected you’ll see the green confirmation message letting you know your connection was successful.
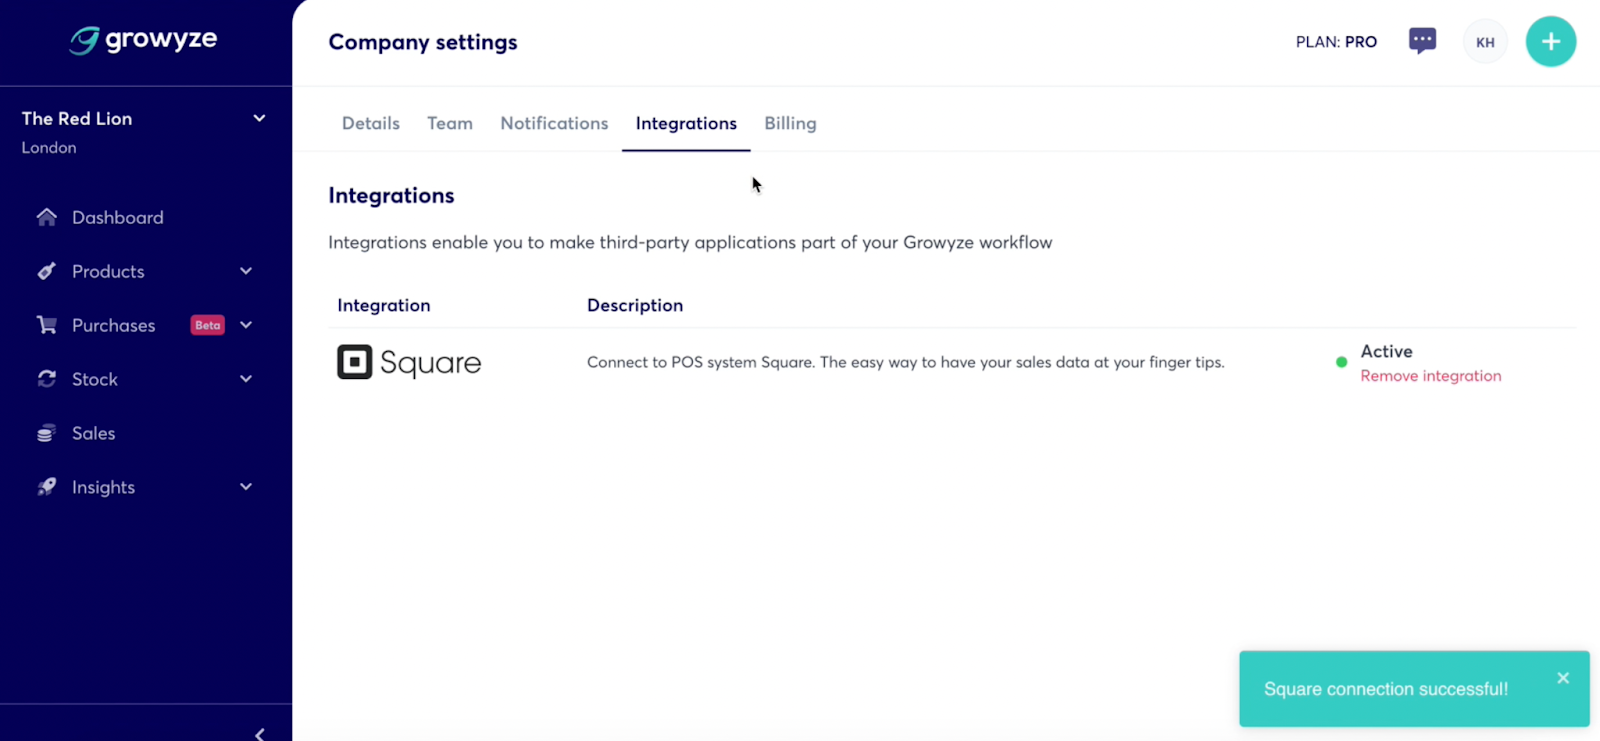
You can cancel the integration at any time using the ‘Remove integration’ button under the status.
For further help using growyze contact us at support@growyze.com
How to Create a Dish/Recipe from Another One
Go to Products -> Recipes & Dishes
From the dashboard you can click on the three dots on the right-hand side and choose ‘Duplicate’.
Proceed to Add/Edit the ingredients, costs and other information such as Method and Notes. You can add other files too.

How to Create a Stock Discrepancy Report
When you’re completing regular stock takes it should be easy to see what you’re missing. Enter: the growyze stock discrepancy report! Learn how to set up accurate stock discrepancy reports here:
Top tip: Before you can run a meaningful stock discrepancy report you’ll need to have ticked off all of the following:
- Completed at least two stocktakes
- Processed all delivery notes for the period of interest between the two stock takes
- Recorded all waste items for the same period
- Imported the sales file for the same period
- Completed all stock transfers (if multi-site venues)
If you have missed any of those steps it’s best to go back and complete them, otherwise you won’t be receiving an accurate discrepancy report.
How to create a stock discrepancy report
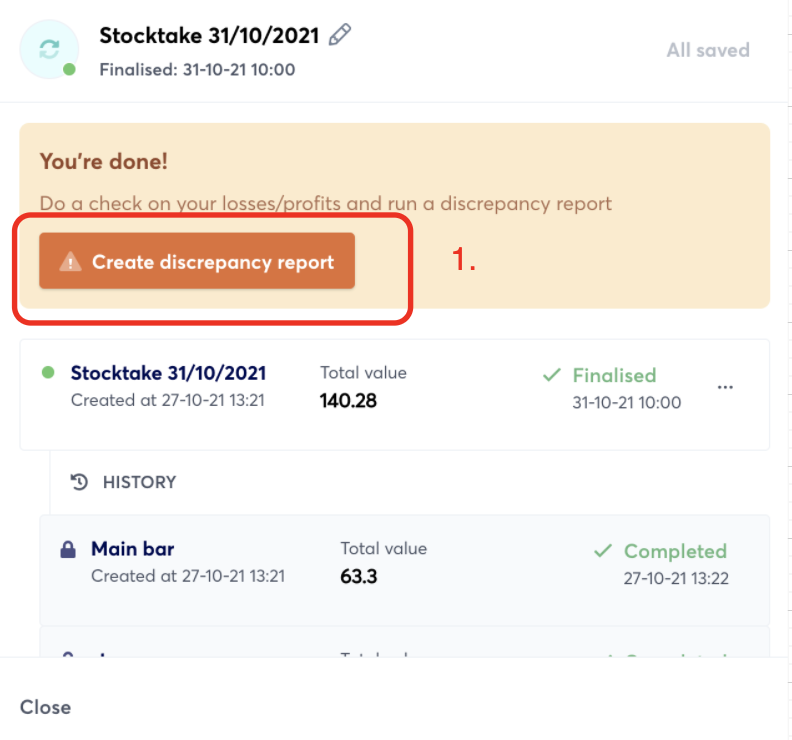
1. Finalise your stocktake(s)
Ensure that your stocktake(s) have been finalised. This means that all areas within the stocktake are ‘Complete’ and that the stocktake is marked as ‘Finalised’.
Once this is done, you will see the option to ‘Create discrepancy report’.
2. Create your discrepancy report
Click the button to create your discrepancy report. Next, you should choose the previous stocktake so that you can compare the period between that stocktake, and the most current stocktake you have just completed.
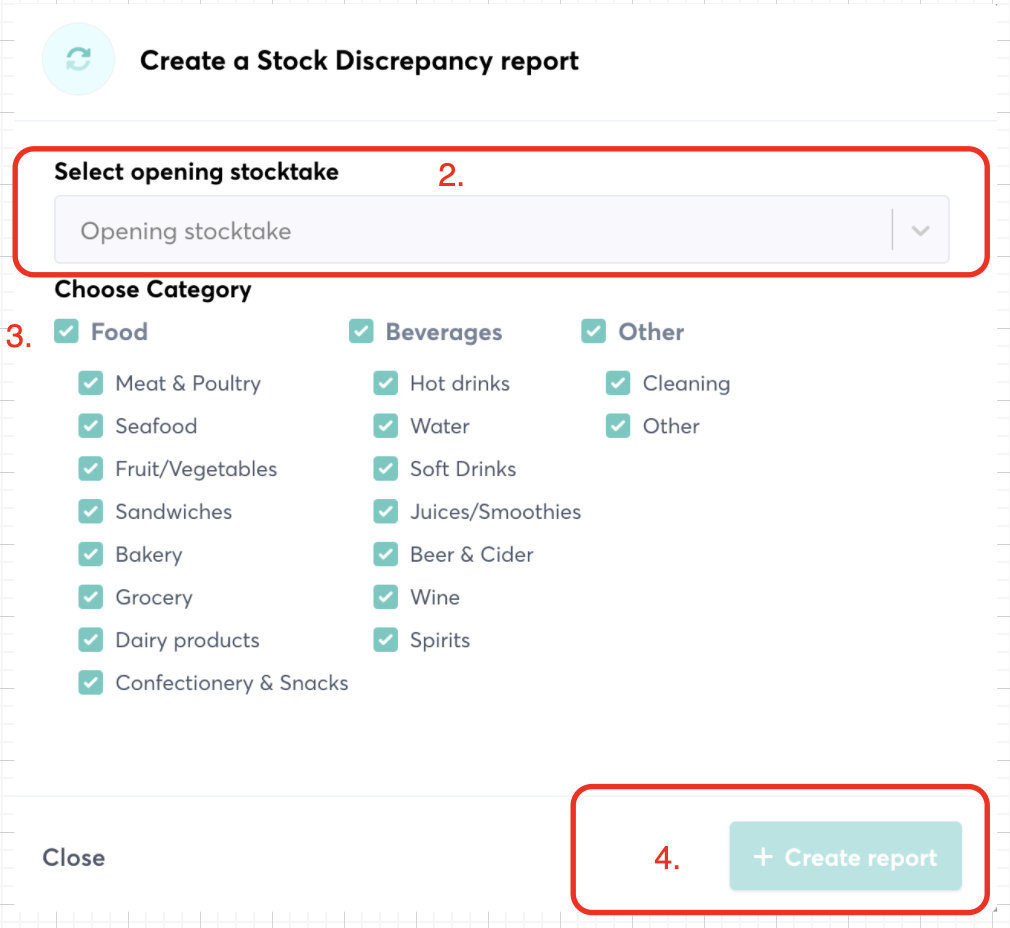
You can also then choose the categories you would like to include within the report and select ‘Create report’.
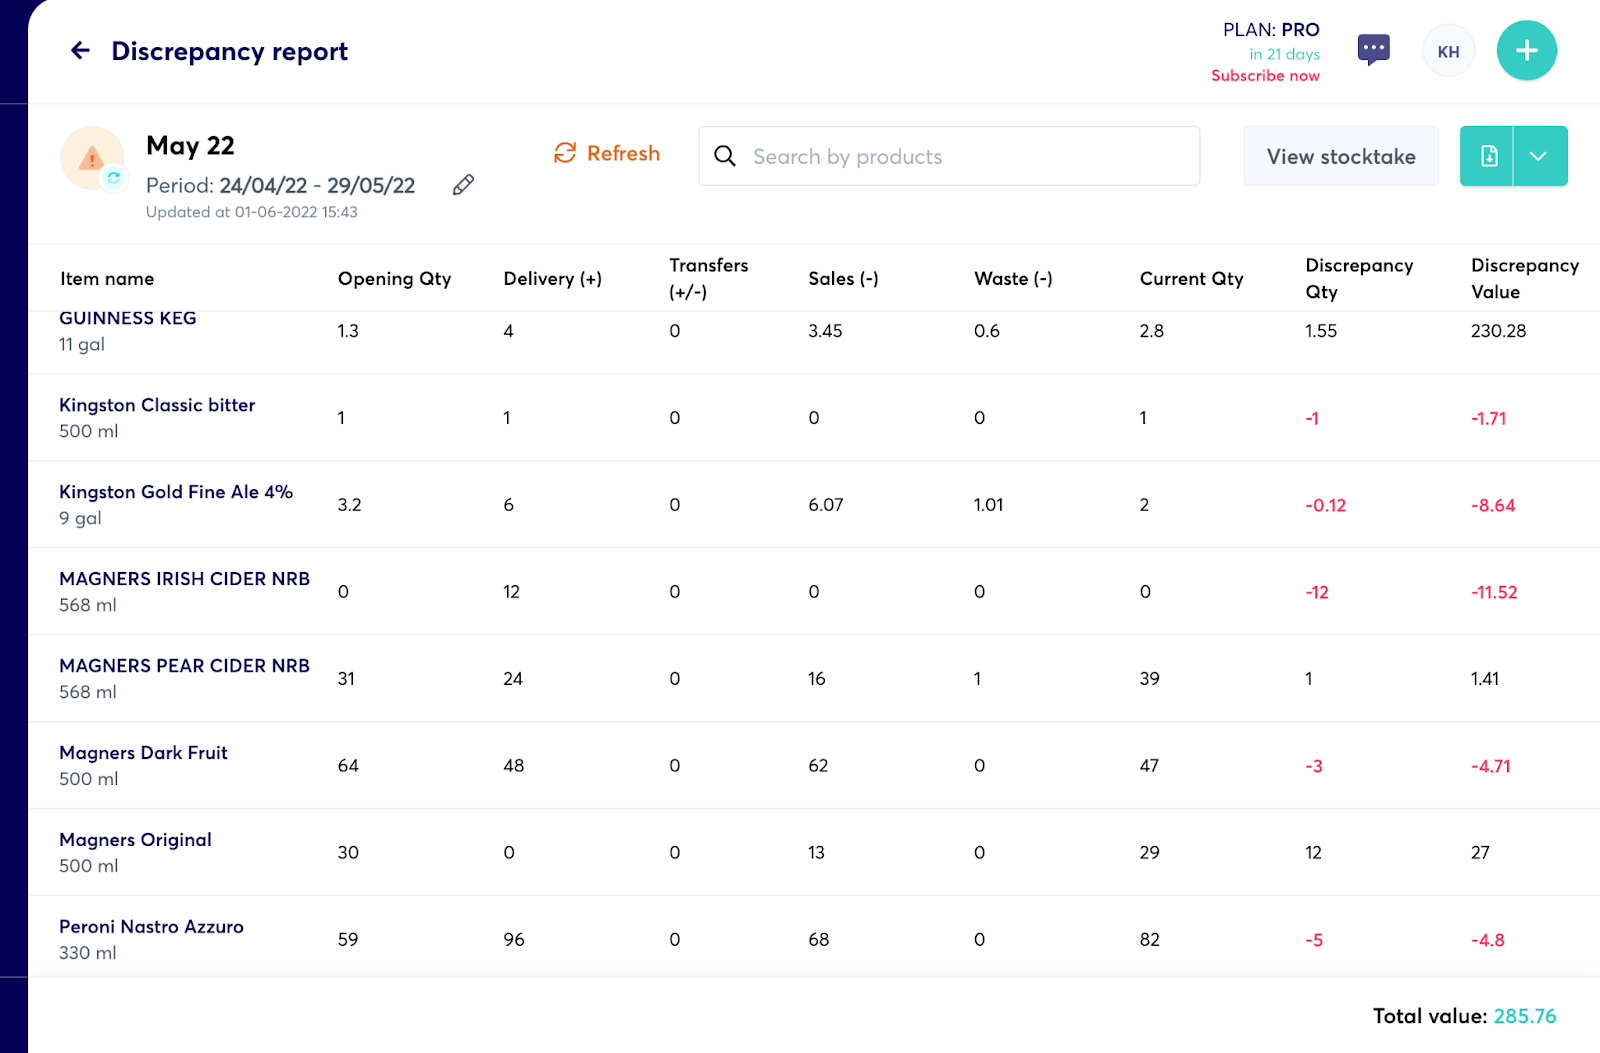
3. Review the report
Here you can easily see any discrepancies between the stock you opened with, how many items were delivered, sold or given to waste, and the current quantity. This lets you easily compare where items are missing or unaccounted for between stock takes.
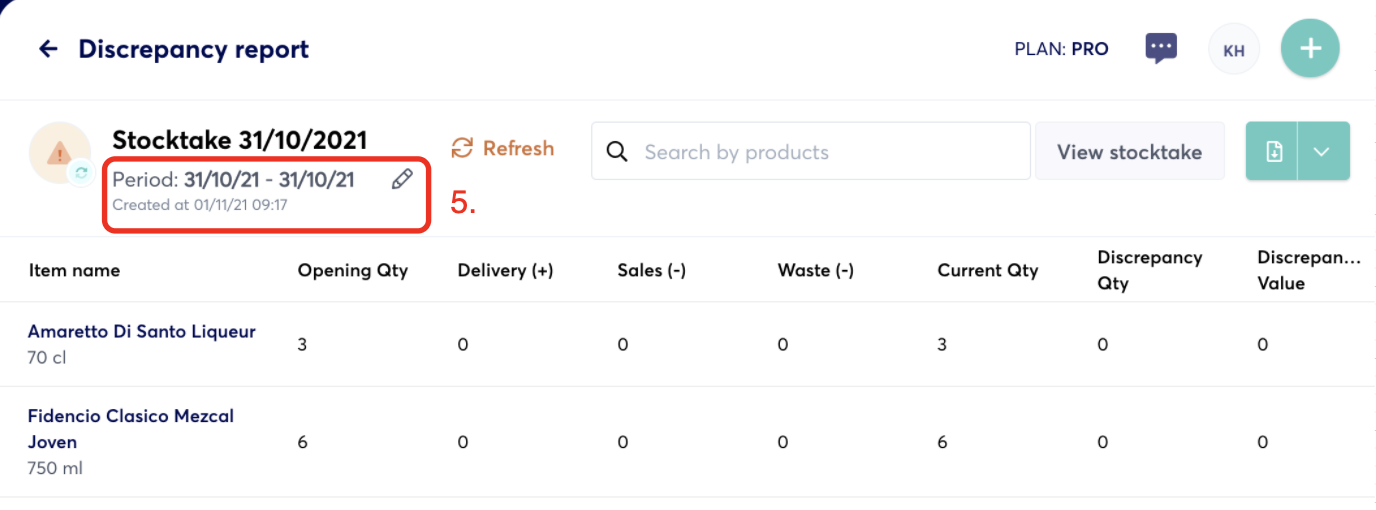
4. Edit the stock discrepancy report
Once you’ve run a stock discrepancy report you can go back and edit the criteria for the report.
To do this, click the pencil icon within the report and change the criteria, for example the period for reporting, or the categories included.
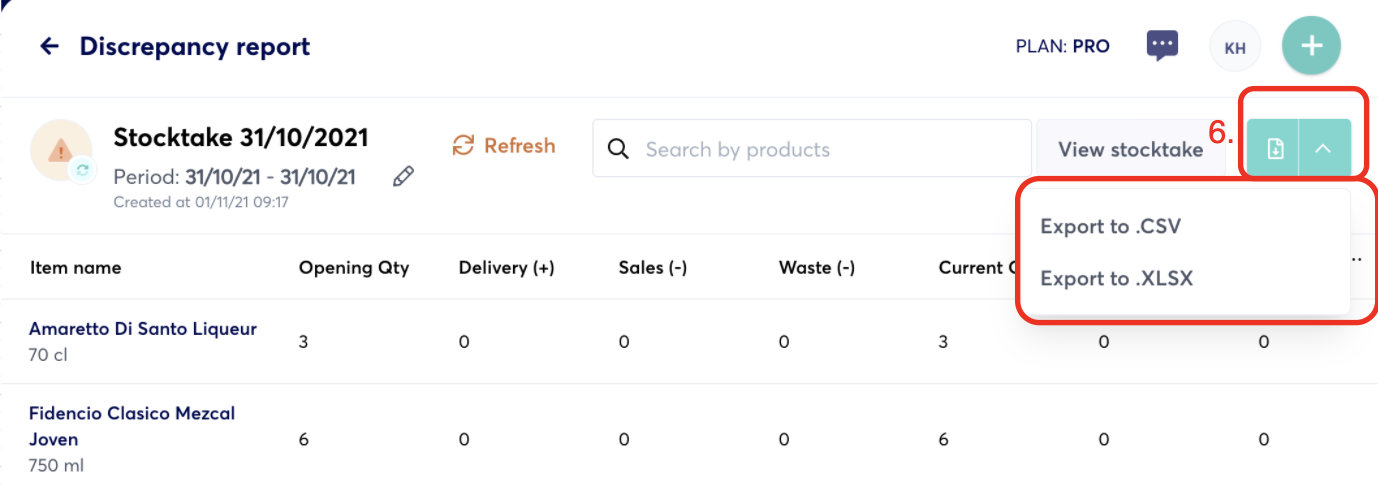
5. Export the stock discrepancy report
With growyze you can export your stock discrepancy report to CSV or Excel. Select the green download button at the top right of the report and choose your export format.
For further help using growyze contact us at support@growyze.com.
How to Edit a Stocktake after it’s been Finalised
Occasionally you may need to edit a stocktake or change an item’s quantity after the stocktake is finalised. Here’s how that works:
1. Open the stocktake report
Click ‘Stock’ then ‘Stocktake’ and ‘History’.

Here, you can choose the stocktake report you’d like to amend by clicking on the name of the stocktake.
Once the report is open you’ll see a list of all items counted during the stocktake.
2. Change a quantity
Now you can select the item you need to change the quantity for, and click on the ‘+” and ‘-’ icons next to it.
Change the quantity number to the correct amount, and click ‘Save’.
If you have already run a discrepancy report you can now refresh it to get the updated stock discrepancy value.
For further help using growyze contact us at support@growyze.com.
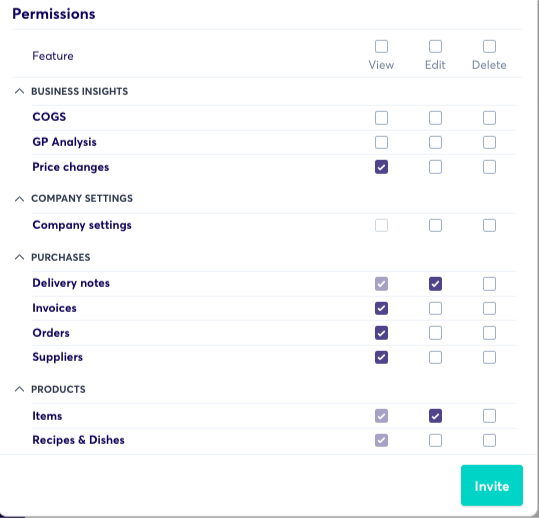
How to Edit User Permissions
In this guide we’ll cover how to assign permissions to team members with access to growyze.
Team members can be granted access to some, or all, growyze features.
For example you may want to keep the sales data inaccessible to certain members of the team, and with growyze you can do that.
1. Go to ‘Company settings’ -> ‘Team’
From the profile icon (top right) go to Company Settings -> Team
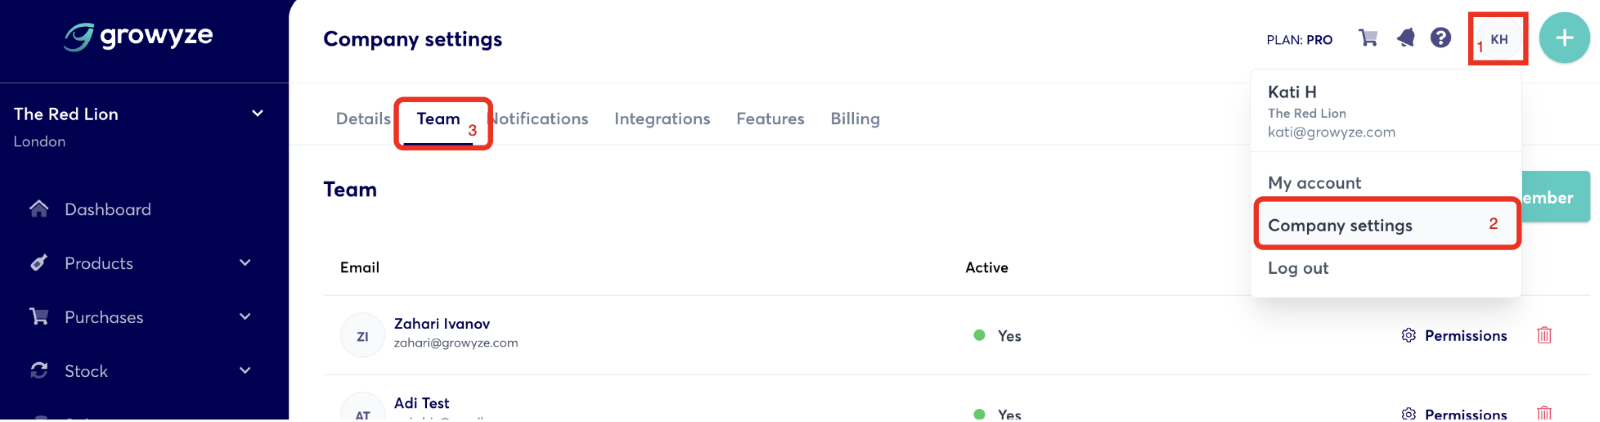
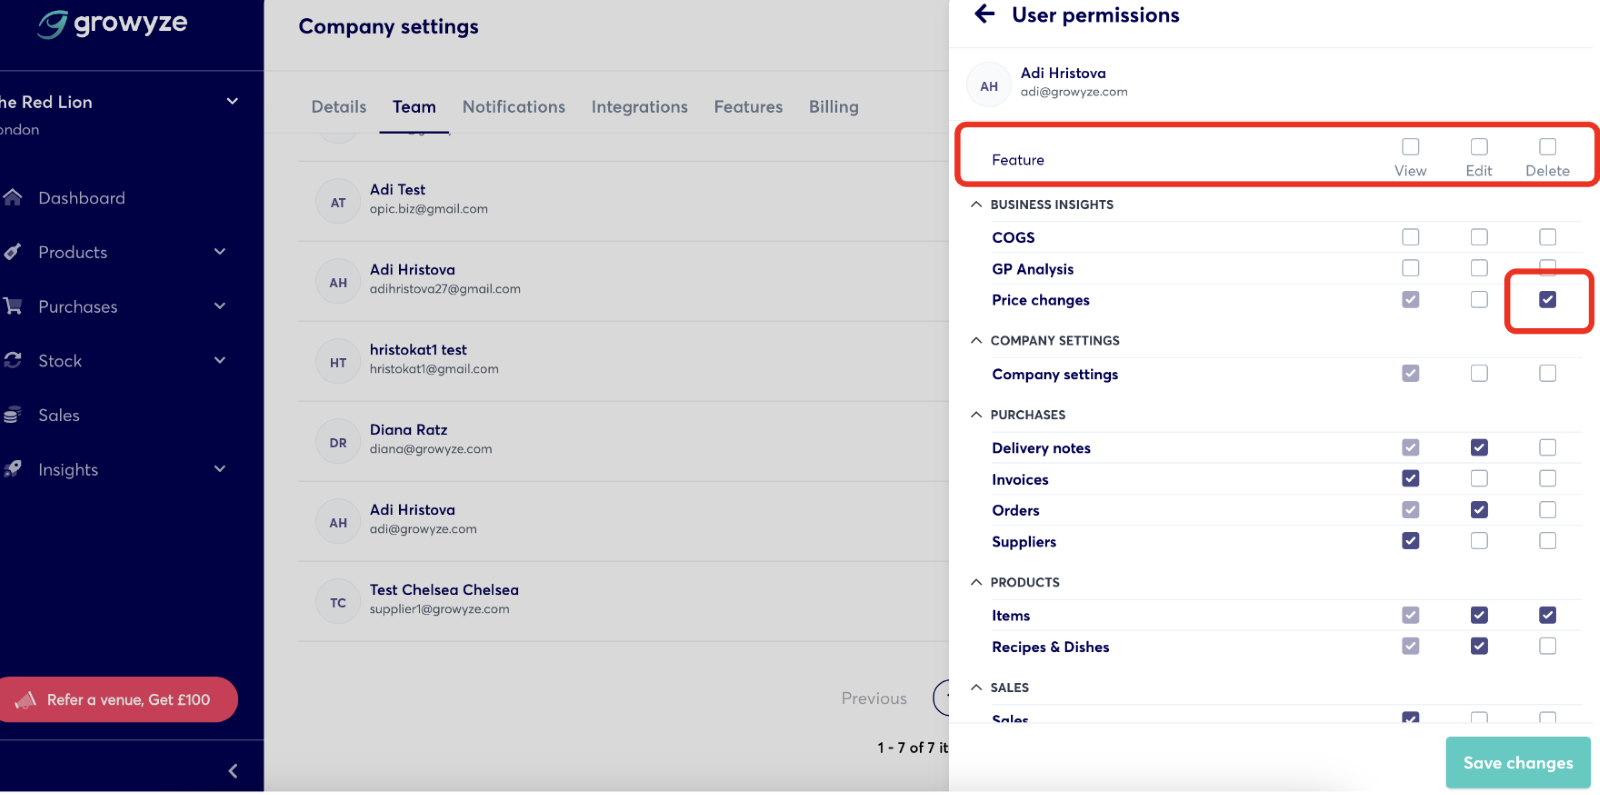
2. Assign / Edit User Permissions
Clicking on ‘Permissions’ next to the user allows you to give them view / edit / delete permissions for each feature within growyze. Should you wish to grant them All access, simply check View / Edit / Delete on the top row just opposite ‘Feature’
For further help using growyze contact us at support@growyze.com
How to Invite Your Team to Help Manage growyze
Doing stocktake is undoubtedly better together! Luckily, growyze makes it easy to invite your team and have them help to scan items without needing to add extra accounts.
Here’s how…
1. Log into your growyze account
Visit app.growyze.com and log in. Once logged in, select your profile from the top right-hand corner and select 'Company Settings'.
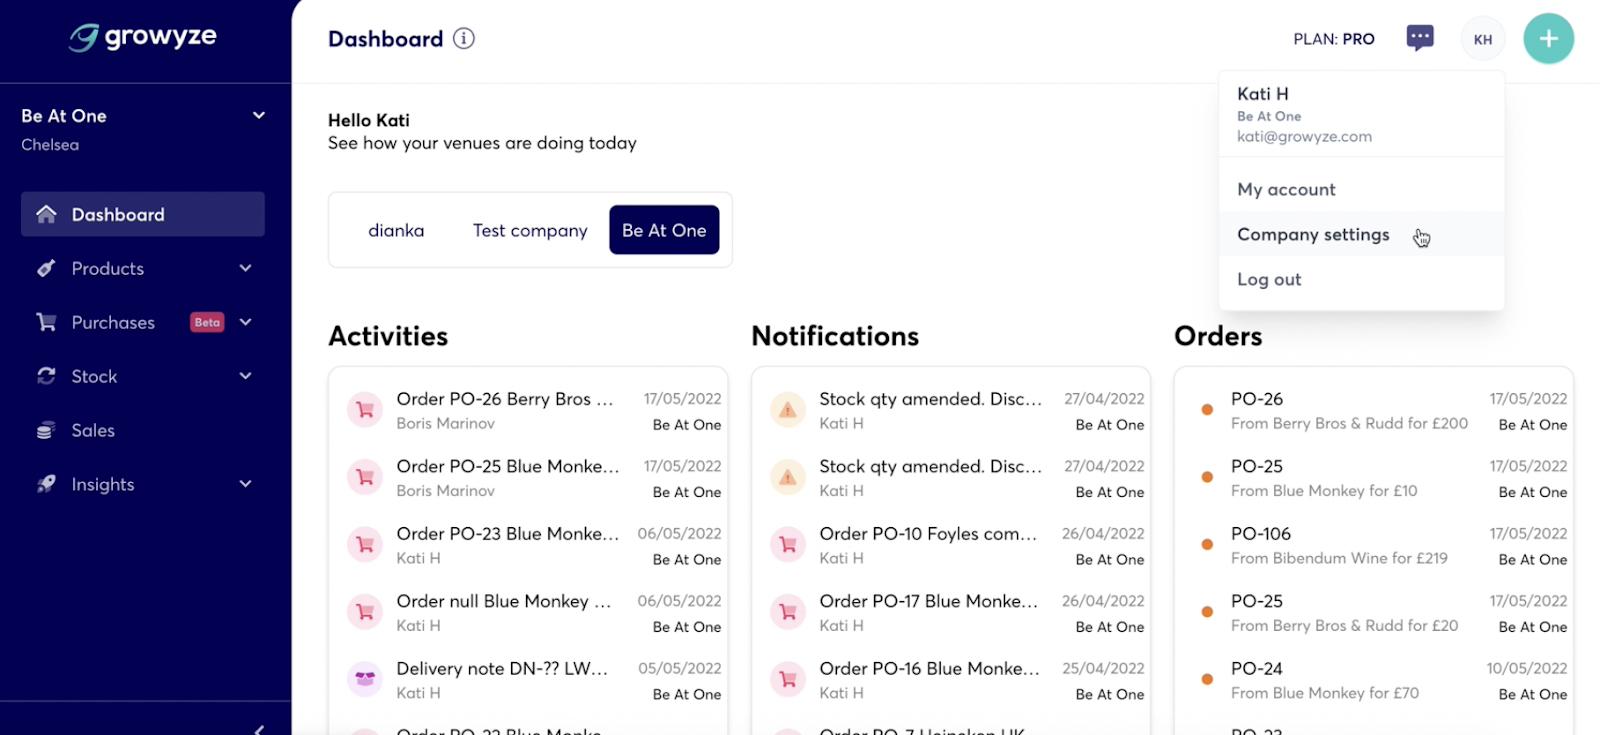
2. Invite team members
From here select 'Team' and choose 'Invite Team Member'.
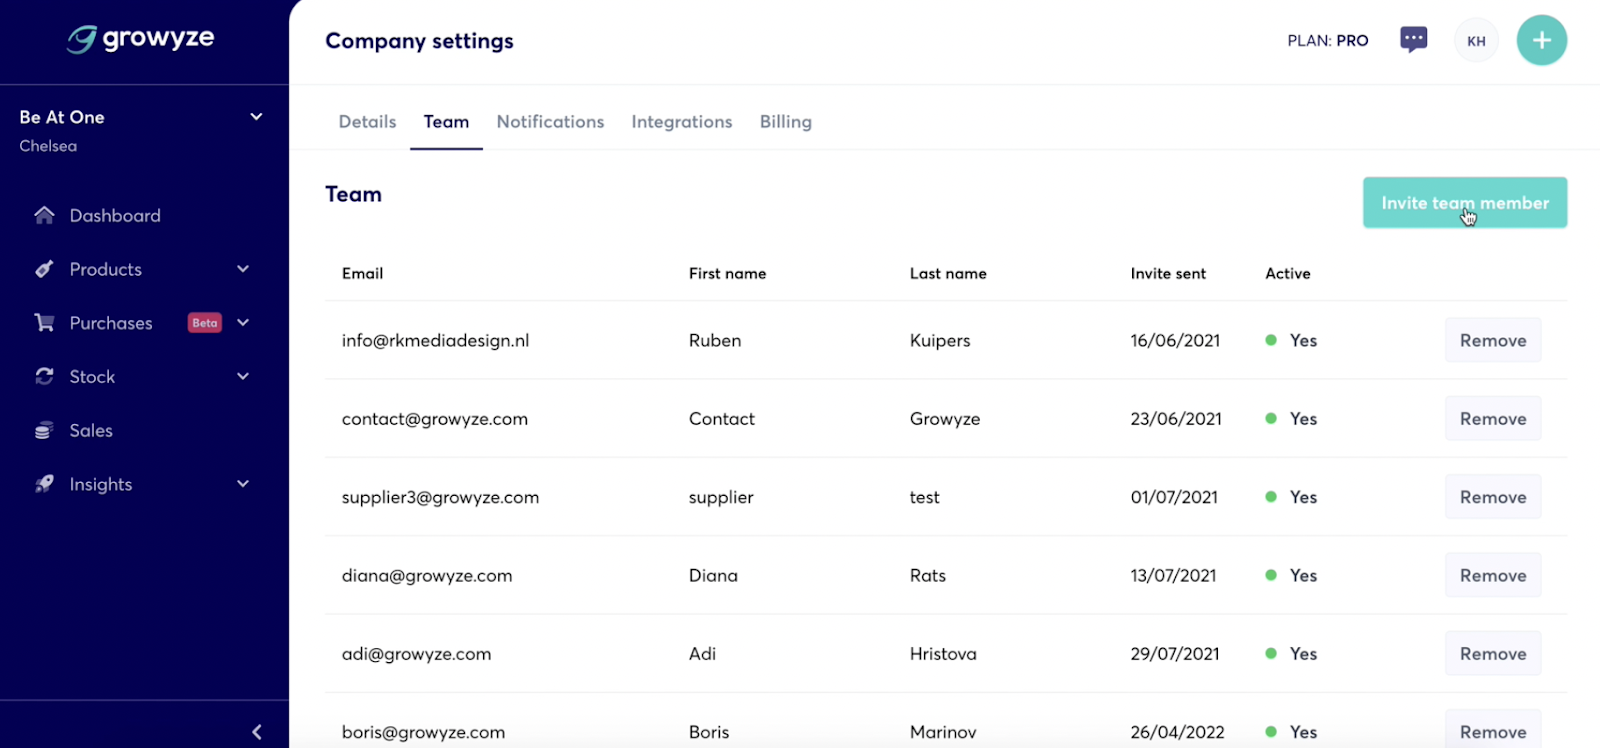
You can now invite a new user to your growyze account by entering their email address and selecting 'Invite'. This will send an email invitation to the user.
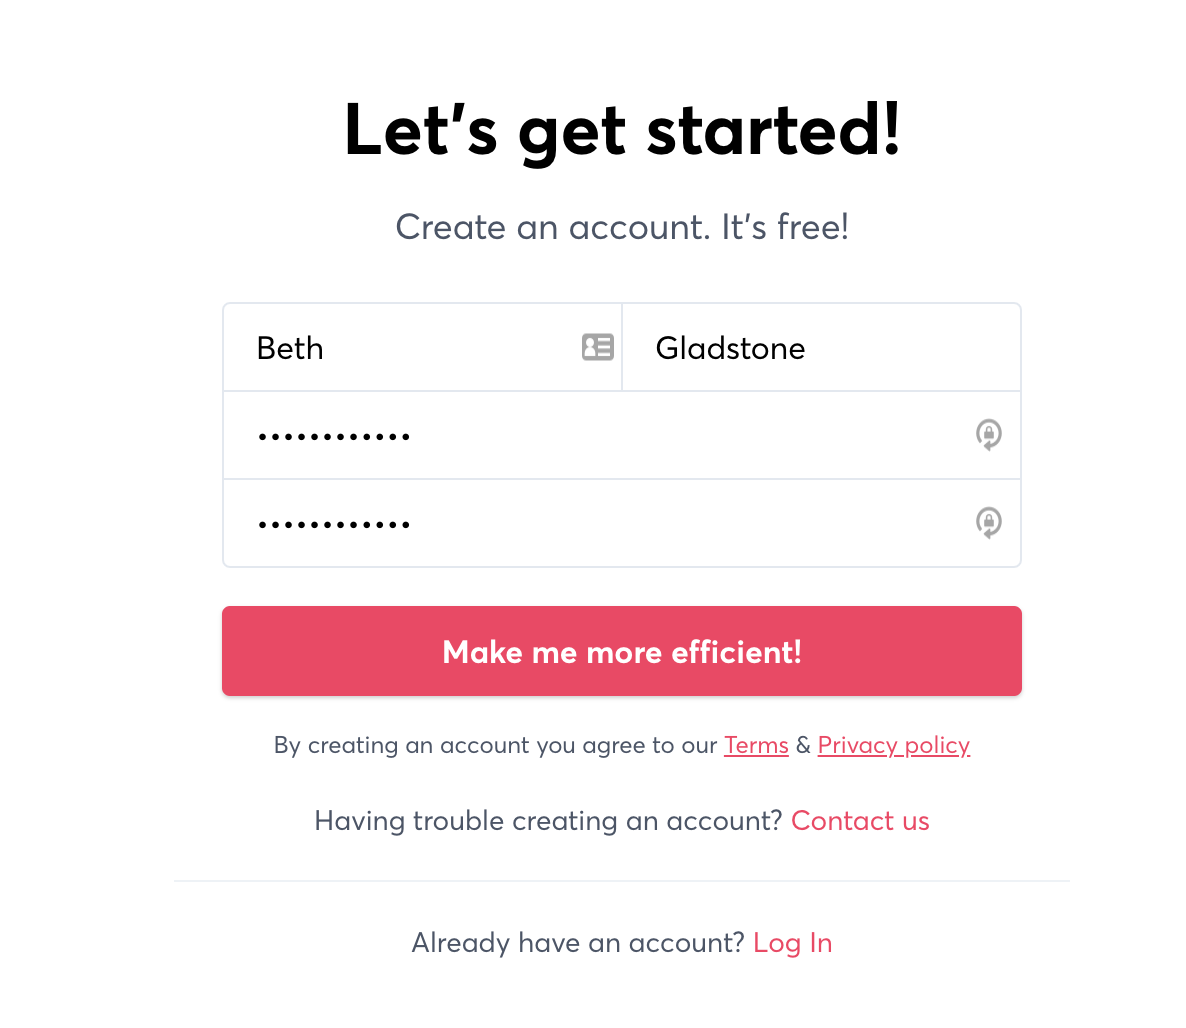
The team member will then receive an email with a joining link. Once the user opens the link they will need to enter their name and a password, giving them access to your account.
In the 'Team' panel you can also see which users have accepted the account invite using the 'Active' status column which will read 'Yes' or 'No'.
Once a team member has been added to the system you may now edit their permissions. To do so, click on the ‘Permissions’ button.

You have three main sectors of permissions ‘View’, ‘Edit’ and ‘Delete’. Each sector has the following permissions for your growyze account. You now have full control over your internal operations and can choose which of your team members have access to certain areas.
For further help using growyze contact us at support@growyze.com.
How to Mark Items as Same Items
When you have the same products supplied by a number of vendors you can ‘group’ these (mark as the same item) to ensure they are counted as ‘one’ in the stocktaking and reporting.
This can be done in 2 ways:
- Automatically - when you add the same barcode to the different products growyze will do the grouping automatically
- Manually - group the items yourself
1. Automatically
growyze will do the grouping when you add the same barcode to different products in the system.
1. Manually
To 'group' items manually - mark as same item:
- Go to Products -> Items
- Select the items you’d like to ‘group’ and click on the ‘Apply action’ button
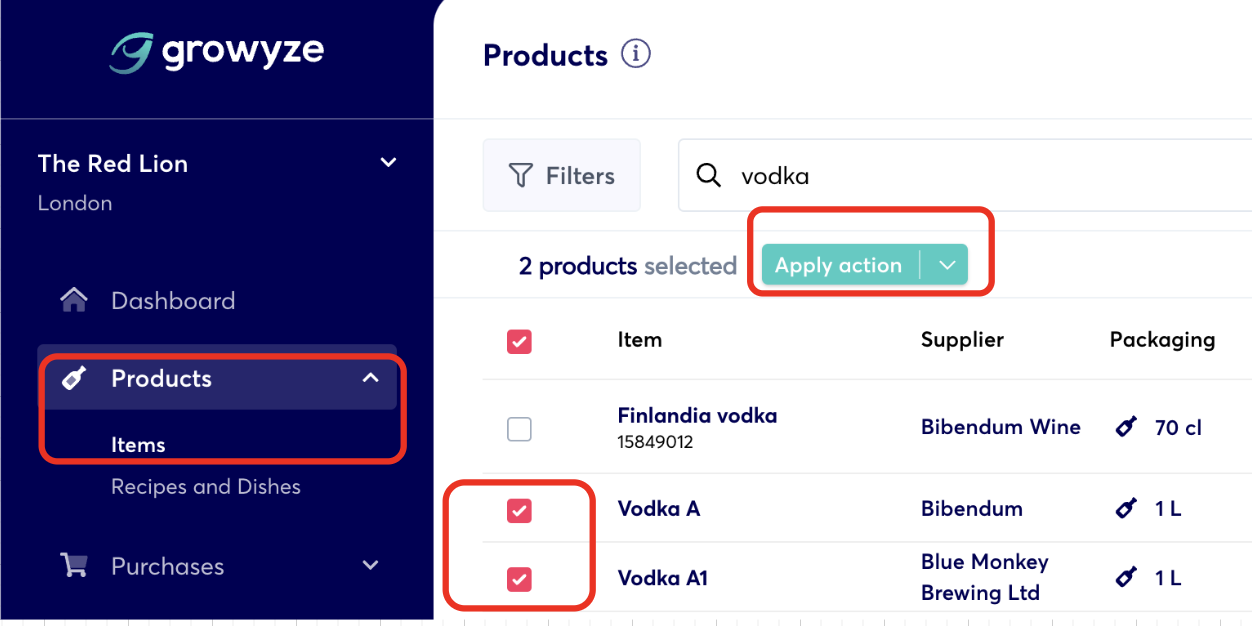
- Select ‘Mark as the same item’
Note: the items must be of the same size & measure (ie 1L, 70cl etc)

- You’ll then be asked to choose the ‘Preferred supplier’
- Then click on ‘Mark as same’
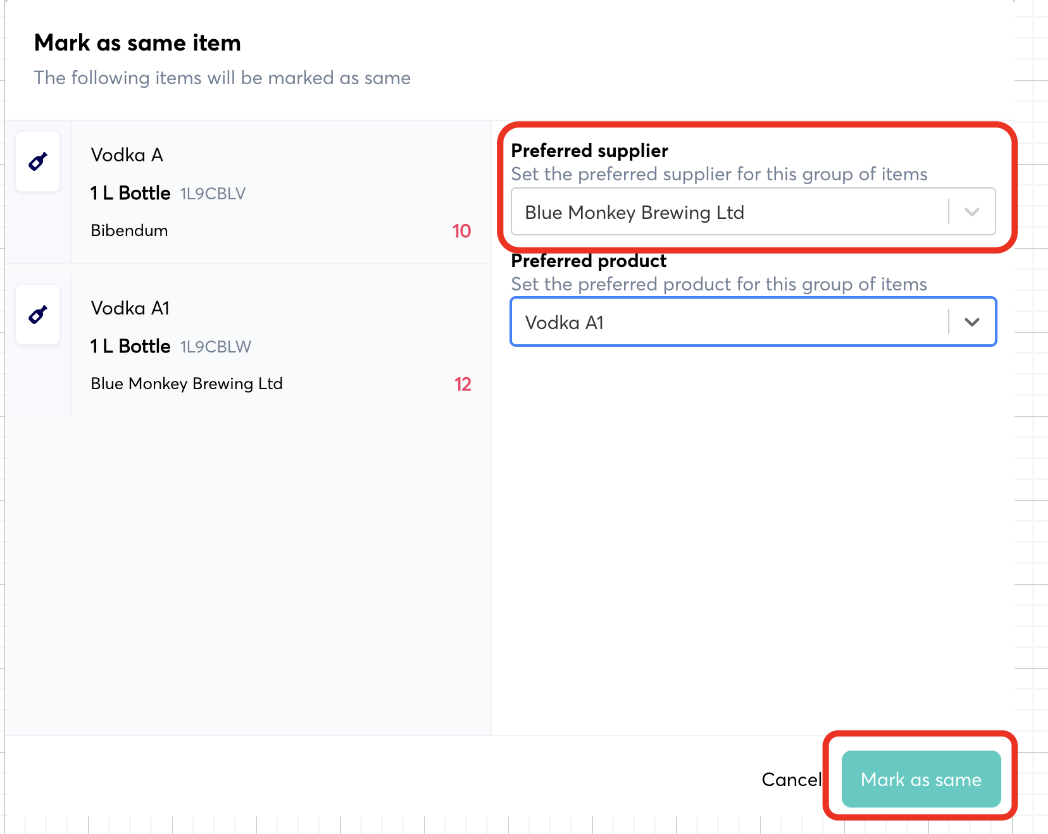
This will now ensure this product is treated as the same item and it will be reported as such in your stock reports.
Note: the cost of the product in the reports will be as per the ‘Preferred supplier’
For further help using growyze contact us at support@growyze.com
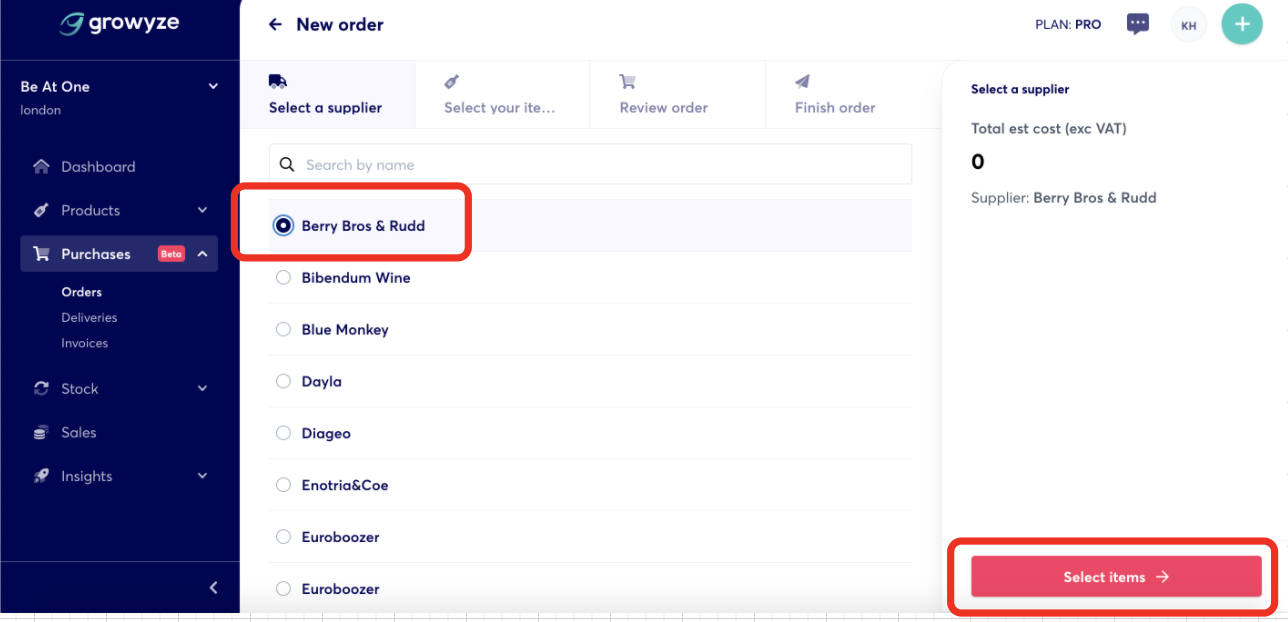
How to Place Orders in a Few Simple Steps
PLACING ORDERS IN FEW SIMPLE STEPS
1. Go to Purchases -> Orders -> New order
2. Choose your supplier and click on ‘Select items ->’ bottom right
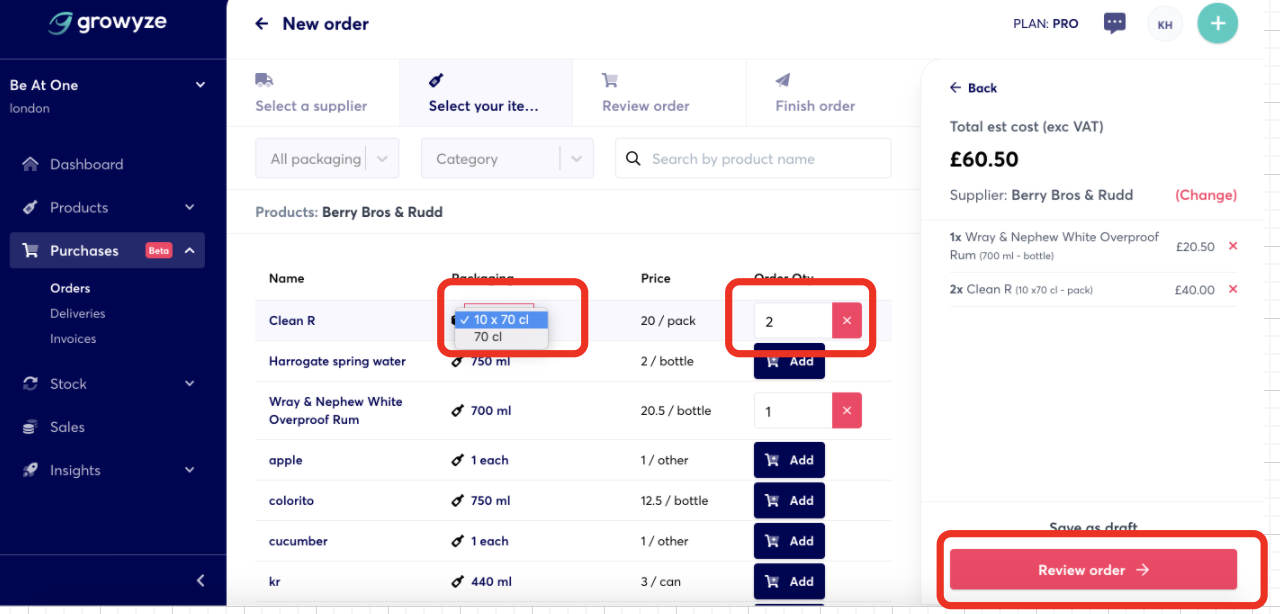
3. Choose the size (single or in a case), and the quantity you want to order for all items. Then click on ‘Review order ->’
4. Have a look through the order to see if you’re happy with it. Add a note to the supplier if you want and click ‘Place order ->’.
NOTE: If for some reason you don’t want to email this order to the supplier, untick the ‘Email supplier’ box.

5. Once the order is placed you’ll see the below screen. An email will be sent to the supplier with a copy of it sent to you for your reference

How to Process and Validate Invoices
Inside growyze you have three-way validation to help you reconcile what you order, what gets delivered and what you pay for. This helps you to spot discrepancies which could affect your final figures, or create stock take issues. In this guide, we’ll show you how to process and validate invoices.
Top Tip: To process and validate an invoice you need to have entered the order and the delivery details that match the invoice.
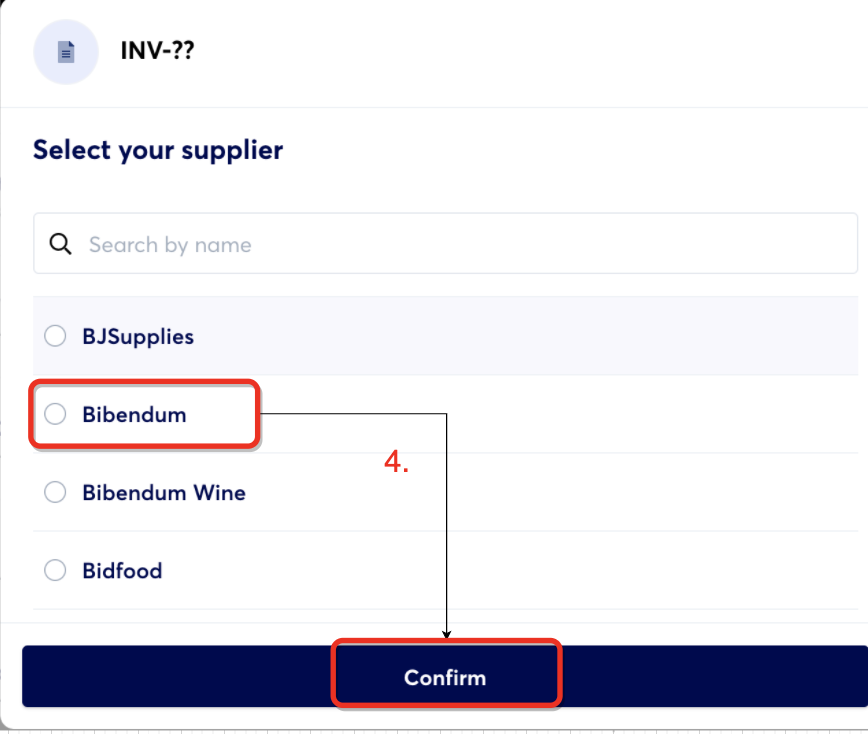
1. Add a new invoice
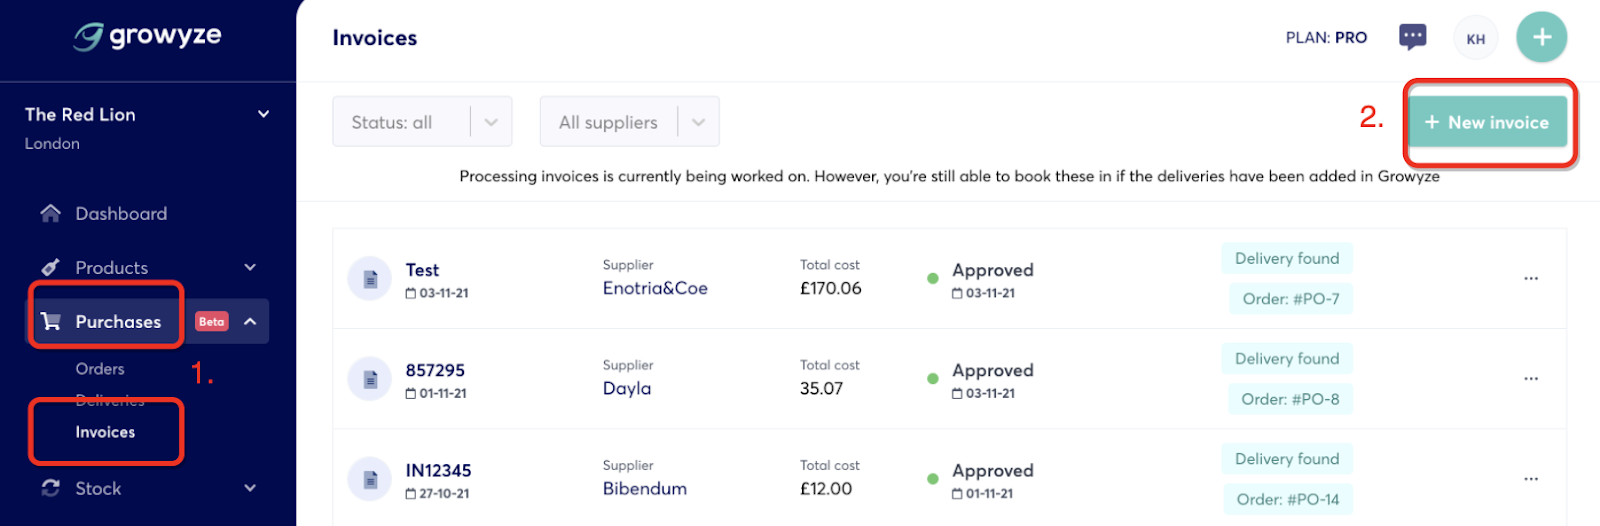
Choose ‘Purchases’ and ‘Invoices’ from the left-hand menu. Then choose ‘New invoice’.
Next, select ‘Add manually’.

Choose the supplier and select ‘Confirm’.
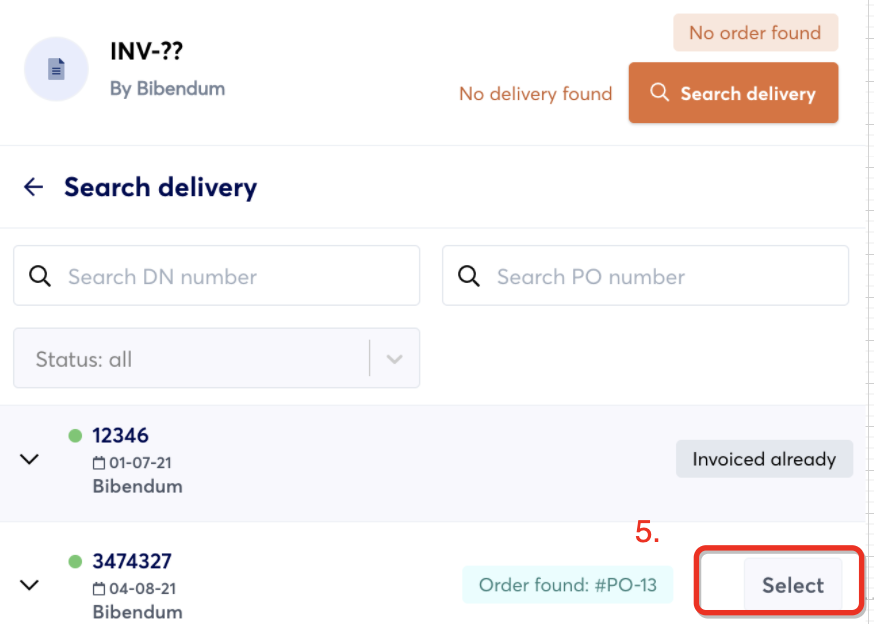
2. Match the invoice to the correct delivery note
Now you’ll see a list of all delivery notes you have entered for this supplier.
There are two types of delivery notes:
- ‘Already invoiced’ - these are delivery notes which have been reconciled
- ‘Select’ - this will provide you with a list of delivery notes that haven’t yet been attached to an invoice
Find the correct delivery note from the list and choose ‘Select’.
3. Process the invoice
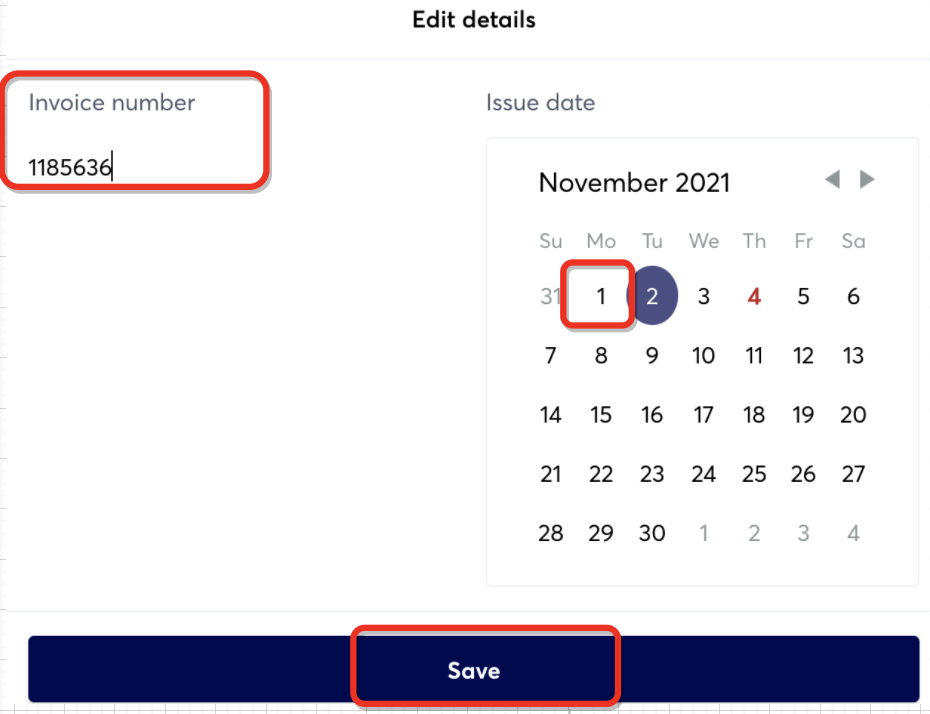
Once you have matched the correct delivery note, click on the edit button to enter the invoice number and date. This is important as it will ensure the invoice has been assigned correctly and that you have all of the details stored.
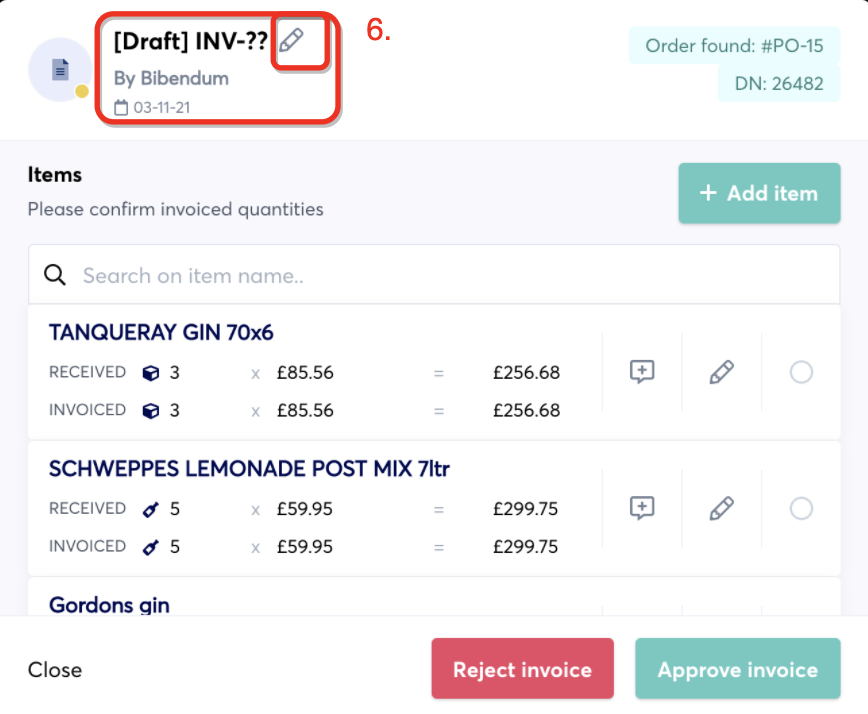
Here you can enter the invoice number and the invoice date.
Now you can scroll to the end of the invoice, and check if the Expected Total matches the Invoice Total as provided on the actual invoice. You should compare the Net total.
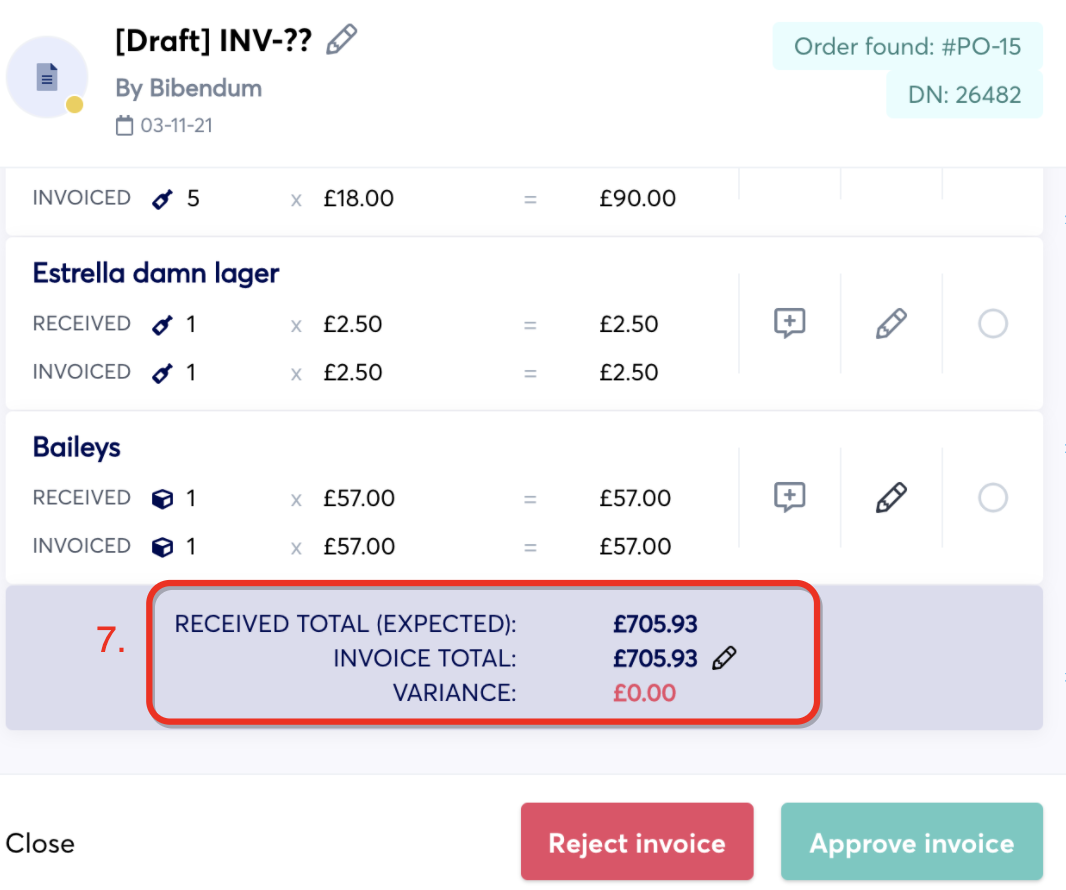
This allows you to spot any discrepancies between the amount of items received, and the amount you have been invoiced for.
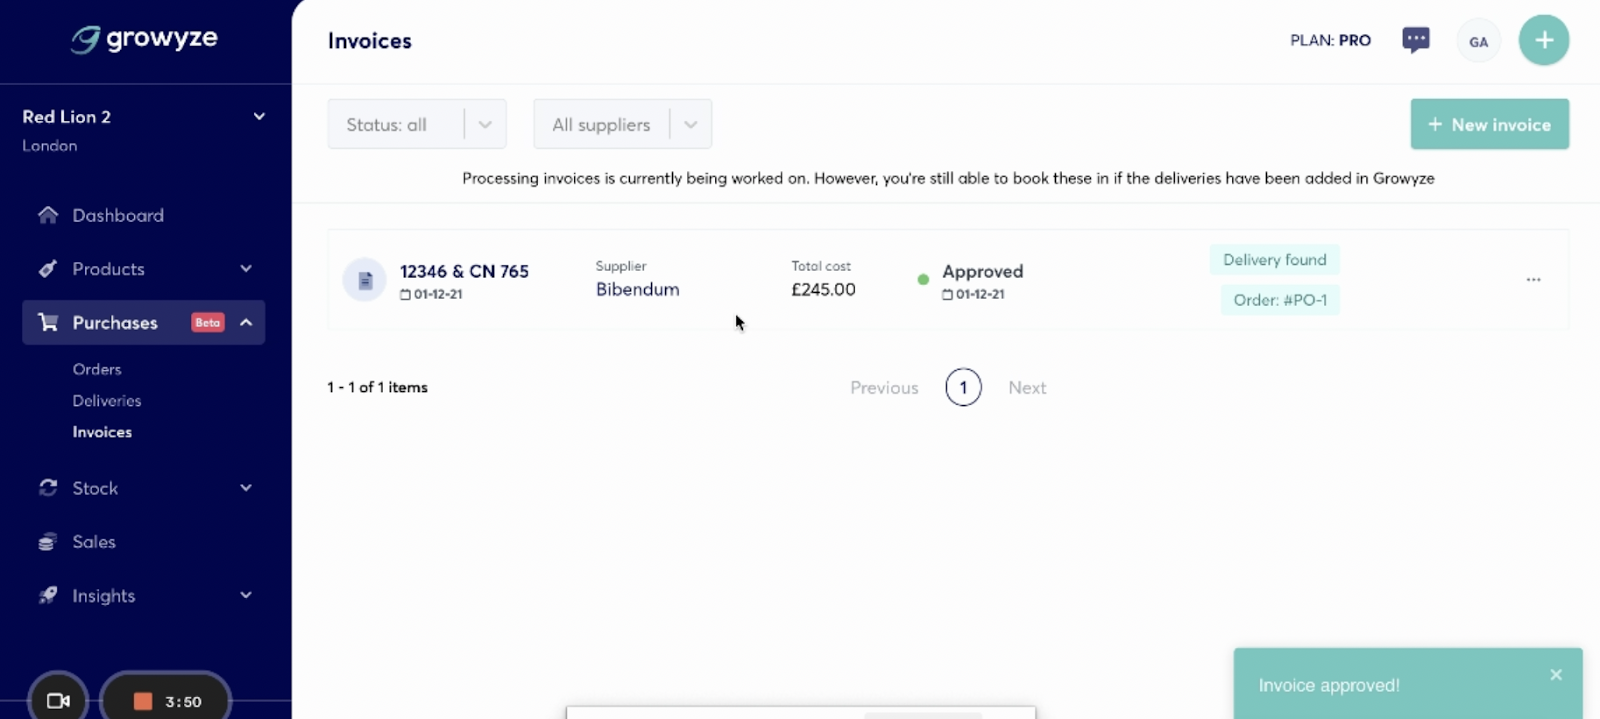
If the amounts are correct and match you can select ‘Approve invoice’.
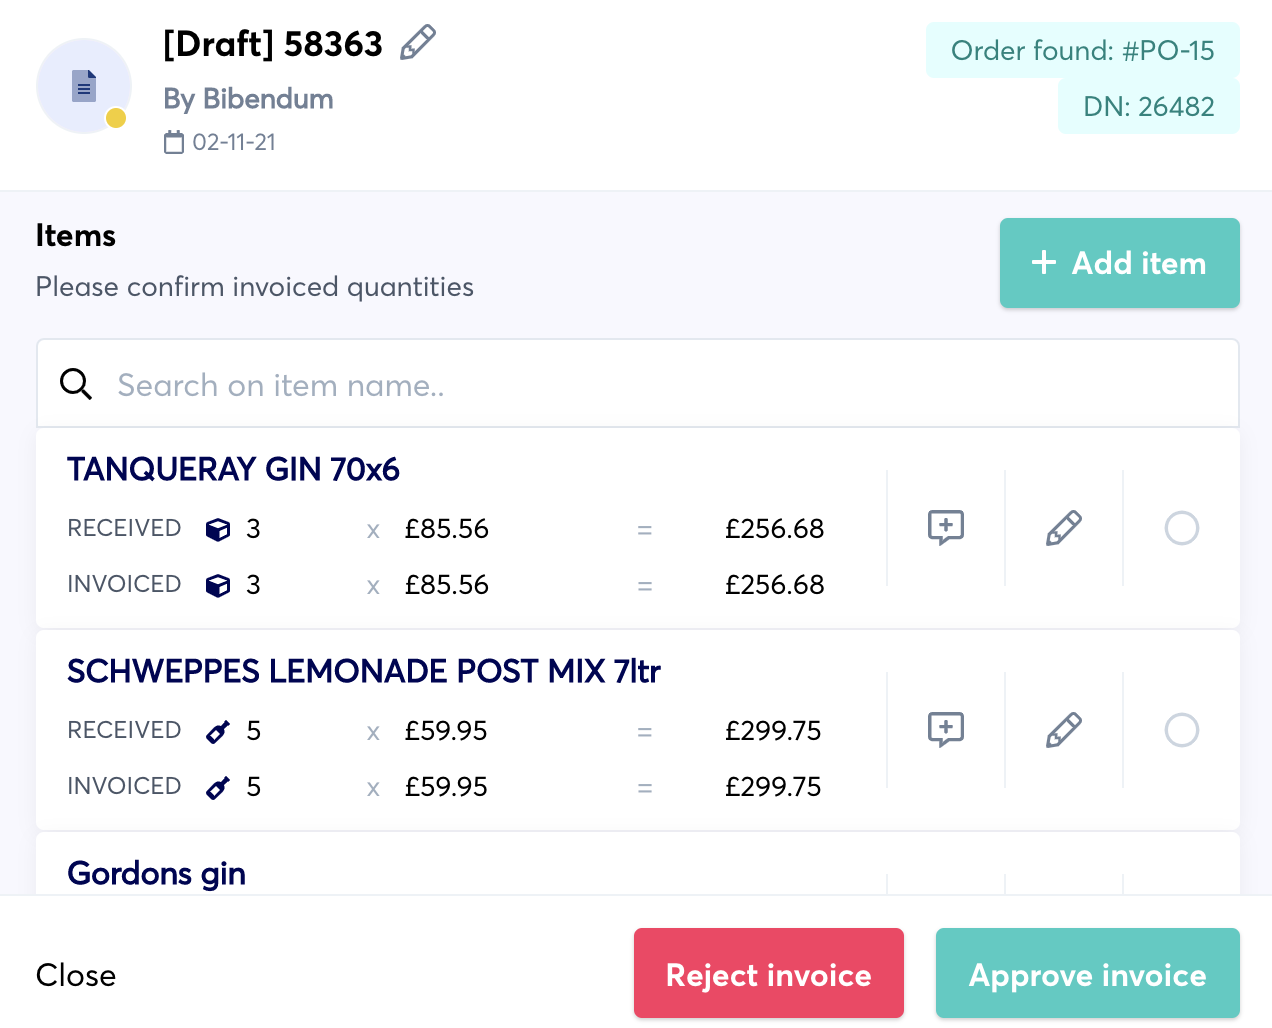
4. Finding and fixing invoice discrepancies
If any totals don’t match you can review the line items to find where the variance is coming from.
There are usually two reasons for discrepancies:
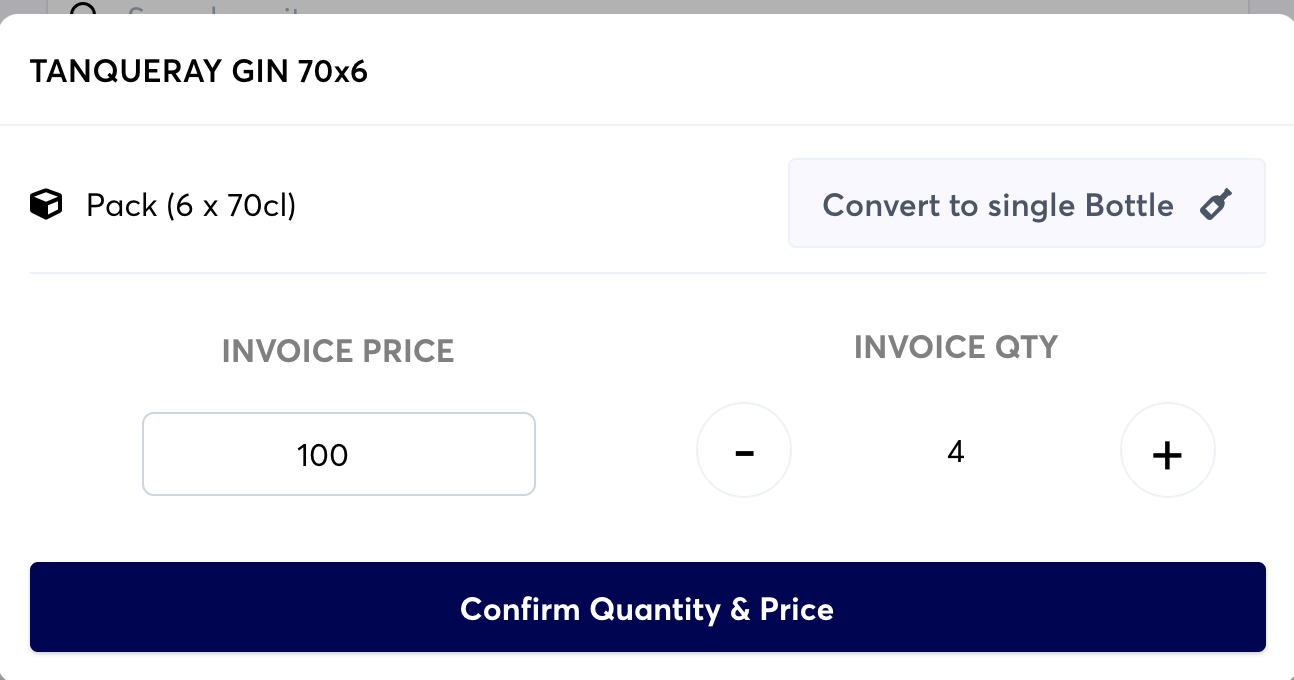
a. Quantity variance
This is where the invoiced quantity (in the invoice) is different to the received quantity (in growyze).
If you have a quantity variance (for example you have only received three bottles of gin but have been invoiced for four) you can amend this by clicking the pencil icon next to the amount under quantity.
Enter the actual invoice quantity and price and then click ‘Confirm Quantity & Price’.
b. Price difference
This is where the invoiced price (in the invoice) is different to the received price (in growyze). If you wish to accept the price change you can click the circle next to the price increase.
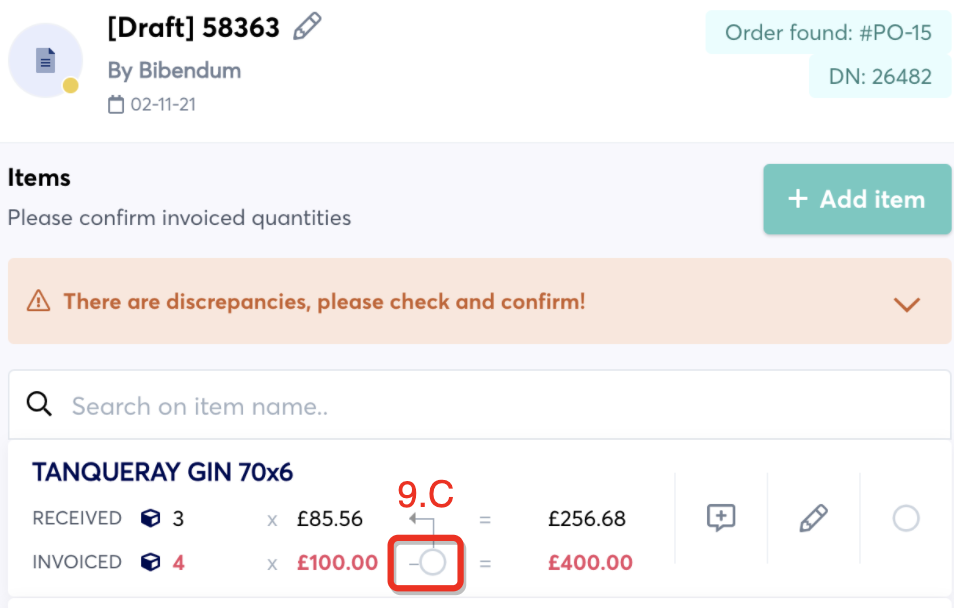
Ticking this will also amend the price in your main list of products. So that next time you place an order, this will be with the updated cost price.
You’ll notice how now, the total invoice has been adjusted to take into account the new quantity and price.
5. Approving or rejecting the invoice
Once you have reconciled the invoice you can choose to approve or reject the invoice, and to notify the supplier of any discrepancies.
a. Approve the invoice
If you are happy with everything in the invoice you can click ‘Approve’ to approve the invoice.
b. Query the invoice
Where discrepancies have been identified, whether because of price variances, or incorrectly invoiced quantities, you’re able to Query the invoice.
Simply click on ‘Notify supplier’ and this will send an automated email to the supplier highlighting all the variances identified in the process of validating the invoice.
You’ll receive a copy of the email for your records.
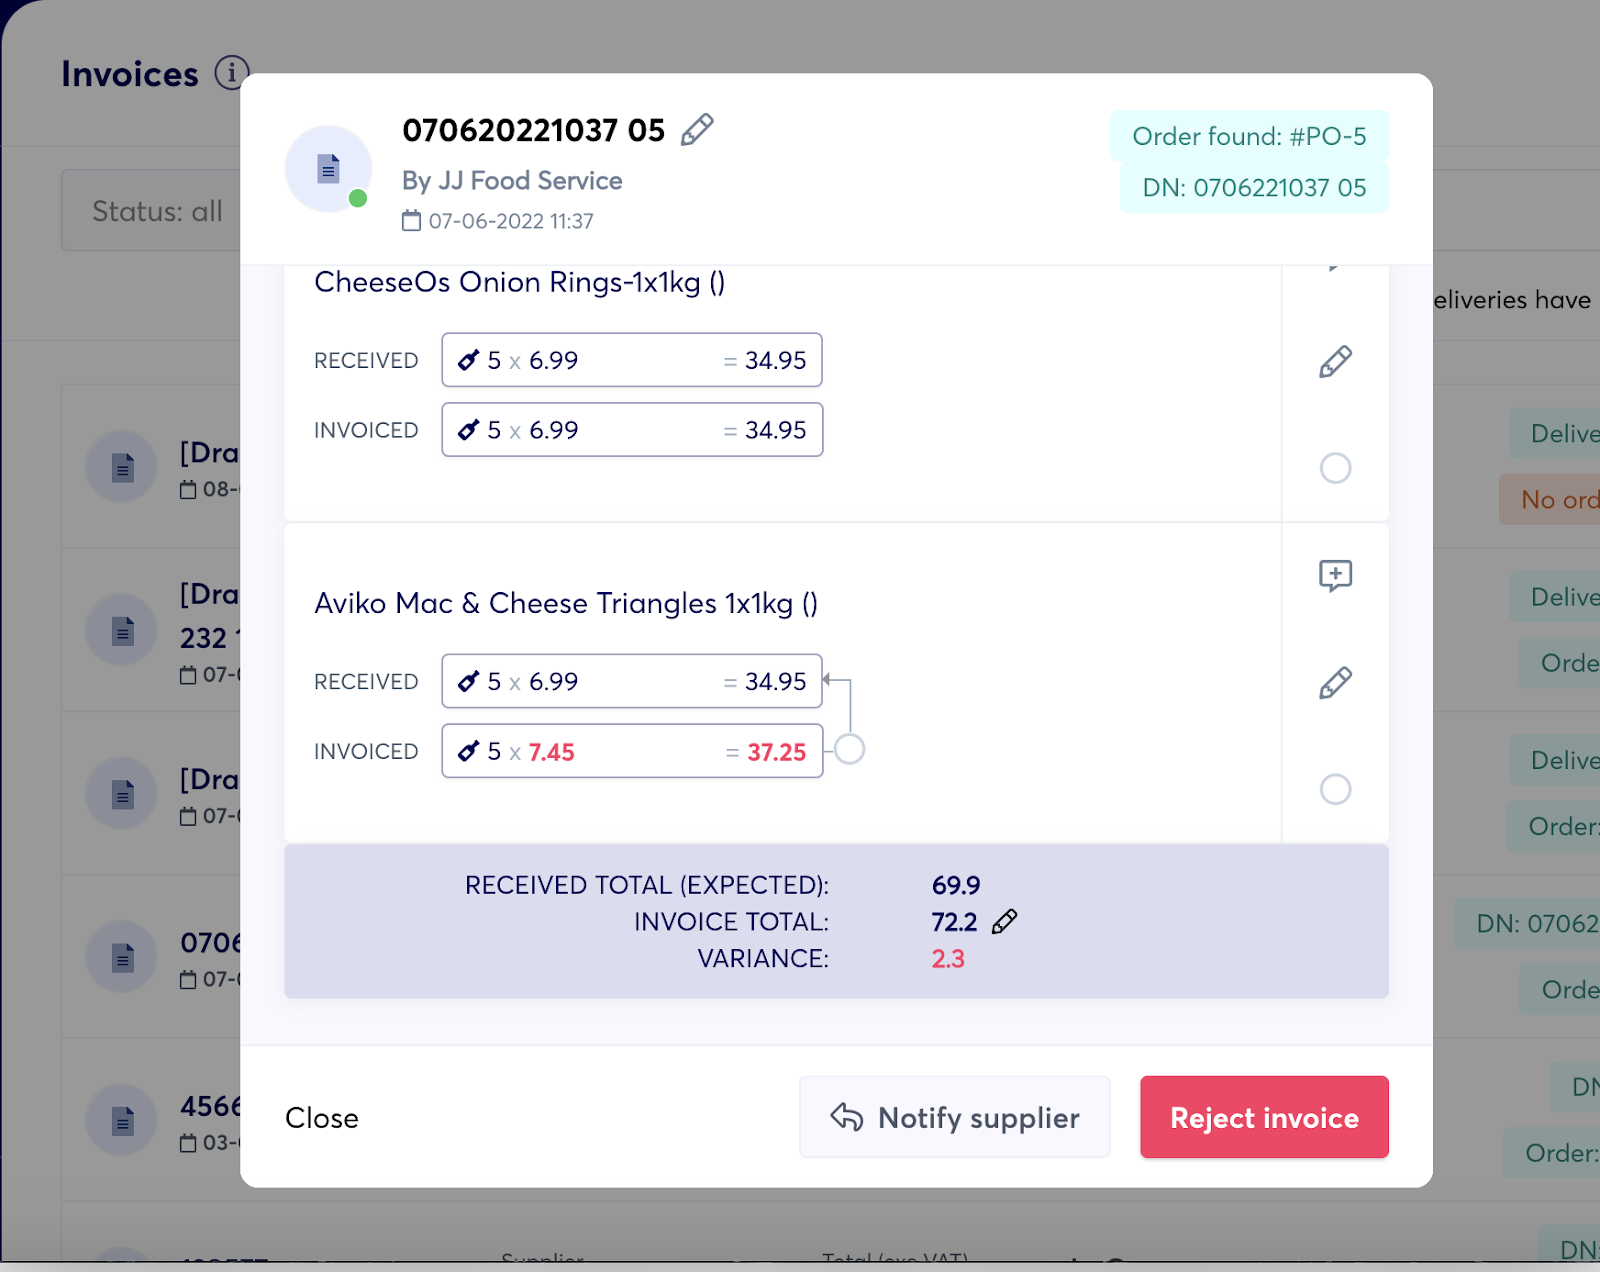
c. Reject the invoice
If you are still unhappy with the invoice you can choose to reject the invoice by selecting ‘Reject invoice’.
For further help using growyze contact us at support@growyze.com
How to Process Deliveries
It’s important for you as a business to ensure you record your deliveries so that you can always match the items you ordered to what’s been delivered. This helps ensure you always have validation between orders, deliveries and invoices, helping you to spot mistakes and raise queries.
Here, we’ll walk you through how to process a delivery using growyze.
Top Tip: To process a delivery you need to have placed (entered) at least one item order in growyze.
1. Add a new delivery
Choose ‘Purchases’ and ‘Deliveries’ from the left-hand menu. Then choose ‘New delivery’.
Here, you need to select the supplier of this delivery.
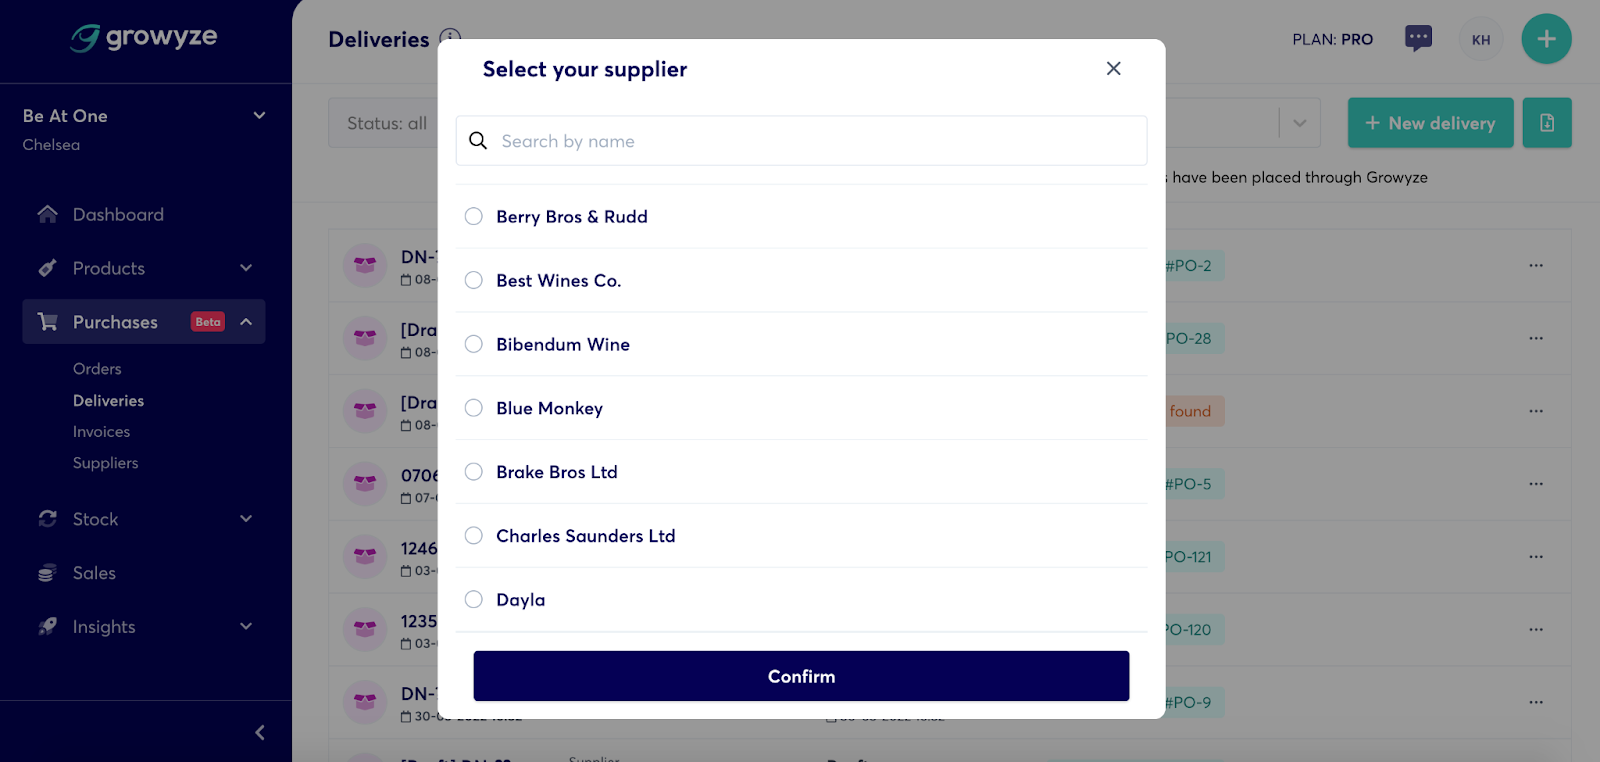
Confirm and next, select ‘Add manually’.

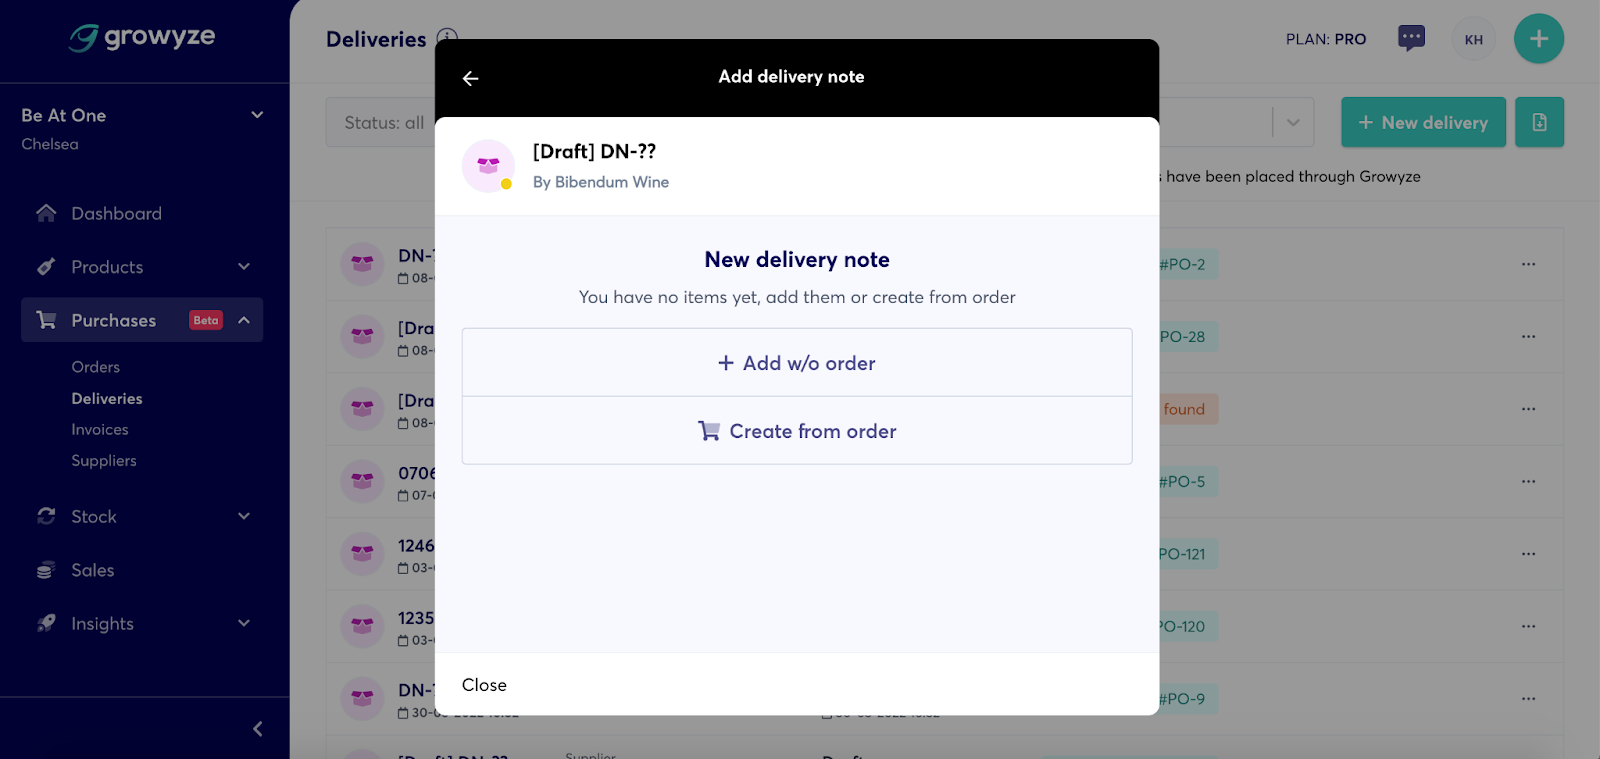
2. Enter the delivery
There are two ways to enter a delivery:
- By matching to an existing order placed through growyze
- By creating a new delivery without an order record in growyze. This can be the case when you’ve placed an order through the supplier portal
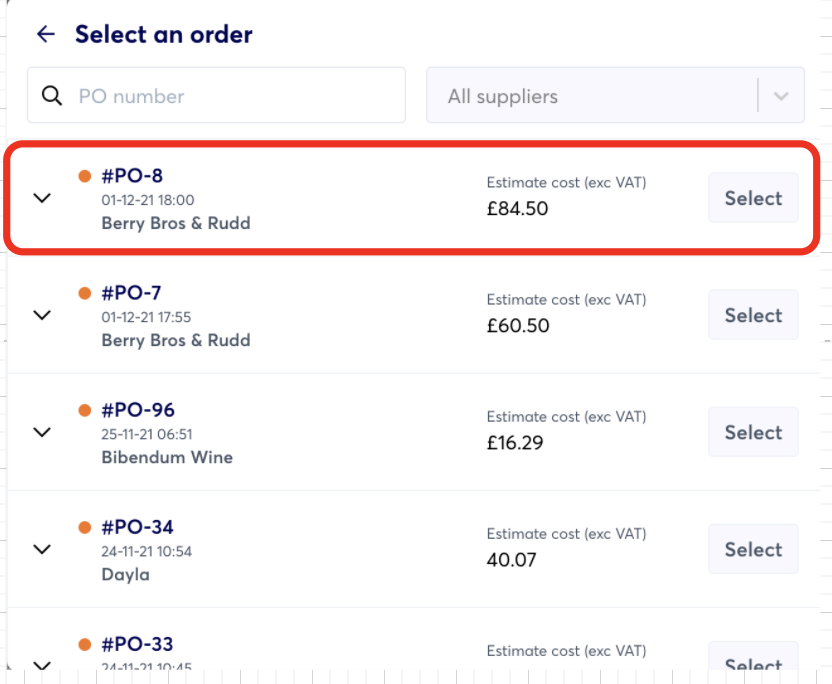
3. Match your delivery to the correct order
Click on ‘Create from order’
Next, you’ll need to select the order details for the delivery you have received or create a delivery record for items received without placing an order through growyze.
Locate the correct order and choose ‘Select’.
Note that only orders that are ‘waiting’ to be matched to deliveries appear here. If you’ve already matched an order to a delivery, the order will not appear within your list.
Now you can add the delivery note number (if received) and choose the date of delivery. You can also edit the delivery name by clicking the pencil icon next to the name of your delivery.
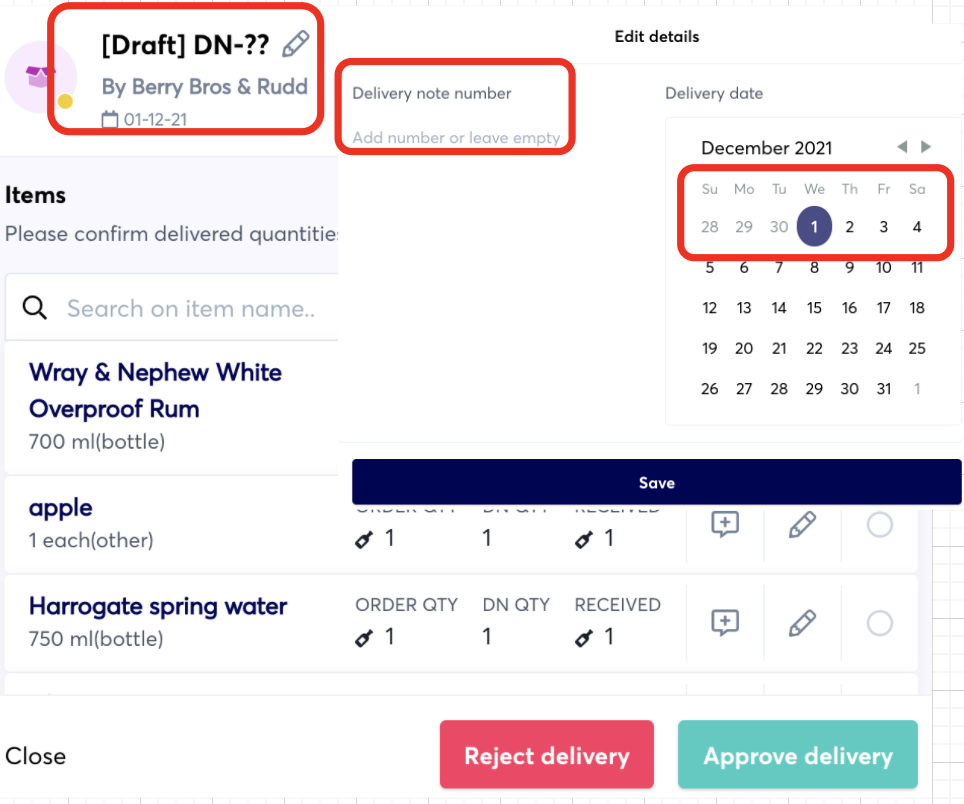
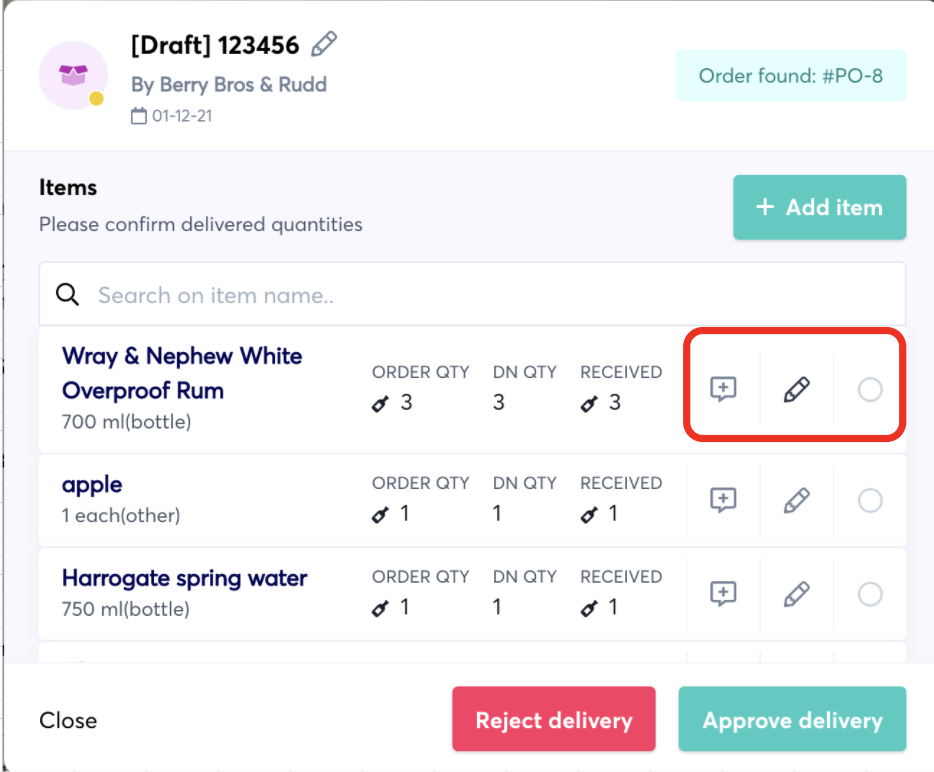
4. Check items
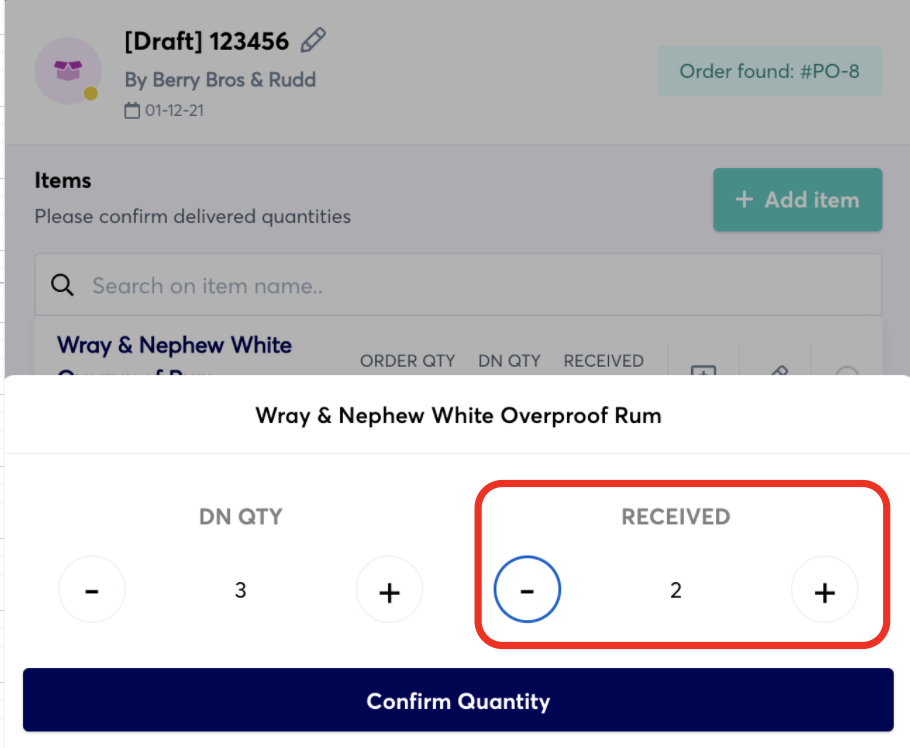
Now you can see the order quantities and the amount delivered. If there are discrepancies you can easily add these by editing the quantity of items delivered using the pencil icon on each line item.
For example, if you ordered three Wray & Nephew White Overproof Rum bottles but only received two, you can click the pencil and adjust the ‘Received quantity’ amount to two.
When complete, click ‘Confirm Quantity’.
5. Raise a delivery query
Once you have checked and logged any discrepancies you have a few options of what to do next:
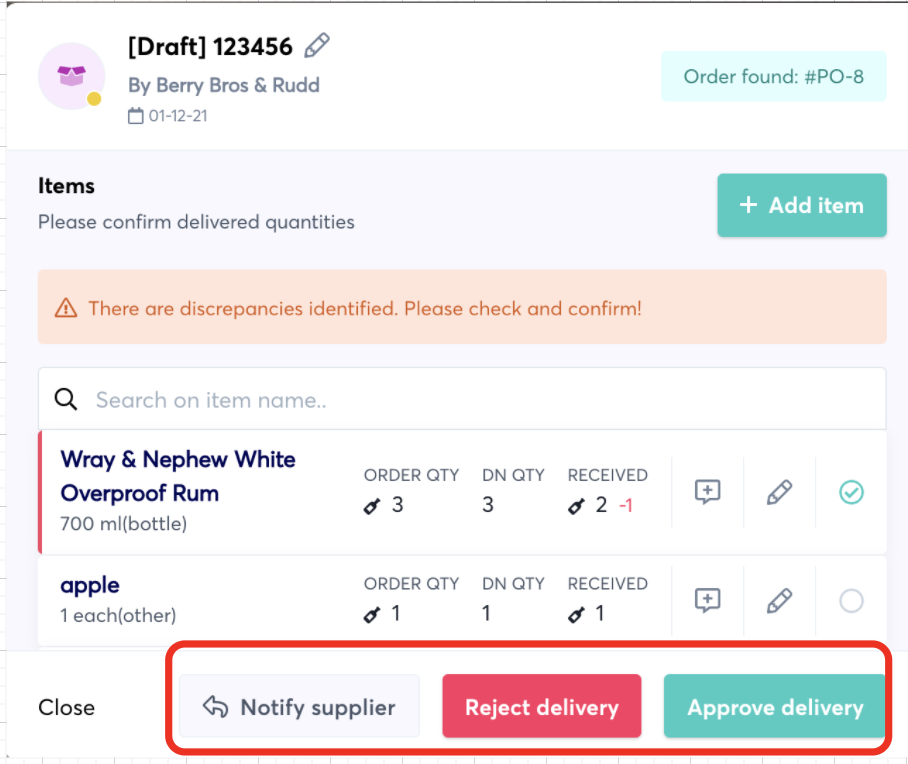
a. Notify your supplier
If there are discrepancies between what you ordered and what was delivered, you can easily notify the supplier using growyze. Click ‘Notify’ and an email will be sent to the supplier informing them of the missing items.
b. Reject the delivery
You can also choose to reject the delivery if you don’t want to accept this.
Clicking on ‘Reject delivery’ will send an email to the supplier notifying them of your decision. You’ll also receive a copy of the email.
c. Approve the delivery
If you’re happy with the delivery and don’t want to query or reject this, you can click ‘Approve delivery’.
In your deliveries dashboard you can see each delivery received and its status.

6. Enter delivery without an order (in growyze)
Click on ‘+ Add w/o order’
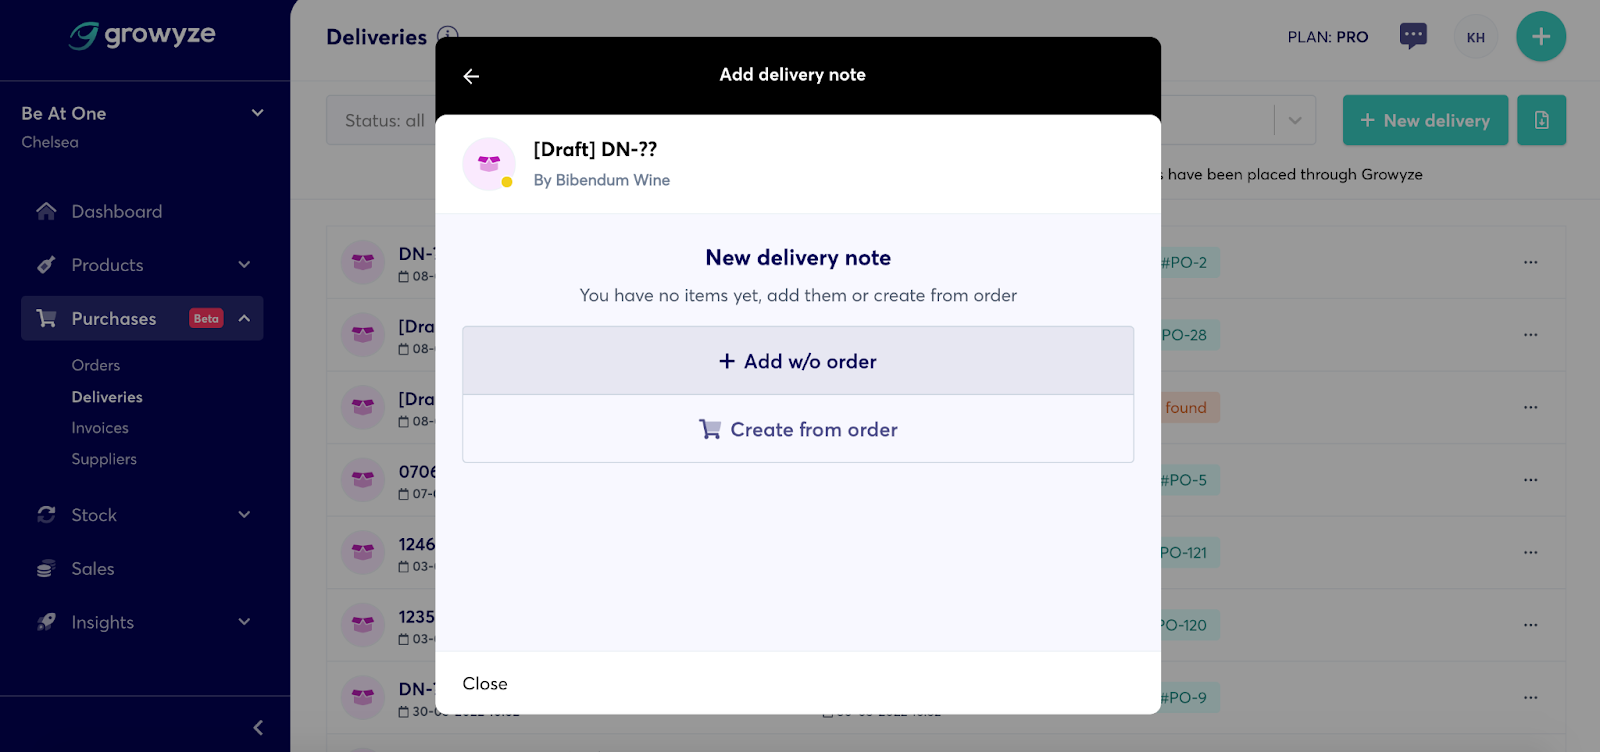
You’re presented with a list of items that are in this supplier’s catalogue you’ve added in growyze.
Clicking on the pluses to the right-hand side you’re able to add the quantity received for the selected item. If you’ve received a delivery note, but the quantity is different to what you’ve actually received (physically) you can enter the DN Qty as it appears in the delivery note, and ‘Received’ will be the actual quantity received.

To add more items, you can search by product name and SKU (this is the supplier product code - note you’ll need to have set these up in your product database).

Once you’re happy with your delivery note entries, click to ‘Confirm’.
Now you can add the delivery note number (if received) and choose the date of delivery. You can also edit the delivery name by clicking the pencil icon next to the name of your delivery.

Once you have checked and logged any discrepancies you have a few options of what to do next:
a. Notify your supplier
If there are discrepancies between what you ordered and what was delivered, you can easily notify the supplier using growyze. Click ‘Notify’ and an email will be sent to the supplier informing them of the missing items.
b. Reject the delivery
You can also choose to reject the delivery if you don’t want to accept this.
Clicking on ‘Reject delivery’ will send an email to the supplier notifying them of your decision. You’ll also receive a copy of the email.
c. Approve the delivery
If you’re happy with the delivery and don’t want to query or reject this, you can click ‘Approve delivery’.
In your deliveries dashboard you can see each delivery received and its status.
For further help using growyze contact us at support@growyze.com.
How to Record Waste with growyze
Recording items as waste whether due to spillages, staff meals or sell-by dates, is an important part of stock management. Here, we’ll show you how to use growyze to easily add new waste items and recipes.
1. Add new waste
Head to ‘Stock’ and choose ‘Waste’ from the left-hand menu. This is where you can view your list of waste items, by individual date that they were added.
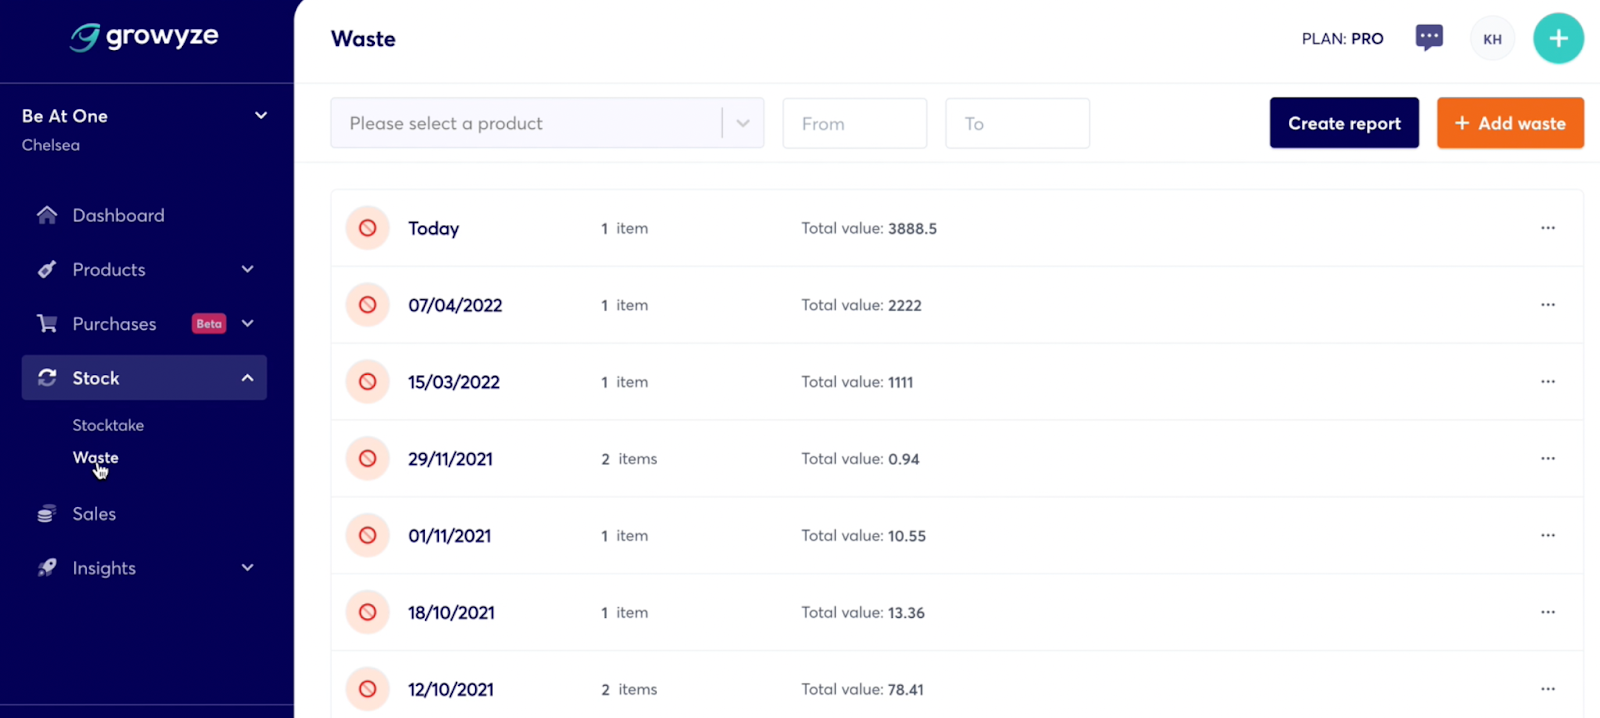
To add new waste select ‘Add waste’. You can then either scan a product to add it to waste, or add the product manually by searching for it within your database.
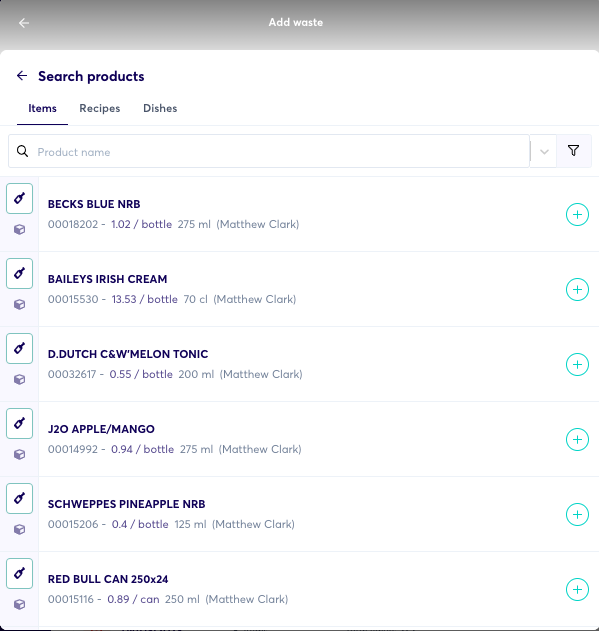
Once you have found the item you are looking for click ‘ + ’ on that item.
2. Enter a waste item
Once the item has been selected, growyze invites you to add further details including the waste quantity by number of items, measurement or percentage.
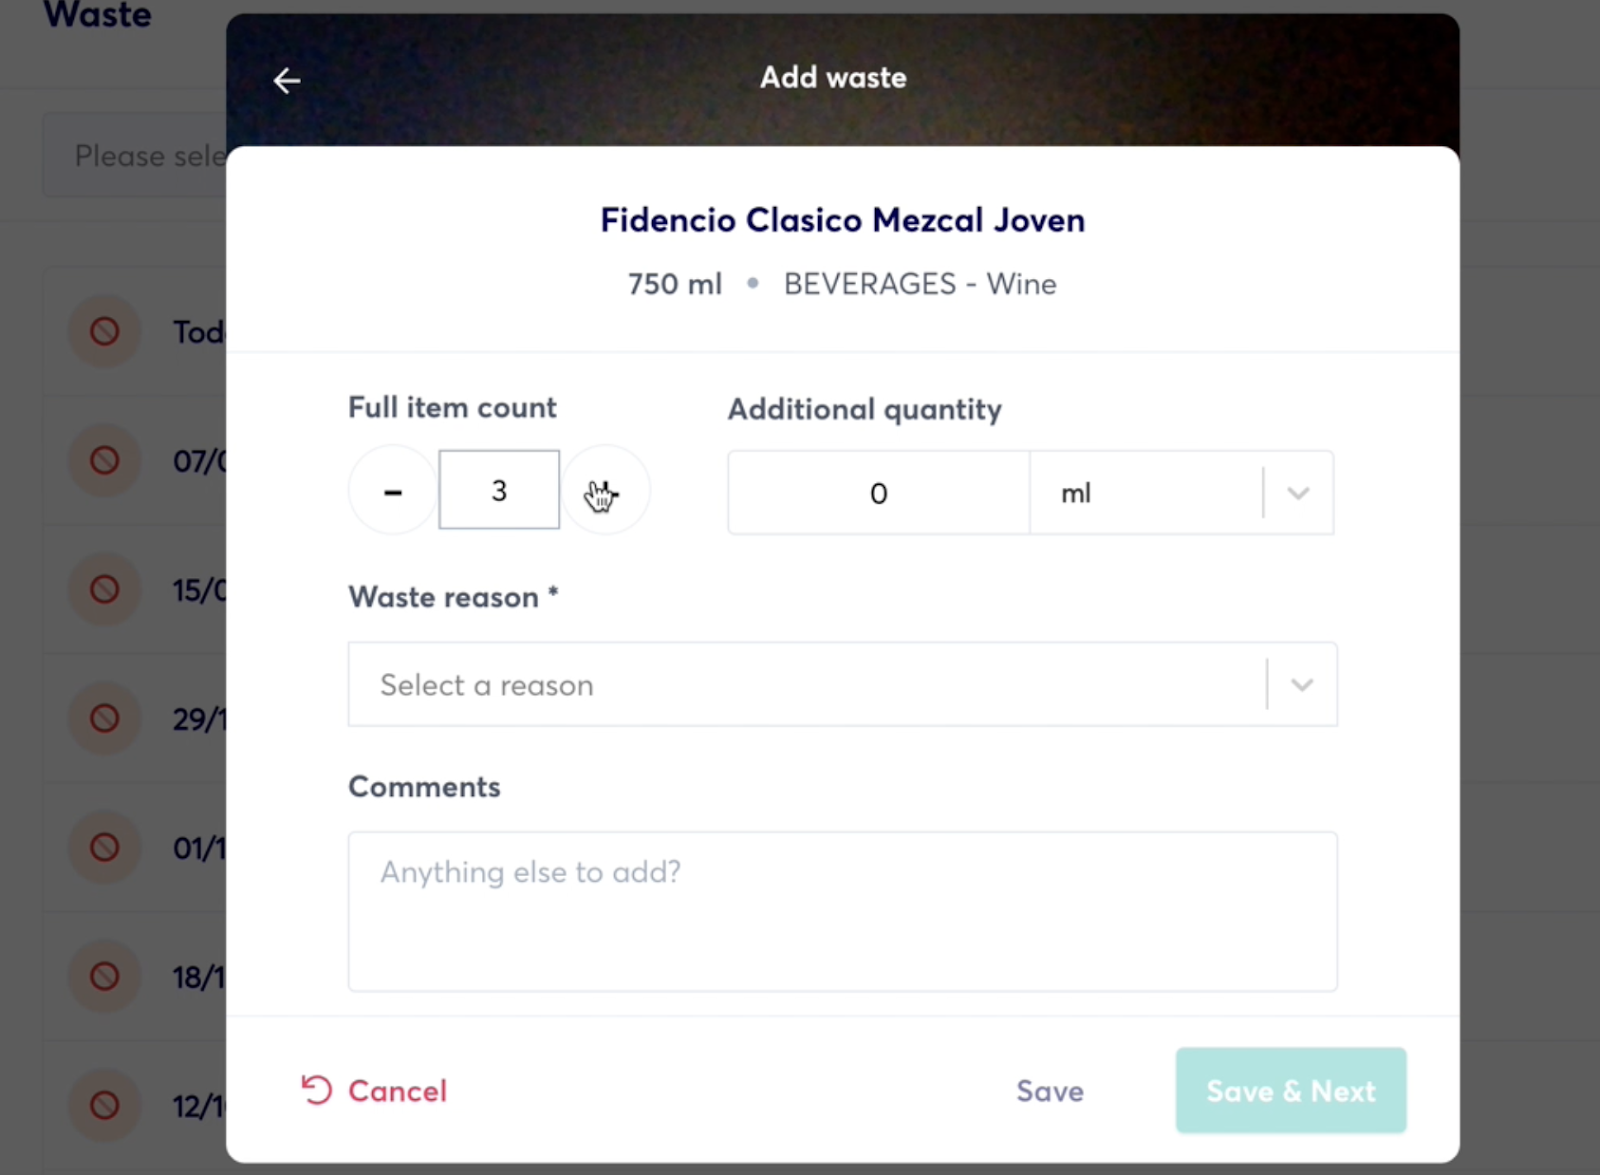
You’ll then need to select a waste reason from the dropdown (this is mandatory). For example, because the item has been broken, spilled or used for staff.
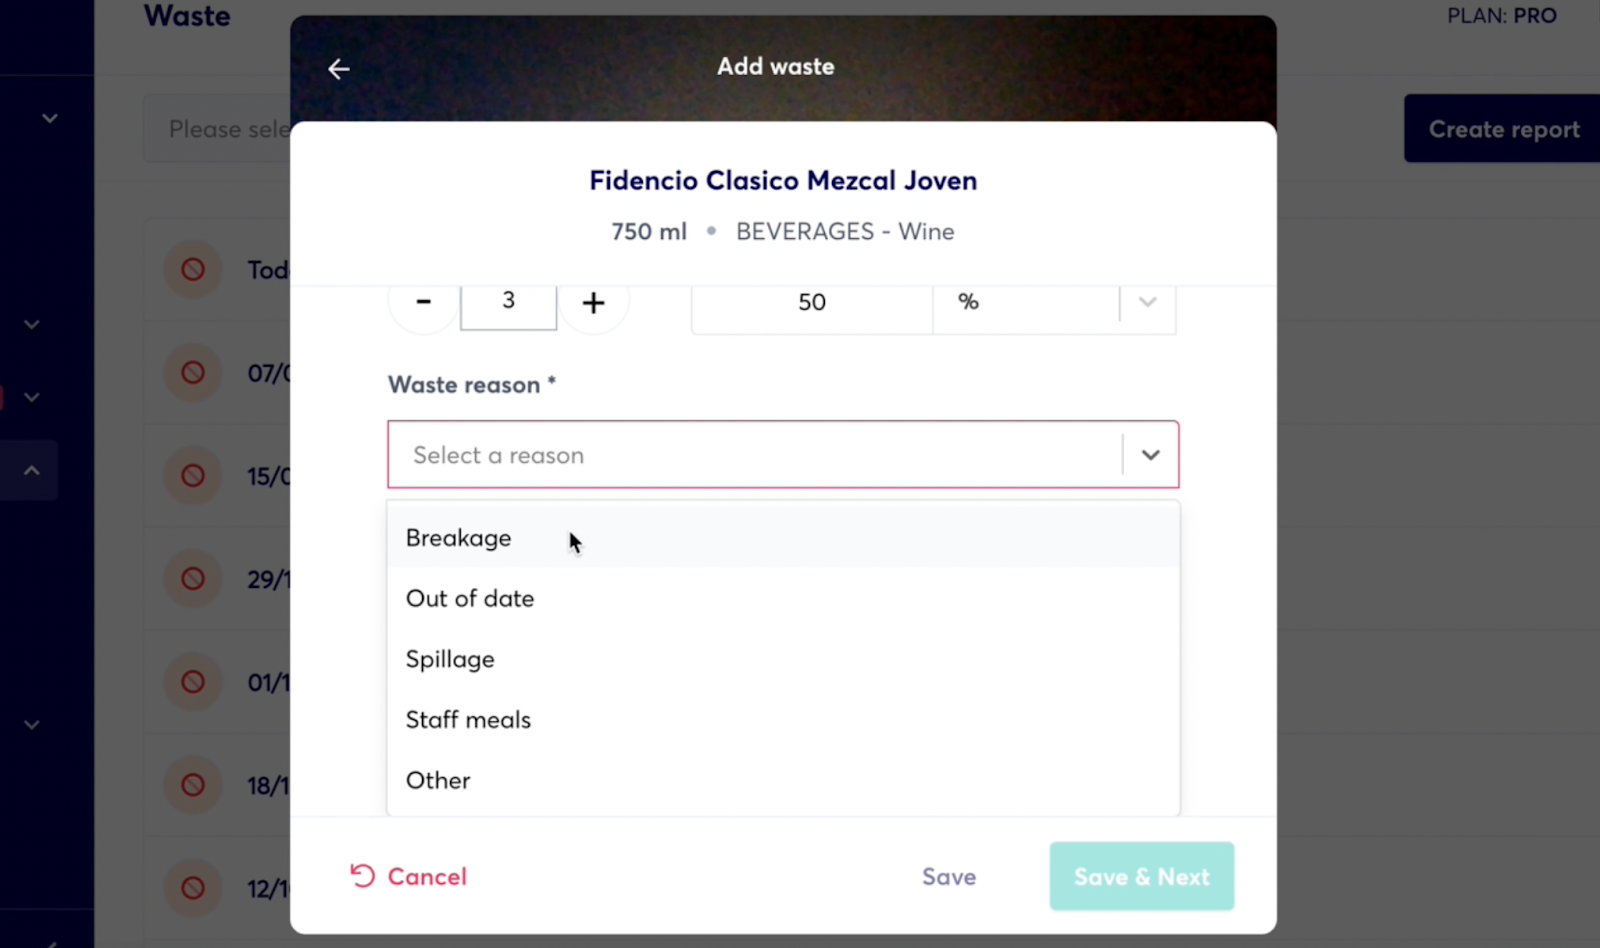
You can also use the reason ‘Other’ to manually type another reason.
If this is the only item of the day you can click ‘Save’. To add multiple items at the same time you can select ‘Save & Next’ to add more items.
3. Enter a waste recipe
With growyze you also have the ability to select a waste recipe, rather than just an individual item. This is useful for logging entire meals, or cocktails, which may have been wasted.
To do this add another waste item and instead of ‘Items’ select ‘Recipes’. Here you can search for any recipe within your database.
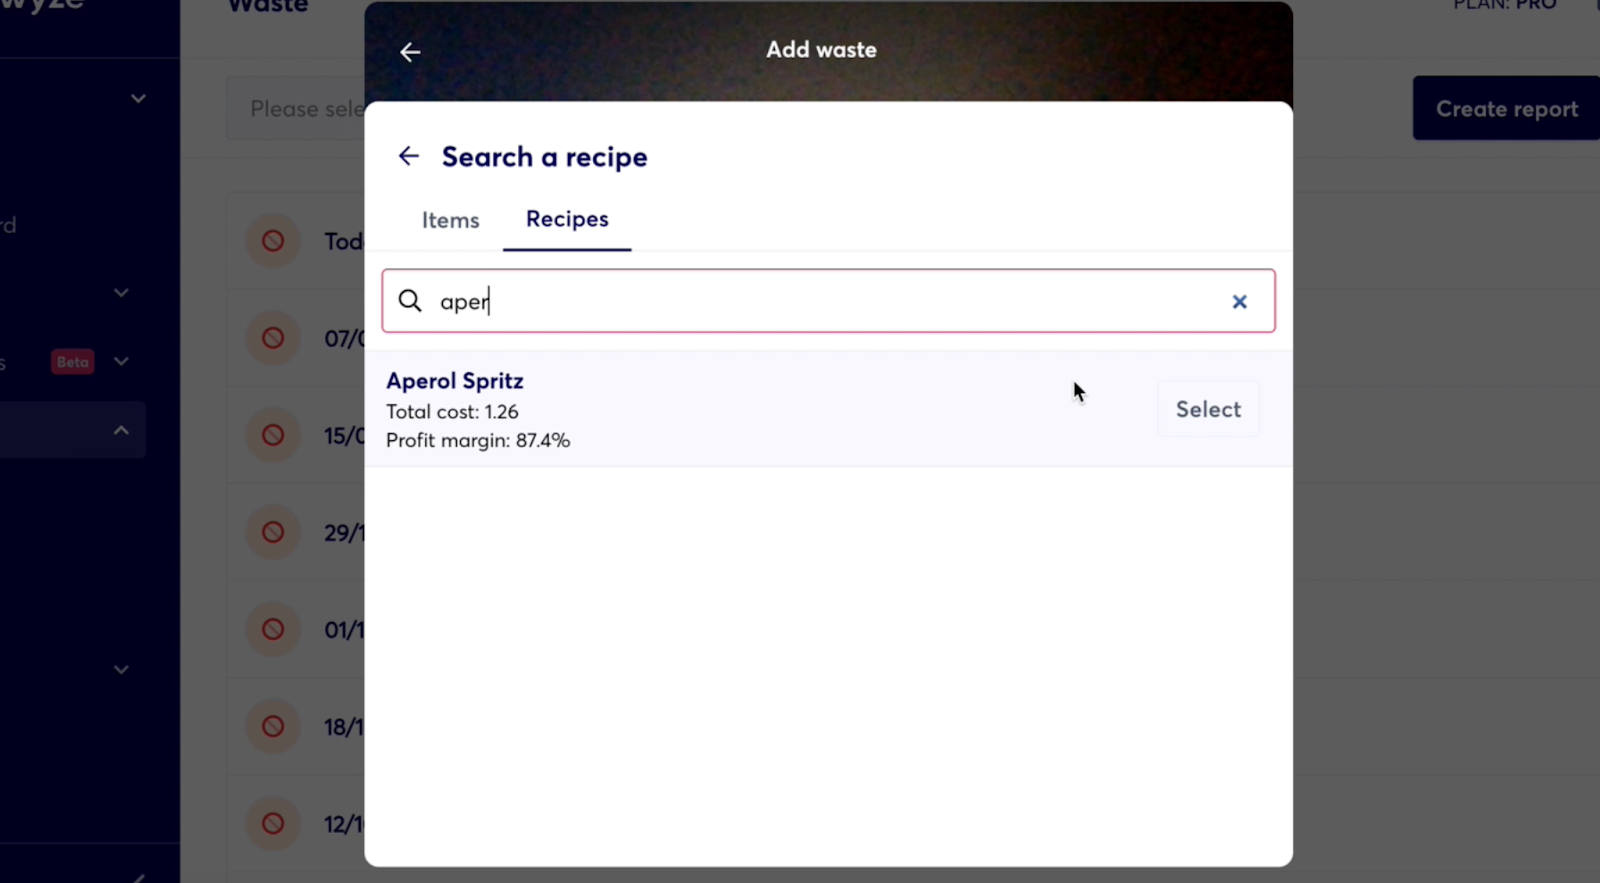
Once you have found the correct recipe choose ‘Select’ and enter the waste details. When you add a recipe to waste, the individual ingredients that make up that recipe also appear in ‘Items’. This allows you to see how much of each ingredient has been wasted.
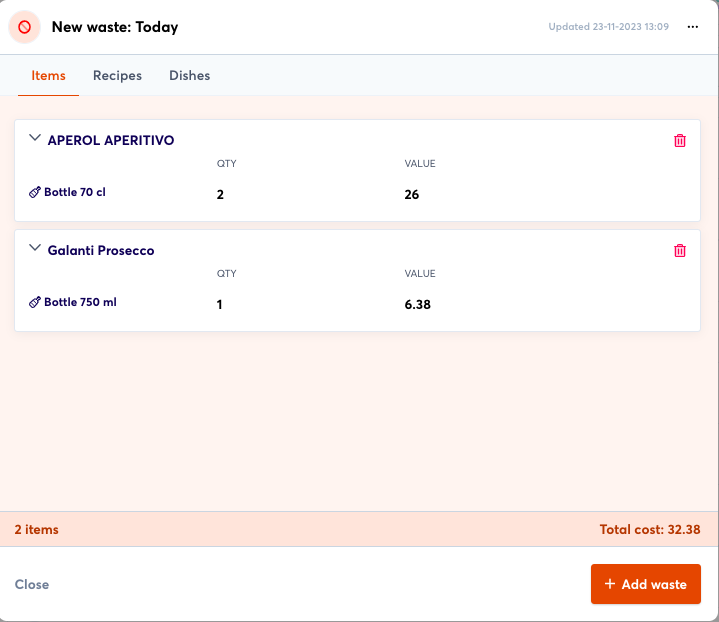
The drop down arrow next to the product name will allow you to see full details of each wasted item. If you need to delete an item from waste, note that you’ll only be able to edit the recipe as a whole, rather than as its individual items.
4. Search for waste items
If you need to find a specific item you can search for this within waste and see all the dates and times when a wasted item was noted, as well as the number of items.
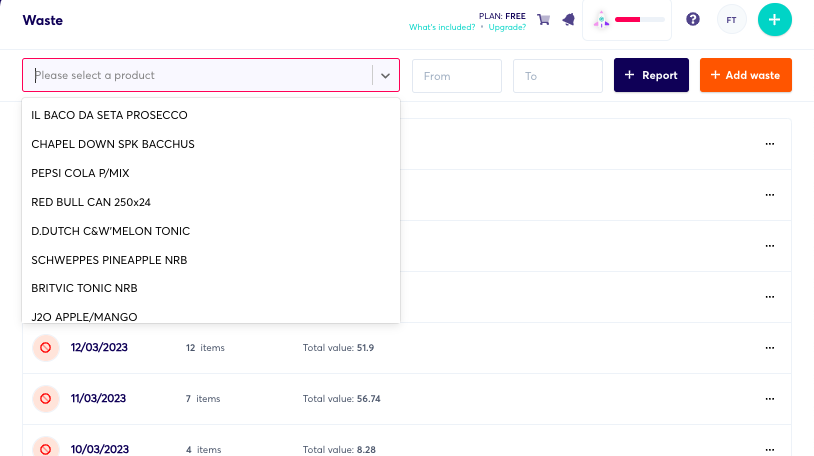
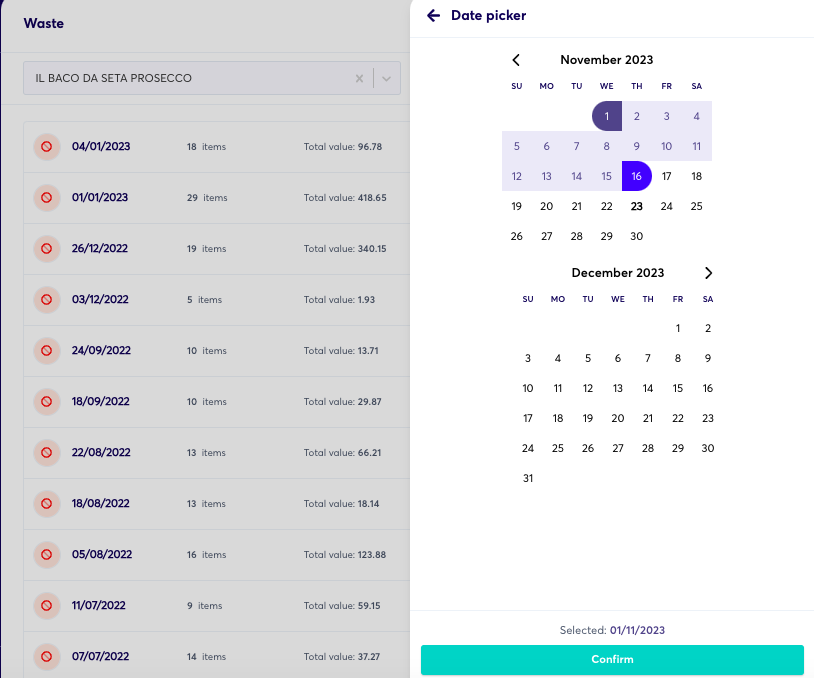
You can also search within a selected period, to see which items were wasted during that time. To do this, select a ‘from’ and ‘to’ date from the date dropdowns.
5. Create a wastage report
Select ‘Create report’ from the menu bar. Next, you can either choose a specific item by searching for it within the Search bar, or you can leave this blank to view all waste items.
You can also choose a time period, or leave this to cover all wastage to date. Once you have selected your criteria you can see a waste report showing all of the items or recipes that have been logged in waste during that time period.
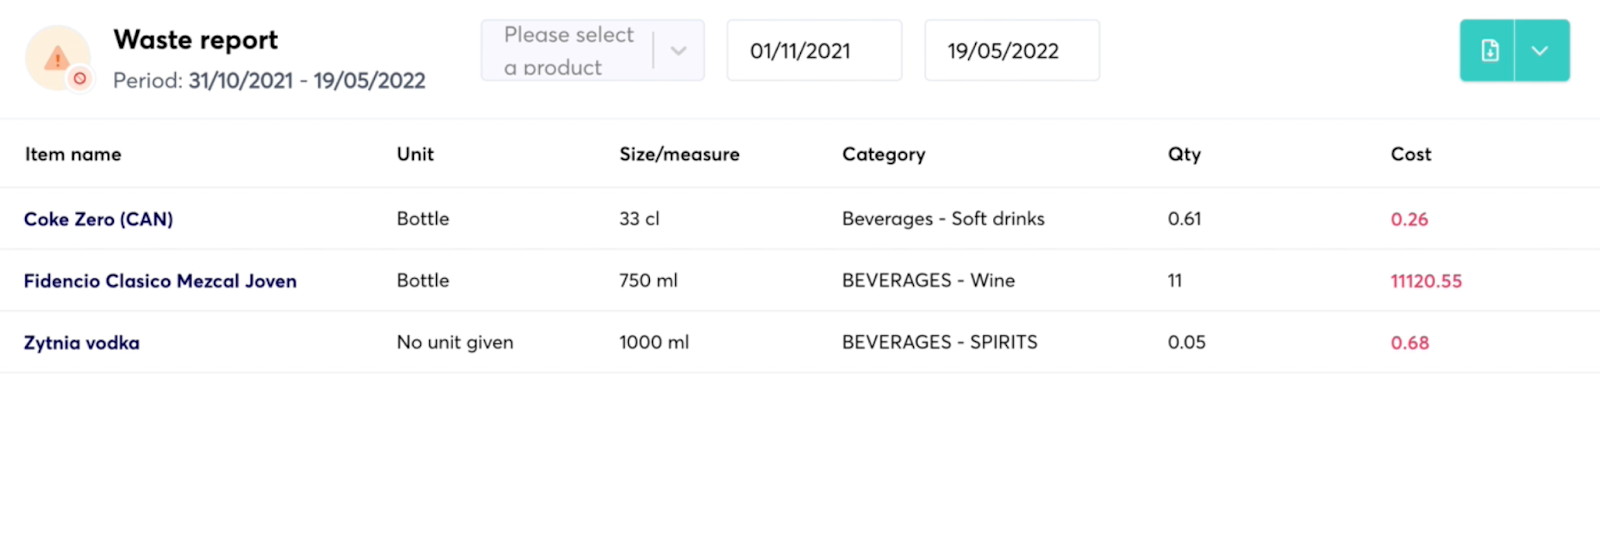
This report can also be exported to CSV by clicking the green download button and choosing ‘Export to CSV’.
For further help using growyze contact us at support@growyze.com.
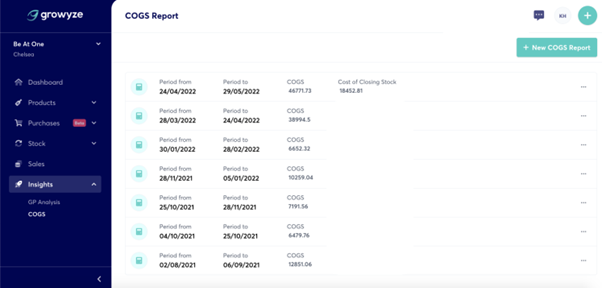
How to Set Up a Cost of Goods Sold (COGS) Report
Cost of goods sold (COGS) helps you to understand the profitability of your restaurant, by summarising the costs associated with each product or menu item. In this guide we’ll show you how to run a COGS report with growyze.
1. Create a new COGS report
From the left-hand menu choose ‘Insights” and ‘COGS’ and then select ‘New COGS Report’ to create a new report.
2. Select your information
Here, you’ll need to choose the information to outline what period the COGS analysis should occur in. Choose your opening stock take and closing stock take from the dropdown options:
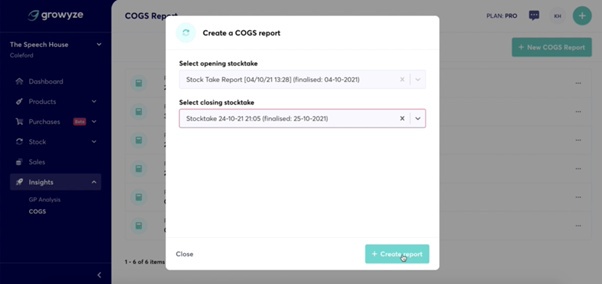
Once you are happy with your selection choose ‘+Create report’.
3. Analyse the report
Once the report has been created you can click the green icon next to the report to view the COGS analysis in detail.
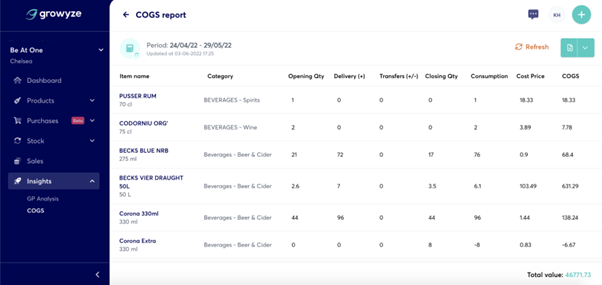
This includes:
- Item name and category
- Opening quantity
- How many (if any) you have received in deliveries for that period
- Closing quantity
- How many have been consumed
- Cost price
- Total COGS for each item which calculates how many were sold at the cost price
4. Download the report
If you wish you can download the report. Click the download button on the top right-hand side and you can export the COGS report as a CSV file.

For further help using growyze contact us at support@growyze.com
How to Set Up a Gross Profit (GP) Analysis Report
Gross profit is one of the most important metrics to understand for your business. In this guide we’ll show you how you can quickly and easily create a gross profit analysis report inside growyze, showing sales data, expected gross profit and variances between your figures.
1. Create a new GP Analysis report
From the left-hand menu choose ‘Insights” and ‘GP Analysis’ and then select ‘New GP Analysis’ to create a new report.
2. Select your information
Here, you’ll need to choose the information to outline what period the gross profit analysis should occur in. Choose your opening stocktake, closing stocktake and the corresponding sales data from the dropdown options:
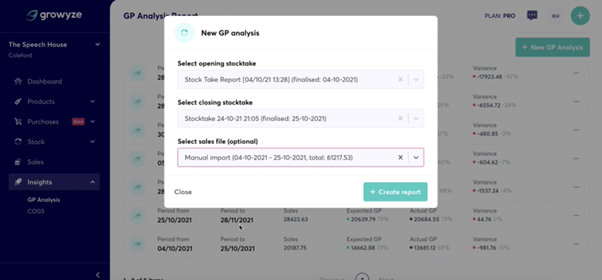
Once you are happy with your selection choose ‘+Create report’.
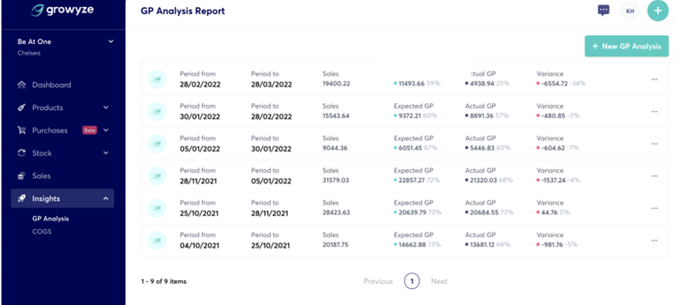
3. Analyse the report
Once the report has been created you can view a top-line overview of information for that period including:
- The period date
- Sales figure
- Expected gross profit figure
- Actual gross profit figure
- Variance between expected and actual gross profit
This helps you to see, at a glance, the gap between what your gross profit should be, and what has actually been recorded.
To delve into the report details you can click the green icon next to the report you wish to view.
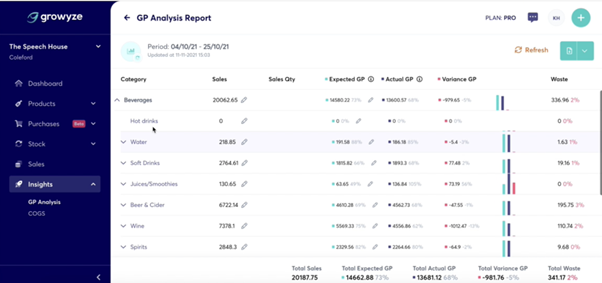
This will load all of the details of the report by categories, subcategories and individual line items.
From this, you can easily see where you have variance, allowing you to investigate further.
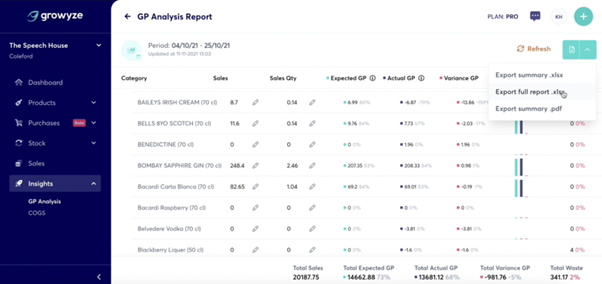
4. Download the report
If you wish you can download the report. Click the download button on the top right-hand side and choose whether to export the report summary or full file, either by PDF or Excel spreadsheet.
For further help using growyze contact us at support@growyze.com
How to Upload Sales Information to growyze
To run a stock discrepancy, COGS or GP Analysis report, your sales information needs to be added inside growyze. This is so you can see an accurate analysis of your sales and stock, for the period between the two stock takes you are interested in. Without sales information it can be difficult to determine how much profit you’ve made, or what your cost of sales were.
Our integration with Square POS allows you to automate sales data into growyze but if you’re using another POS, or want to enter your sales information manually, here’s how it works.
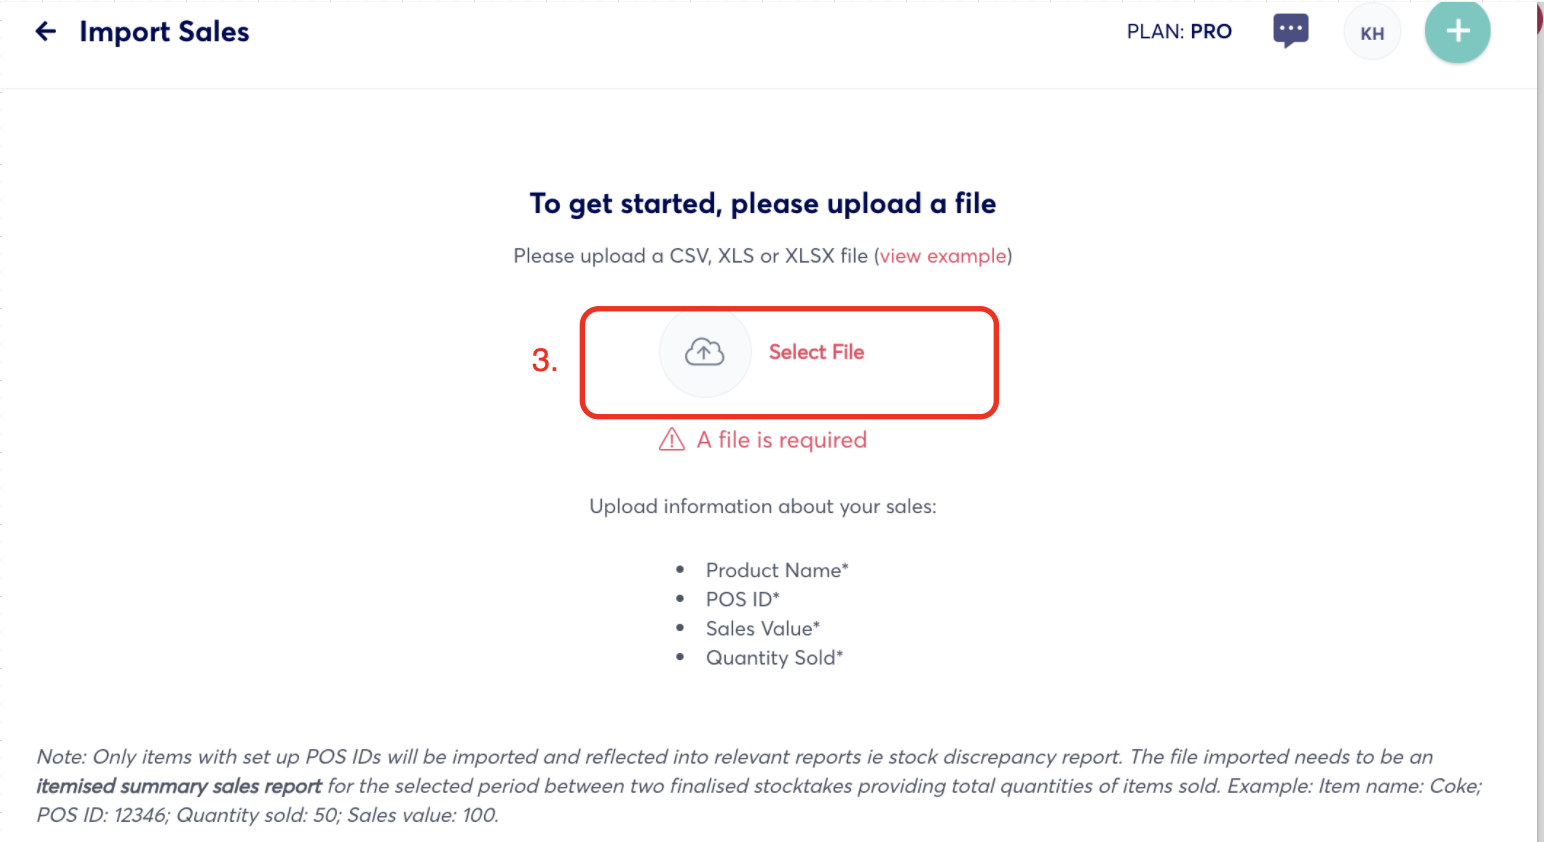
1. Export and organise your sales data
First you’ll need to export the relevant file from your POS. This can be in xls, xlsx or csv format. However, the file will need to contain at least these four columns:
- Product Name
- POS ID (SKU)
- Sales Value (this should be the net amount)
- Quantity Sold
If your file doesn’t have those columns you will need to add them, or edit the names of the existing columns to these exact names. You can then save your file as a csv, xls or xlsx file.
2. Upload your sales data to growyze
Log in to growyze and select ‘Sales’ from the left-hand menu. Then select ‘Import file’.
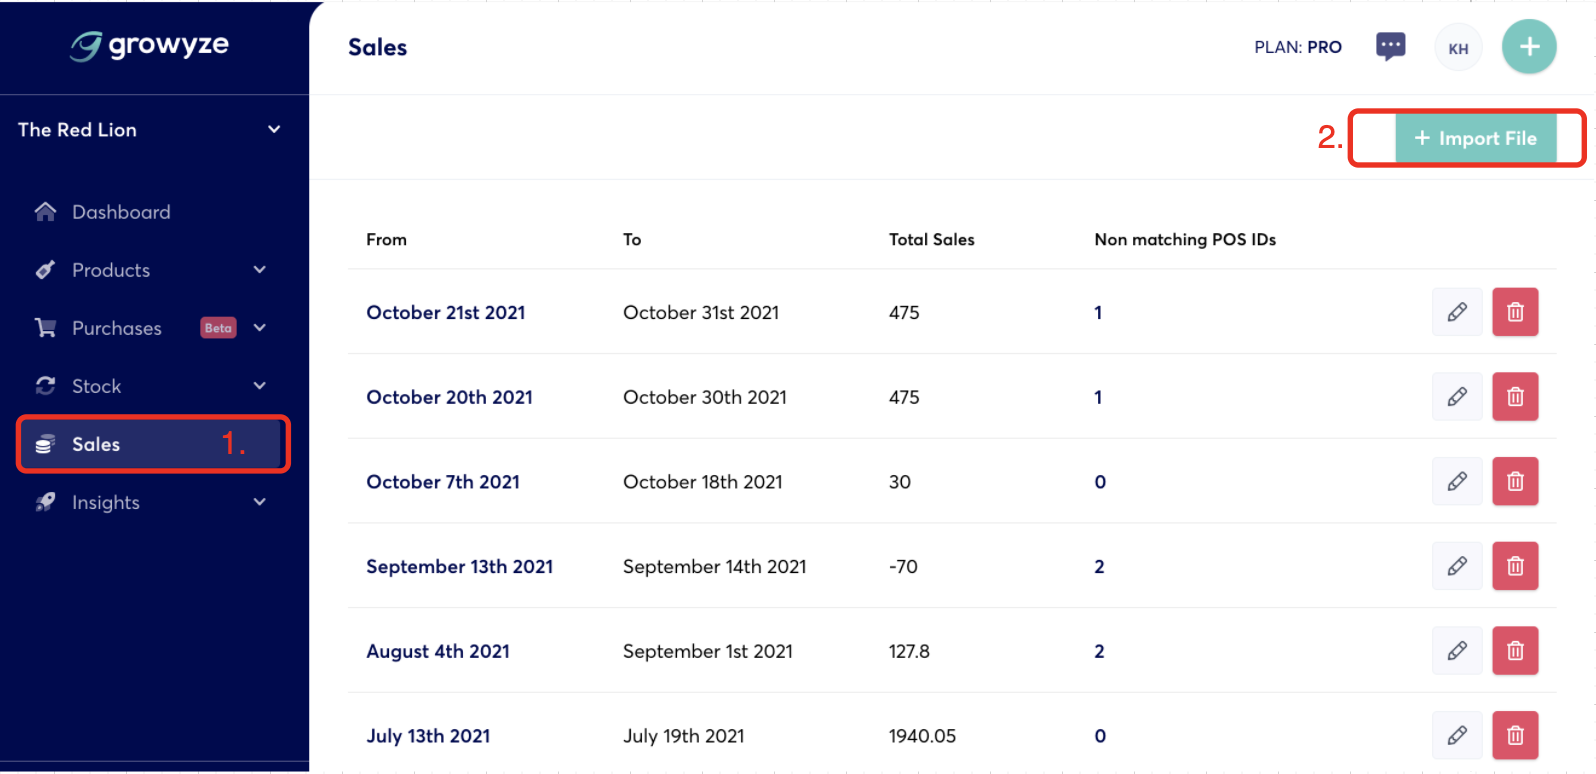
Here you can choose your file from wherever it’s saved.
Now you’ll need to select the period for which you’re importing the file. This is usually the period between two stocktakes, for example between two weekly stocktakes or two monthly stocktakes.
3. Assign headers
You’ll now need to match headers to the imported file using the four headers we mentioned above:
- Product Name
- POS ID
- Sales Value (this should be the net amount)
- Quantity Sold
All of these columns should have values in them as you won’t be able to import the file if you’ve assigned headers to empty columns.
Once uploaded, you’ll need to match the headers to each column.
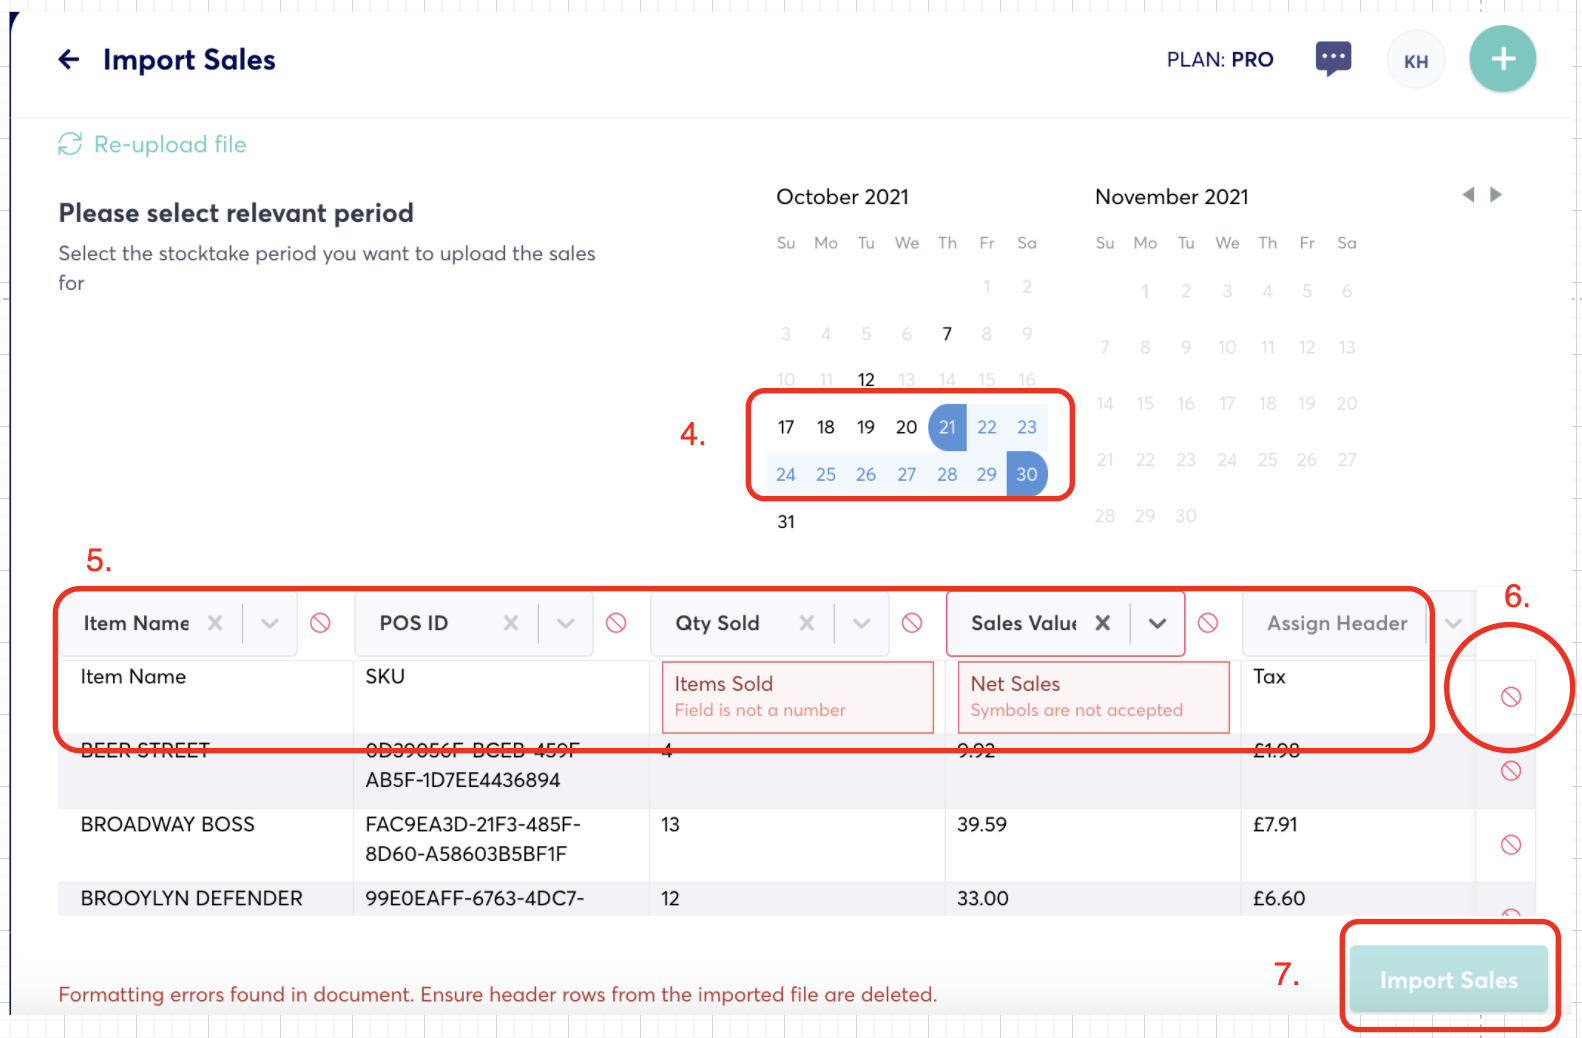
You can delete any redundant columns using the delete icon on the right-hand side, or leave them. This won’t affect the import.
Next, delete the first row containing the headers so that this line isn’t imported.
Once you’re happy with your columns you can select ‘Import Sales’. Once imported, you’ll be able to view your sales information in your growyze account and use this as part of your reporting.
For further help using growyze contact us at support@growyze.com.
How to Use growyze On Your Smartphone (Android)
Want to use growyze on the go? In this guide we’ll walk you through how to easily access the growyze app on your Android phone.
1. Visit app.growyze.com
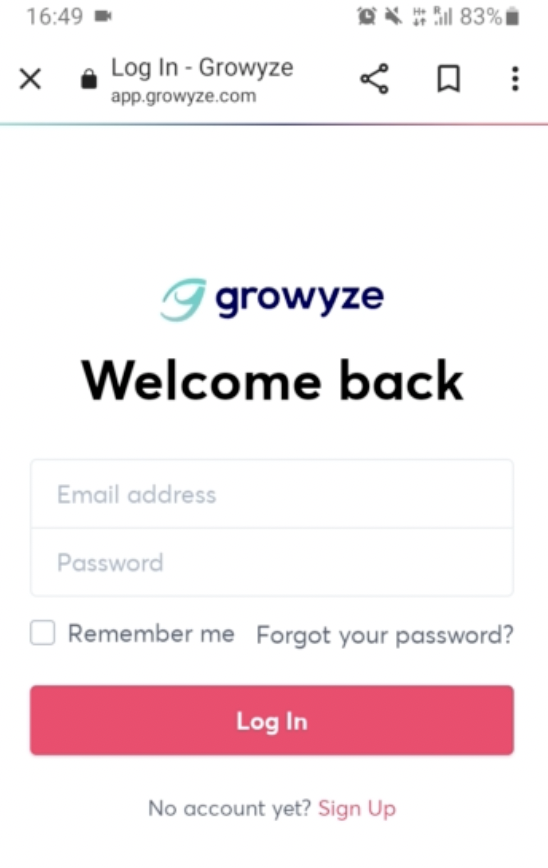
Open your smartphone’s browser and enter app.growyze.com to access the mobile site. Once loaded, enter your growyze sign-up details to log in to your account.
2. Add to home screen
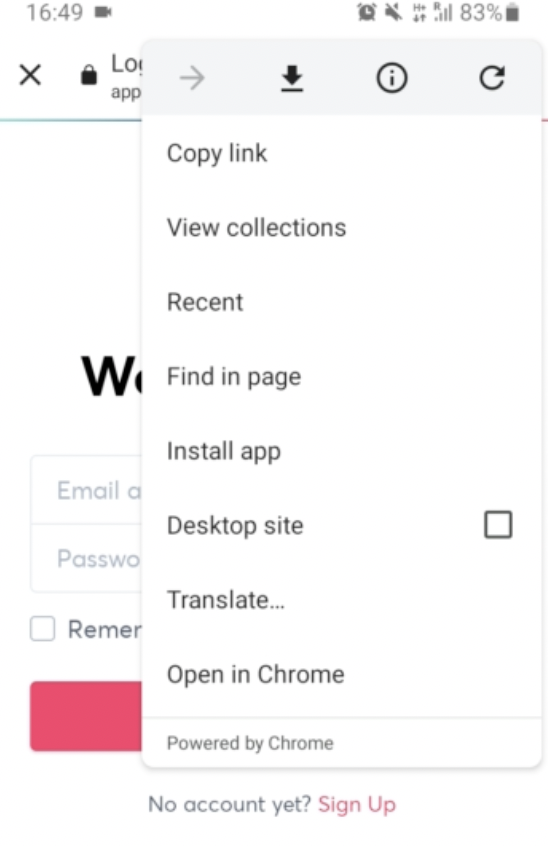
To give you faster access to growyze you can add the app to your browser’s home screen. To do this, select the three dots on the top right-hand corner of the screen and select 'Install app'.
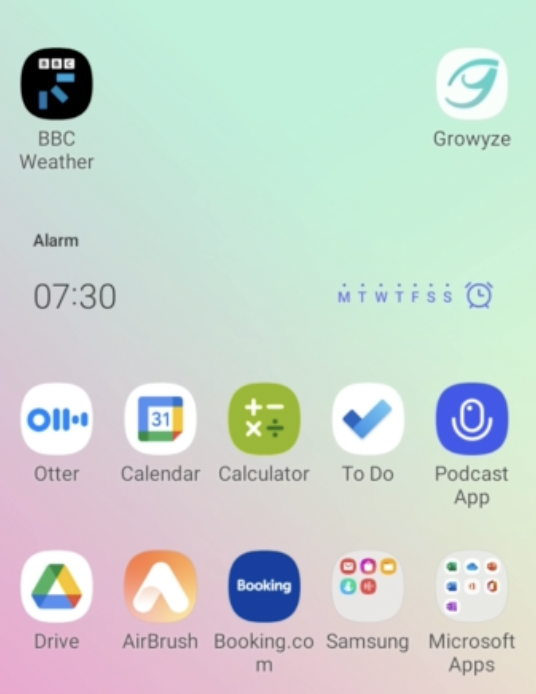
Confirm the install by selecting 'Install'. This will add a growyze shortcut to your home screen on Android, allowing you to visit the browser-based site any time you wish to complete a stocktake or make a new order.
Simple!
For further help using growyze contact us at support@growyze.com.
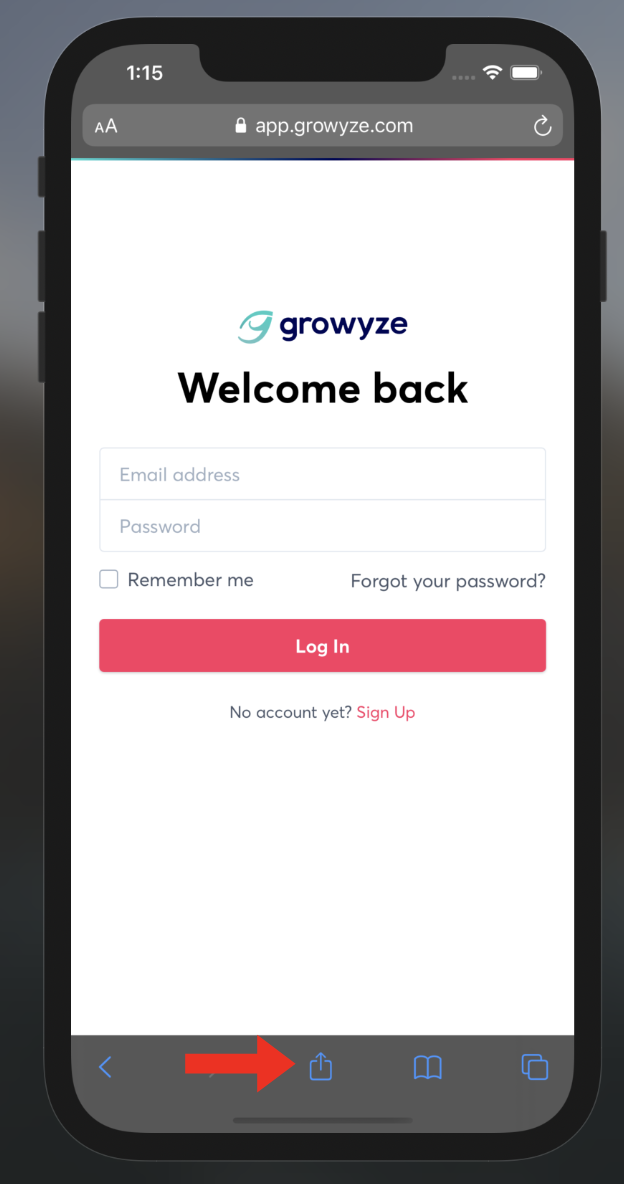
How to Use growyze On Your Smartphone (iOS)
Want to use growyze on the go? In this guide we’ll walk you through how to easily access the growyze app on any iOS phone.
1. Visit app.growyze.com
Open your smartphone’s browser and enter app.growyze.com to access the mobile site. Once loaded, enter your growyze sign in details to log in to your account.

2. Bookmark the app
To give you faster access to growyze you can also add a bookmark for growyze on your iPhone. To do this, select the sharing button at the bottom of the screen.
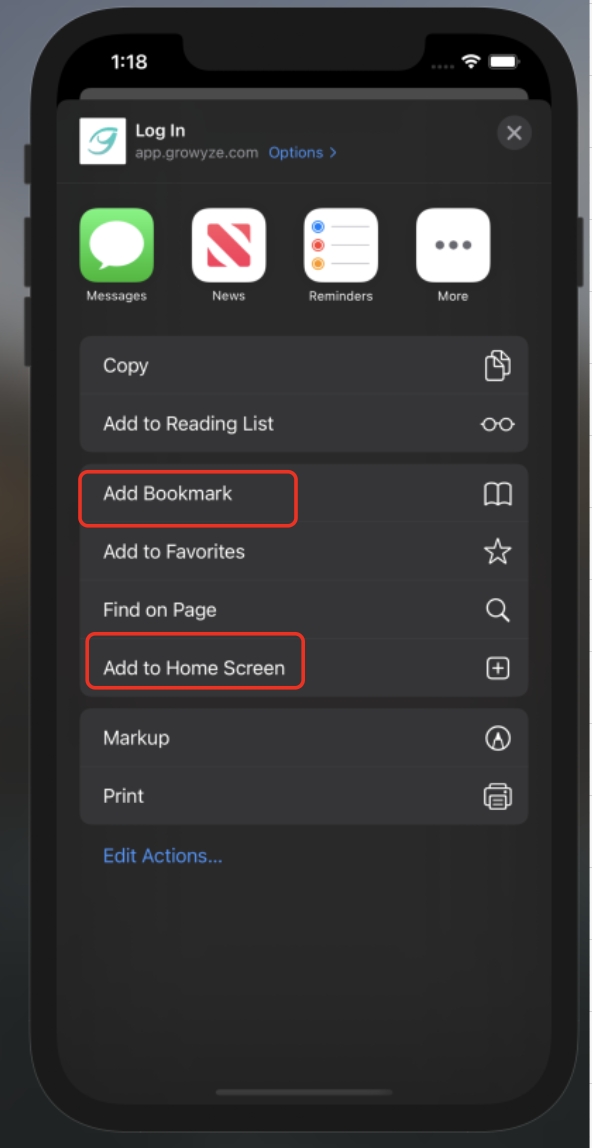
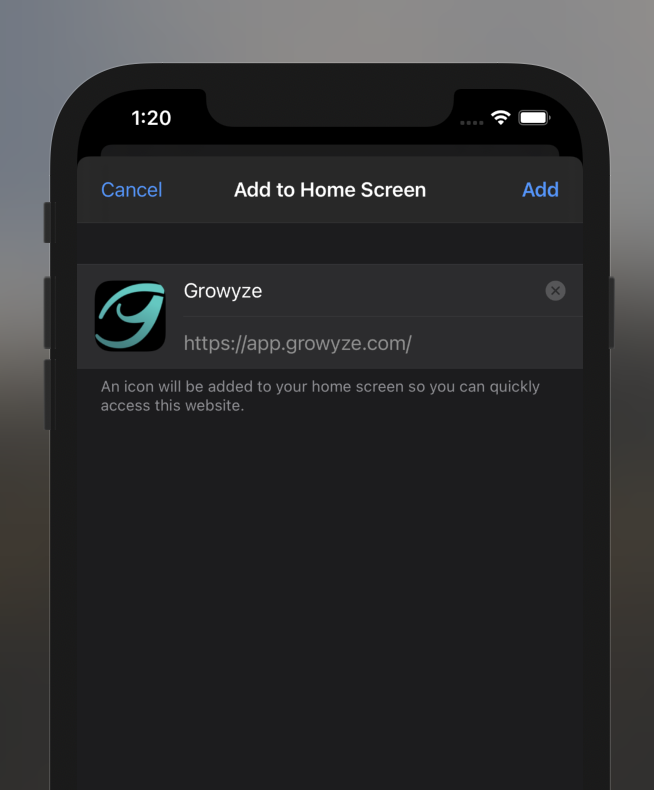
Here you have two options. You can select 'Add Bookmark' to add a bookmark just within your iPhone’s browser, or you can select 'Add to Home Screen' which will add a shortcut on your home screen to take you straight to growyze.

Simple!
For further help using growyze contact us at support@growyze.com.


Make complex operations simple
Making your hospitality business profitable has never been easier when everything lives, and operates, inside growyze. Get started with our support today.
